Dell C1765NFW Dell Users Guide - Page 278
Sending a Delayed Fax, Sending a Fax from the Driver (Direct Fax), Example - color mfp driver
 |
View all Dell C1765NFW manuals
Add to My Manuals
Save this manual to your list of manuals |
Page 278 highlights
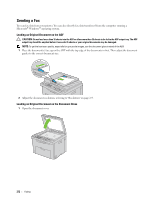
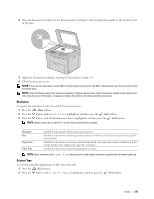
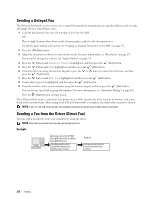
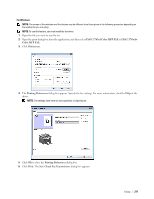
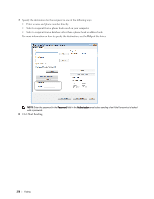
Sending a Delayed Fax The Delayed Start mode can be used to save scanned documents for transmission at a specified time in order to take advantage of lower long distance rates. 1 Load the document(s) face up with top edge in first into the ADF. OR Place a single document face down on the document glass, and close the document cover. For details about loading a document, see "Loading an Original Document on the ADF" on page 272. 2 Press the (Fax) button. 3 Adjust the document resolution to suit your fax needs. For more information, see "Resolution" on page 273. If you need to change the contrast, see "Lighter/Darker" on page 274. 4 Press the button until Delayed Start is highlighted, and then press the (Set) button. 5 Press the button until On is highlighted, and then press the (Set) button. 6 Enter the start time using the numeric keypad or press the or button to select the start time, and then press the (Set) button. 7 Press the button until Fax to is highlighted, and then press the (Set) button. 8 Ensure that Keypad is highlighted, and then press the (Set) button. 9 Enter the number of the remote machine using the numeric keypad, and then press the (Set) button. You can also use speed dial or group dial numbers. For more information, see "Automatic Dialing" on page 282. Press the (Start) button to begin faxing. Once Delayed Start mode is activated, your printer stores all the documents to be faxed to its memory and sends them at the specified time. After faxing in the Delayed Start mode is complete, the data in the memory is cleared. NOTE: If you turn off and on the printer, the stored documents are sent as soon as the printer is activated. Sending a Fax from the Driver (Direct Fax) You can send a fax directly from your computer by using the driver. NOTE: Only black and white faxes can be sent using Direct Fax. Example Send data via the Dell C1765nf Color MFP FAX or Dell C1765nfw Color MFP FAX driver Sending machine (Dell C1765nf/C1765nfw Color Multifunction Printer) Send fax Receiving machine (fax machine/multifunction printer) 276 Faxing
-
 1
1 -
2
-
3
-
4
-
5
-
6
-
7
-
8
-
9
-
10
-
11
-
12
-
13
-
14
-
15
-
16
-
17
-
18
-
19
-
20
-
21
-
22
-
23
-
24
-
25
-
26
-
27
-
28
-
29
-
30
-
31
-
32
-
33
-
34
-
35
-
36
-
37
-
38
-
39
-
40
-
41
-
42
-
43
-
44
-
45
-
46
-
47
-
48
-
49
-
50
-
51
-
52
-
53
-
54
-
55
-
56
-
57
-
58
-
59
-
60
-
61
-
62
-
63
-
64
-
65
-
66
-
67
-
68
-
69
-
70
-
71
-
72
-
73
-
74
-
75
-
76
-
77
-
78
-
79
-
80
-
81
-
82
-
83
-
84
-
85
-
86
-
87
-
88
-
89
-
90
-
91
-
92
-
93
-
94
-
95
-
96
-
97
-
98
-
99
-
100
-
101
-
102
-
103
-
104
-
105
-
106
-
107
-
108
-
109
-
110
-
111
-
112
-
113
-
114
-
115
-
116
-
117
-
118
-
119
-
120
-
121
-
122
-
123
-
124
-
125
-
126
-
127
-
128
-
129
-
130
-
131
-
132
-
133
-
134
-
135
-
136
-
137
-
138
-
139
-
140
-
141
-
142
-
143
-
144
-
145
-
146
-
147
-
148
-
149
-
150
-
151
-
152
-
153
-
154
-
155
-
156
-
157
-
158
-
159
-
160
-
161
-
162
-
163
-
164
-
165
-
166
-
167
-
168
-
169
-
170
-
171
-
172
-
173
-
174
-
175
-
176
-
177
-
178
-
179
-
180
-
181
-
182
-
183
-
184
-
185
-
186
-
187
-
188
-
189
-
190
-
191
-
192
-
193
-
194
-
195
-
196
-
197
-
198
-
199
-
200
-
201
-
202
-
203
-
204
-
205
-
206
-
207
-
208
-
209
-
210
-
211
-
212
-
213
-
214
-
215
-
216
-
217
-
218
-
219
-
220
-
221
-
222
-
223
-
224
-
225
-
226
-
227
-
228
-
229
-
230
-
231
-
232
-
233
-
234
-
235
-
236
-
237
-
238
-
239
-
240
-
241
-
242
-
243
-
244
-
245
-
246
-
247
-
248
-
249
-
250
-
251
-
252
-
253
-
254
-
255
-
256
-
257
-
258
-
259
-
260
-
261
-
262
-
263
-
264
-
265
-
266
-
267
-
268
-
269
-
270
-
271
-
272
-
 273
273 -
 274
274 -
 275
275 -
 276
276 -
 277
277 -
 278
278 -
 279
279 -
 280
280 -
 281
281 -
 282
282 -
 283
283 -
284
-
285
-
286
-
287
-
288
-
289
-
290
-
291
-
292
-
293
-
294
-
295
-
296
-
297
-
298
-
299
-
300
-
301
-
302
-
303
-
304
-
305
-
306
-
307
-
308
-
309
-
310
-
311
-
312
-
313
-
314
-
315
-
316
-
317
-
318
-
319
-
320
-
321
-
322
-
323
-
324
-
325
-
326
-
327
-
328
-
329
-
330
-
331
-
332
-
333
-
334
-
335
-
336
-
337
-
338
-
339
-
340
-
341
-
342
-
343
-
344
-
345
-
346
-
347
-
348
-
349
-
350
-
351
-
352
-
353
-
354
-
355
-
356
-
357
-
358
-
359
-
360
-
361
-
362
-
363
-
364
-
365
-
366
-
367
-
368
-
369
-
370
-
371
-
372
-
373
-
374
-
375
-
376
 |
 |
