Dell C1765NFW Dell Users Guide - Page 320
Printing the Color Registration Chart, Determining Values
 |
View all Dell C1765NFW manuals
Add to My Manuals
Save this manual to your list of manuals |
Page 320 highlights
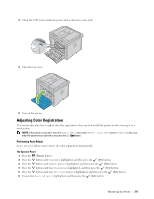
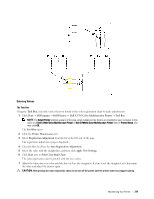
7 Ensure that Are You Sure? is displayed, press the button. Auto adjust is performed. button to select Yes, and then press the (Set) The Tool Box 1 Click Start → All Programs → Dell Printers → Dell C1765 Color Multifunction Printer → Tool Box. NOTE: The Select Printer window appears in this step, when multiple printer drivers are installed on your computer. In this case, click Dell C1765nf Color Multifunction Printer or Dell C1765nfw Color Multifunction Printer listed in Printer Name, and then click OK. The Tool Box opens. 2 Click the Printer Maintenance tab. 3 Select Registration Adjustment from the list at the left side of the page. The registration adjustment page is displayed. 4 Clear the On check box for Auto Registration Adjustment. 5 Click Start next to Auto Correct. The color registration is corrected automatically. Printing the Color Registration Chart The Tool Box 1 Click Start → All Programs → Dell Printers → Dell C1765 Color Multifunction Printer → Tool Box. NOTE: The Select Printer window appears in this step, when multiple printer drivers are installed on your computer. In this case, click Dell C1765nf Color Multifunction Printer or Dell C1765nfw Color Multifunction Printer listed in Printer Name, and then click OK. The Tool Box opens. 2 Click the Printer Maintenance tab. 3 Select Registration Adjustment from the list at the left side of the page. The registration adjustment page is displayed. 4 Clear the On check box for Auto Registration Adjustment. 5 Click Start next to Print Color Regi Chart. The color registration chart is printed. Determining Values On the color registration chart printed, find the straightest lines where the two black lines and the colored line are most closely aligned for each color (Y, M, and C). If you find the straightest line, make a note of the value (-5 - +5) indicated by the straightest line for each color. When the value is 0 for each color, you do not need to adjust the color registration. When the value is not 0, enter the value according to the procedure in "Entering Values" on page 319. 318 Maintaining Your Printer
-
 1
1 -
2
-
3
-
4
-
5
-
6
-
7
-
8
-
9
-
10
-
11
-
12
-
13
-
14
-
15
-
16
-
17
-
18
-
19
-
20
-
21
-
22
-
23
-
24
-
25
-
26
-
27
-
28
-
29
-
30
-
31
-
32
-
33
-
34
-
35
-
36
-
37
-
38
-
39
-
40
-
41
-
42
-
43
-
44
-
45
-
46
-
47
-
48
-
49
-
50
-
51
-
52
-
53
-
54
-
55
-
56
-
57
-
58
-
59
-
60
-
61
-
62
-
63
-
64
-
65
-
66
-
67
-
68
-
69
-
70
-
71
-
72
-
73
-
74
-
75
-
76
-
77
-
78
-
79
-
80
-
81
-
82
-
83
-
84
-
85
-
86
-
87
-
88
-
89
-
90
-
91
-
92
-
93
-
94
-
95
-
96
-
97
-
98
-
99
-
100
-
101
-
102
-
103
-
104
-
105
-
106
-
107
-
108
-
109
-
110
-
111
-
112
-
113
-
114
-
115
-
116
-
117
-
118
-
119
-
120
-
121
-
122
-
123
-
124
-
125
-
126
-
127
-
128
-
129
-
130
-
131
-
132
-
133
-
134
-
135
-
136
-
137
-
138
-
139
-
140
-
141
-
142
-
143
-
144
-
145
-
146
-
147
-
148
-
149
-
150
-
151
-
152
-
153
-
154
-
155
-
156
-
157
-
158
-
159
-
160
-
161
-
162
-
163
-
164
-
165
-
166
-
167
-
168
-
169
-
170
-
171
-
172
-
173
-
174
-
175
-
176
-
177
-
178
-
179
-
180
-
181
-
182
-
183
-
184
-
185
-
186
-
187
-
188
-
189
-
190
-
191
-
192
-
193
-
194
-
195
-
196
-
197
-
198
-
199
-
200
-
201
-
202
-
203
-
204
-
205
-
206
-
207
-
208
-
209
-
210
-
211
-
212
-
213
-
214
-
215
-
216
-
217
-
218
-
219
-
220
-
221
-
222
-
223
-
224
-
225
-
226
-
227
-
228
-
229
-
230
-
231
-
232
-
233
-
234
-
235
-
236
-
237
-
238
-
239
-
240
-
241
-
242
-
243
-
244
-
245
-
246
-
247
-
248
-
249
-
250
-
251
-
252
-
253
-
254
-
255
-
256
-
257
-
258
-
259
-
260
-
261
-
262
-
263
-
264
-
265
-
266
-
267
-
268
-
269
-
270
-
271
-
272
-
273
-
274
-
275
-
276
-
277
-
278
-
279
-
280
-
281
-
282
-
283
-
284
-
285
-
286
-
287
-
288
-
289
-
290
-
291
-
292
-
293
-
294
-
295
-
296
-
297
-
298
-
299
-
300
-
301
-
302
-
303
-
304
-
305
-
306
-
307
-
308
-
309
-
310
-
311
-
312
-
313
-
314
-
 315
315 -
 316
316 -
 317
317 -
 318
318 -
 319
319 -
 320
320 -
 321
321 -
 322
322 -
 323
323 -
 324
324 -
 325
325 -
326
-
327
-
328
-
329
-
330
-
331
-
332
-
333
-
334
-
335
-
336
-
337
-
338
-
339
-
340
-
341
-
342
-
343
-
344
-
345
-
346
-
347
-
348
-
349
-
350
-
351
-
352
-
353
-
354
-
355
-
356
-
357
-
358
-
359
-
360
-
361
-
362
-
363
-
364
-
365
-
366
-
367
-
368
-
369
-
370
-
371
-
372
-
373
-
374
-
375
-
376
 |
 |