Dell C1765NFW Dell Users Guide - Page 356
Problem, Action
 |
View all Dell C1765NFW manuals
Add to My Manuals
Save this manual to your list of manuals |
Page 356 highlights
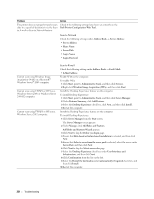
Problem The printer does not properly transfer scan data to a specified destination via the Scan to E-mail or Scan to Network feature. Action Check if the following settings have been set correctly on the Dell Printer Configuration Web Tool. Scan to Network Check the following settings under Address Book → Server Address: • Server Address • Share Name • Server Path • Login Name • Login Password Cannot scan using Windows Image Acquisition (WIA) on a Microsoft® Windows Server® 2003 computer. Cannot scan using TWAIN or WIA on a Windows Server 2008 or Windows Server 2008 R2 computer. Cannot scan using TWAIN or WIA on a Windows Server 2012 computer. Scan to E-mail Check the following setting under Address Book → Fax/E-Mail: • E-Mail Address Enable WIA on the computer. To enable WIA: 1 Click Start, point to Administrative Tools, and then click Services. 2 Right-click Windows Image Acquisition (WIA), and then click Start. Install the Desktop Experience feature on the computer. To install Desktop Experience: 1 Click Start, point to Administrative Tools, and then click Server Manager. 2 Under Features Summary, click Add Features. 3 Select the Desktop Experience check box, click Next, and then click Install. 4 Restart the computer. Install the Desktop Experience feature on the computer. To install Desktop Experience: 1 Click Server Manager from the Start screen. The Server Manager screen appears. 2 Under Manage, click Add Roles and Features. Add Roles and Features Wizard appears. 3 Click Next to skip the Before you begin page. 4 Ensure that Role-based or feature-based installation is selected, and then click Next. 5 Ensure that Select a server from the server pool is selected, select the server under Server Pool, and then click Next. 6 Click Next to skip the Select server roles page. 7 Select the Desktop Experience check box under User Interfaces and Infrastructure, and then click Next. 8 Click Confirmation from the list on the left. 9 Select the Restart the destination server automatically if required check box, and then click Install. 10 Restart the computer. 354 Troubleshooting
-
 1
1 -
2
-
3
-
4
-
5
-
6
-
7
-
8
-
9
-
10
-
11
-
12
-
13
-
14
-
15
-
16
-
17
-
18
-
19
-
20
-
21
-
22
-
23
-
24
-
25
-
26
-
27
-
28
-
29
-
30
-
31
-
32
-
33
-
34
-
35
-
36
-
37
-
38
-
39
-
40
-
41
-
42
-
43
-
44
-
45
-
46
-
47
-
48
-
49
-
50
-
51
-
52
-
53
-
54
-
55
-
56
-
57
-
58
-
59
-
60
-
61
-
62
-
63
-
64
-
65
-
66
-
67
-
68
-
69
-
70
-
71
-
72
-
73
-
74
-
75
-
76
-
77
-
78
-
79
-
80
-
81
-
82
-
83
-
84
-
85
-
86
-
87
-
88
-
89
-
90
-
91
-
92
-
93
-
94
-
95
-
96
-
97
-
98
-
99
-
100
-
101
-
102
-
103
-
104
-
105
-
106
-
107
-
108
-
109
-
110
-
111
-
112
-
113
-
114
-
115
-
116
-
117
-
118
-
119
-
120
-
121
-
122
-
123
-
124
-
125
-
126
-
127
-
128
-
129
-
130
-
131
-
132
-
133
-
134
-
135
-
136
-
137
-
138
-
139
-
140
-
141
-
142
-
143
-
144
-
145
-
146
-
147
-
148
-
149
-
150
-
151
-
152
-
153
-
154
-
155
-
156
-
157
-
158
-
159
-
160
-
161
-
162
-
163
-
164
-
165
-
166
-
167
-
168
-
169
-
170
-
171
-
172
-
173
-
174
-
175
-
176
-
177
-
178
-
179
-
180
-
181
-
182
-
183
-
184
-
185
-
186
-
187
-
188
-
189
-
190
-
191
-
192
-
193
-
194
-
195
-
196
-
197
-
198
-
199
-
200
-
201
-
202
-
203
-
204
-
205
-
206
-
207
-
208
-
209
-
210
-
211
-
212
-
213
-
214
-
215
-
216
-
217
-
218
-
219
-
220
-
221
-
222
-
223
-
224
-
225
-
226
-
227
-
228
-
229
-
230
-
231
-
232
-
233
-
234
-
235
-
236
-
237
-
238
-
239
-
240
-
241
-
242
-
243
-
244
-
245
-
246
-
247
-
248
-
249
-
250
-
251
-
252
-
253
-
254
-
255
-
256
-
257
-
258
-
259
-
260
-
261
-
262
-
263
-
264
-
265
-
266
-
267
-
268
-
269
-
270
-
271
-
272
-
273
-
274
-
275
-
276
-
277
-
278
-
279
-
280
-
281
-
282
-
283
-
284
-
285
-
286
-
287
-
288
-
289
-
290
-
291
-
292
-
293
-
294
-
295
-
296
-
297
-
298
-
299
-
300
-
301
-
302
-
303
-
304
-
305
-
306
-
307
-
308
-
309
-
310
-
311
-
312
-
313
-
314
-
315
-
316
-
317
-
318
-
319
-
320
-
321
-
322
-
323
-
324
-
325
-
326
-
327
-
328
-
329
-
330
-
331
-
332
-
333
-
334
-
335
-
336
-
337
-
338
-
339
-
340
-
341
-
342
-
343
-
344
-
345
-
346
-
347
-
348
-
349
-
350
-
 351
351 -
 352
352 -
 353
353 -
 354
354 -
 355
355 -
 356
356 -
 357
357 -
 358
358 -
 359
359 -
 360
360 -
 361
361 -
362
-
363
-
364
-
365
-
366
-
367
-
368
-
369
-
370
-
371
-
372
-
373
-
374
-
375
-
376
 |
 |