Dell C1765NFW Dell Users Guide - Page 55
Setting the IP Address, Assigning an IP Address, The Operator Panel
 |
View all Dell C1765NFW manuals
Add to My Manuals
Save this manual to your list of manuals |
Page 55 highlights
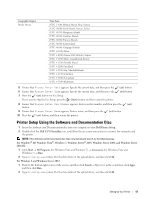
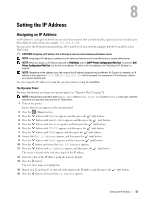
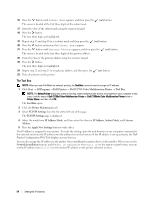
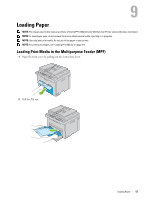
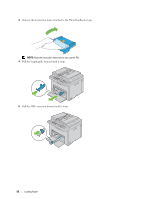
8 Setting the IP Address Assigning an IP Address An IP address is a unique number that consists of four sections that are delimited by a period and can include up to three digits in each section, for example, 111.222.33.44. You can select the IP mode from Dual Stack, IPv4, and IPv6. If your network supports both IPv4 and IPv6, select Dual Stack. CAUTION: Assigning an IP address that is already in use can cause network performance issues. NOTE: Assigning an IP address is considered as an advanced function and is normally done by a system administrator. NOTE: When you assign an IP address manually in IPv6 Mode, use the Dell™ Printer Configuration Web Tool. To open the Dell Printer Configuration Web Tool, use the link local address. To check a link local address, see "Verifying the IP Settings" on page 55. NOTE: Depending on the address class, the range of the IP address assigned may be different. On Class A, for example, an IP address in the range from 0.0.0.0 to 127.255.255.255 will be assigned. For assignment of IP addresses, contact your system administrator. You can assign the IP address by using the operator panel or using the Tool Box. The Operator Panel For more information on using your operator panel, see "Operator Panel" on page 91. NOTE: A Password is required to enter Admin Menu when Panel Lock Set is set to Enable. In this case, enter the password you specified, and press the (Set) button. 1 Turn on the printer. Ensure that Ready appears on the operator panel. 2 Press the (Menu) button. 3 Press the button until System appears, and then press the (set) button. 4 Press the button until Admin Menu appears, and then press the (set) button. 5 Press the button until Network appears, and then press the (set) button. 6 Press the button until TCP/IP appears, and then press the (set) button. 7 Press the button until IPv4 appears, and then press the (set) button. 8 Ensure that Get IP Address appears, and then press the (set) button. 9 Press the button until Panel appears, and then press the (set) button. 10 Press the button and ensure that Get IP Address appears. 11 Press the button until IP Address appears, and then press the (set) button. The cursor is located at the first three digits of the IP address. 12 Enter the value of the IP address using the numeric keypad. 13 Press the button. The next three digits are highlighted. 14 Repeat step 12 and step 13 to enter all of the digits in the IP address, and then press the 15 Press the button and ensure that IP Address appears. (set) button. Setting the IP Address 53
-
 1
1 -
2
-
3
-
4
-
5
-
6
-
7
-
8
-
9
-
10
-
11
-
12
-
13
-
14
-
15
-
16
-
17
-
18
-
19
-
20
-
21
-
22
-
23
-
24
-
25
-
26
-
27
-
28
-
29
-
30
-
31
-
32
-
33
-
34
-
35
-
36
-
37
-
38
-
39
-
40
-
41
-
42
-
43
-
44
-
45
-
46
-
47
-
48
-
49
-
 50
50 -
 51
51 -
 52
52 -
 53
53 -
 54
54 -
 55
55 -
 56
56 -
 57
57 -
 58
58 -
 59
59 -
 60
60 -
61
-
62
-
63
-
64
-
65
-
66
-
67
-
68
-
69
-
70
-
71
-
72
-
73
-
74
-
75
-
76
-
77
-
78
-
79
-
80
-
81
-
82
-
83
-
84
-
85
-
86
-
87
-
88
-
89
-
90
-
91
-
92
-
93
-
94
-
95
-
96
-
97
-
98
-
99
-
100
-
101
-
102
-
103
-
104
-
105
-
106
-
107
-
108
-
109
-
110
-
111
-
112
-
113
-
114
-
115
-
116
-
117
-
118
-
119
-
120
-
121
-
122
-
123
-
124
-
125
-
126
-
127
-
128
-
129
-
130
-
131
-
132
-
133
-
134
-
135
-
136
-
137
-
138
-
139
-
140
-
141
-
142
-
143
-
144
-
145
-
146
-
147
-
148
-
149
-
150
-
151
-
152
-
153
-
154
-
155
-
156
-
157
-
158
-
159
-
160
-
161
-
162
-
163
-
164
-
165
-
166
-
167
-
168
-
169
-
170
-
171
-
172
-
173
-
174
-
175
-
176
-
177
-
178
-
179
-
180
-
181
-
182
-
183
-
184
-
185
-
186
-
187
-
188
-
189
-
190
-
191
-
192
-
193
-
194
-
195
-
196
-
197
-
198
-
199
-
200
-
201
-
202
-
203
-
204
-
205
-
206
-
207
-
208
-
209
-
210
-
211
-
212
-
213
-
214
-
215
-
216
-
217
-
218
-
219
-
220
-
221
-
222
-
223
-
224
-
225
-
226
-
227
-
228
-
229
-
230
-
231
-
232
-
233
-
234
-
235
-
236
-
237
-
238
-
239
-
240
-
241
-
242
-
243
-
244
-
245
-
246
-
247
-
248
-
249
-
250
-
251
-
252
-
253
-
254
-
255
-
256
-
257
-
258
-
259
-
260
-
261
-
262
-
263
-
264
-
265
-
266
-
267
-
268
-
269
-
270
-
271
-
272
-
273
-
274
-
275
-
276
-
277
-
278
-
279
-
280
-
281
-
282
-
283
-
284
-
285
-
286
-
287
-
288
-
289
-
290
-
291
-
292
-
293
-
294
-
295
-
296
-
297
-
298
-
299
-
300
-
301
-
302
-
303
-
304
-
305
-
306
-
307
-
308
-
309
-
310
-
311
-
312
-
313
-
314
-
315
-
316
-
317
-
318
-
319
-
320
-
321
-
322
-
323
-
324
-
325
-
326
-
327
-
328
-
329
-
330
-
331
-
332
-
333
-
334
-
335
-
336
-
337
-
338
-
339
-
340
-
341
-
342
-
343
-
344
-
345
-
346
-
347
-
348
-
349
-
350
-
351
-
352
-
353
-
354
-
355
-
356
-
357
-
358
-
359
-
360
-
361
-
362
-
363
-
364
-
365
-
366
-
367
-
368
-
369
-
370
-
371
-
372
-
373
-
374
-
375
-
376
 |
 |