Dell Dimension 2400 Owner's Manual - Page 67
press the power button to ground the system board. - have a battery
 |
View all Dell Dimension 2400 manuals
Add to My Manuals
Save this manual to your list of manuals |
Page 67 highlights
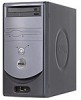
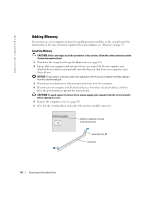
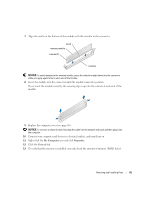
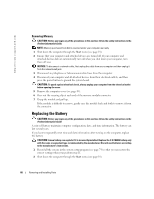
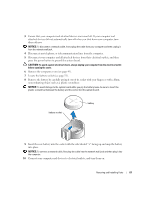
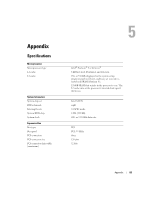
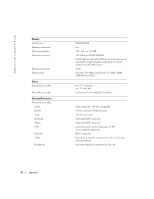
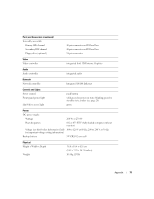
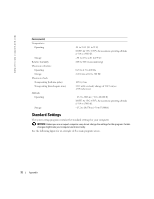
3 Ensure that your computer and attached devices are turned off. If your computer and attached devices did not automatically turn off when you shut down your computer, turn them off now. NOTICE: To disconnect a network cable, first unplug the cable from your computer and then unplug it from the network wall jack. 4 Disconnect any telephone or telecommunication lines from the computer. 5 Disconnect your computer and all attached devices from their electrical outlets, and then press the power button to ground the system board. CAUTION: To guard against electrical shock, always unplug your computer from the electrical outlet before opening the cover. 6 Remove the computer cover (see page 49). 7 Locate the battery socket (see page 51). 8 Remove the battery by carefully prying it out of its socket with your fingers or with a blunt, nonconducting object such as a plastic screwdriver. NOTICE: To avoid damage to the system board while you pry the battery loose, be sure to insert the plastic screwdriver between the battery and the socket (not the system board). battery socket battery 9 Insert the new battery into the socket with the side labeled "+" facing up and snap the battery into place. NOTICE: To connect a network cable, first plug the cable into the network wall jack and then plug it into the computer. 10 Connect your computer and devices to electrical outlets, and turn them on. Removing and Installing Parts 67
-
 1
1 -
2
-
3
-
4
-
5
-
6
-
7
-
8
-
9
-
10
-
11
-
12
-
13
-
14
-
15
-
16
-
17
-
18
-
19
-
20
-
21
-
22
-
23
-
24
-
25
-
26
-
27
-
28
-
29
-
30
-
31
-
32
-
33
-
34
-
35
-
36
-
37
-
38
-
39
-
40
-
41
-
42
-
43
-
44
-
45
-
46
-
47
-
48
-
49
-
50
-
51
-
52
-
53
-
54
-
55
-
56
-
57
-
58
-
59
-
60
-
61
-
 62
62 -
 63
63 -
 64
64 -
 65
65 -
 66
66 -
 67
67 -
 68
68 -
 69
69 -
 70
70 -
 71
71 -
 72
72 -
73
-
74
-
75
-
76
-
77
-
78
-
79
-
80
-
81
-
82
-
83
-
84
-
85
-
86
-
87
-
88
-
89
-
90
-
91
-
92
-
93
-
94
-
95
-
96
-
97
-
98
-
99
-
100
 |
 |