Dell Dimension 9200 Owner's Manual - Page 101
Removing the Drive-Panel Insert, the right side of the drive panel.
 |
View all Dell Dimension 9200 manuals
Add to My Manuals
Save this manual to your list of manuals |
Page 101 highlights
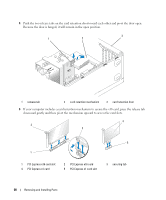
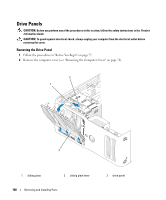
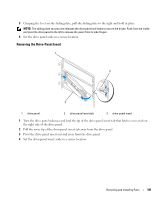
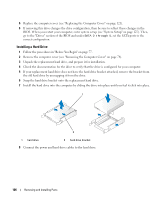
3 Grasping the lever on the sliding plate, pull the sliding plate to the right and hold in place. NOTE: The sliding plate secures and releases the drive panel and helps to secure the drives. Push from the inside and pivot the drive panel to the left to release the panel from its side hinges. 4 Set the drive panel aside in a secure location. Removing the Drive-Panel Insert 1 2 3 1 drive panel 2 drive-panel insert tab 3 drive-panel insert 1 Turn the drive panel sideways and find the tip of the drive-panel insert tab that latches over a tab on the right side of the drive panel. 2 Pull the inner tip of the drive-panel insert tab away from the drive panel. 3 Pivot the drive-panel insert out and away from the drive panel. 4 Set the drive-panel insert aside in a secure location. Removing and Installing Parts 101
-
 1
1 -
2
-
3
-
4
-
5
-
6
-
7
-
8
-
9
-
10
-
11
-
12
-
13
-
14
-
15
-
16
-
17
-
18
-
19
-
20
-
21
-
22
-
23
-
24
-
25
-
26
-
27
-
28
-
29
-
30
-
31
-
32
-
33
-
34
-
35
-
36
-
37
-
38
-
39
-
40
-
41
-
42
-
43
-
44
-
45
-
46
-
47
-
48
-
49
-
50
-
51
-
52
-
53
-
54
-
55
-
56
-
57
-
58
-
59
-
60
-
61
-
62
-
63
-
64
-
65
-
66
-
67
-
68
-
69
-
70
-
71
-
72
-
73
-
74
-
75
-
76
-
77
-
78
-
79
-
80
-
81
-
82
-
83
-
84
-
85
-
86
-
87
-
88
-
89
-
90
-
91
-
92
-
93
-
94
-
95
-
 96
96 -
 97
97 -
 98
98 -
 99
99 -
 100
100 -
 101
101 -
 102
102 -
 103
103 -
 104
104 -
 105
105 -
 106
106 -
107
-
108
-
109
-
110
-
111
-
112
-
113
-
114
-
115
-
116
-
117
-
118
-
119
-
120
-
121
-
122
-
123
-
124
-
125
-
126
-
127
-
128
-
129
-
130
-
131
-
132
-
133
-
134
-
135
-
136
-
137
-
138
-
139
-
140
-
141
-
142
-
143
-
144
-
145
-
146
-
147
-
148
-
149
-
150
-
151
-
152
-
153
-
154
-
155
-
156
-
157
-
158
-
159
-
160
-
161
-
162
-
163
-
164
-
165
-
166
-
167
-
168
-
169
-
170
-
171
-
172
 |
 |
