Dell Dimension 9200 Owner's Manual - Page 107
Adding a Second Hard Drive
 |
View all Dell Dimension 9200 manuals
Add to My Manuals
Save this manual to your list of manuals |
Page 107 highlights
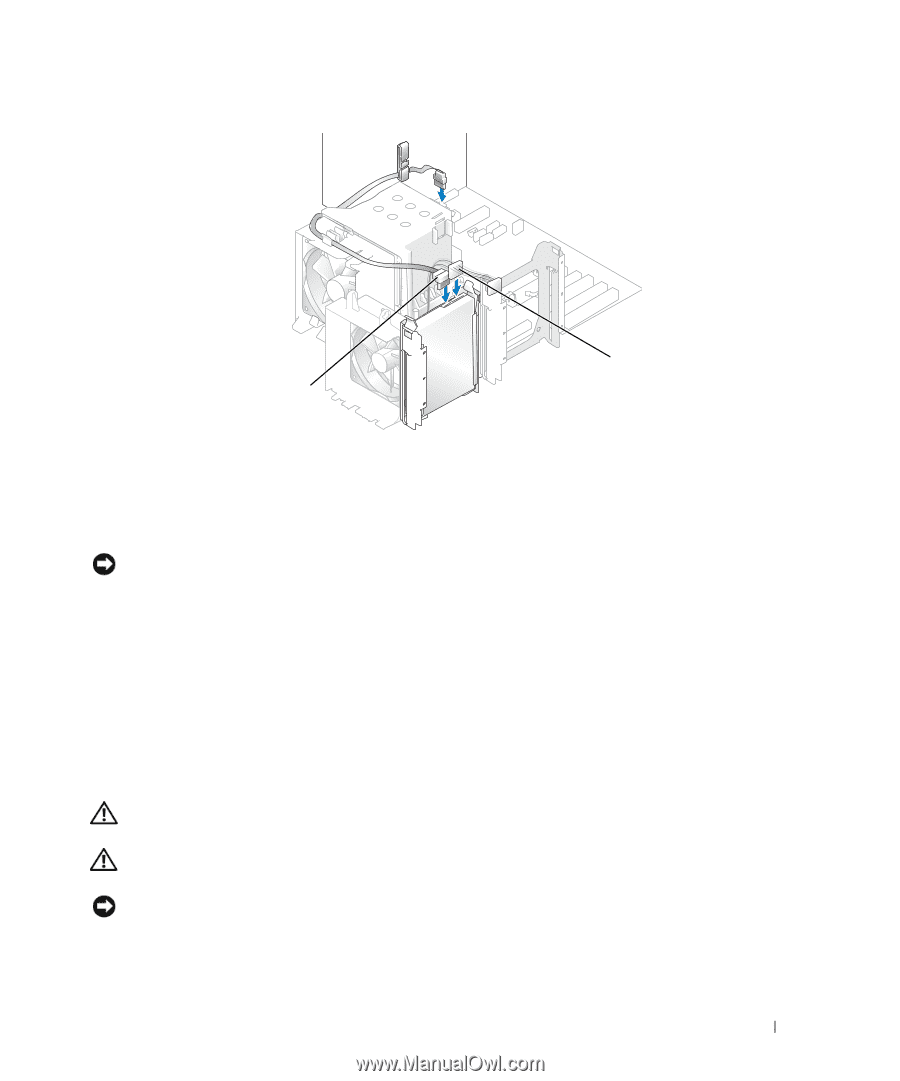
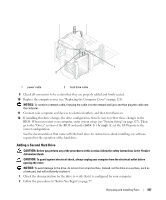
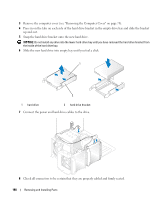
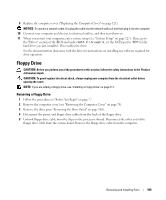
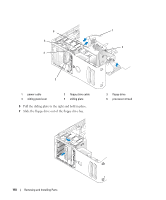
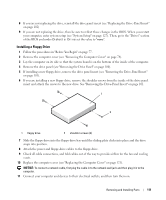
1 2 1 power cable 2 hard drive cable 9 Check all connectors to be certain that they are properly cabled and firmly seated. 10 Replace the computer cover (see "Replacing the Computer Cover" on page 121). NOTICE: To connect a network cable, first plug the cable in to the network wall jack and then plug the cable into the computer. 11 Connect your computer and devices to electrical outlets, and then turn them on. 12 If installing this drive changes the drive configuration, then be sure to reflect these changes in the BIOS. When you restart your computer, enter system setup (see "System Setup" on page 127). Then, go to the "Drives" section of the BIOS and under SATA 0 through 5, set the SATA ports to the correct configuration. See the documentation that came with the hard drive for instructions about installing any software required for the operation of the hard drive. Adding a Second Hard Drive CAUTION: Before you perform any of the procedures in this section, follow the safety instructions in the Product Information Guide. CAUTION: To guard against electrical shock, always unplug your computer from the electrical outlet before opening the cover. NOTICE: To avoid damage to the drive, do not set it on a hard surface. Instead, set the drive on a surface, such as a foam pad, that will sufficiently cushion it. 1 Check the documentation for the drive to verify that it is configured for your computer. 2 Follow the procedures in "Before You Begin" on page 77. Removing and Installing Parts 107
-
 1
1 -
2
-
3
-
4
-
5
-
6
-
7
-
8
-
9
-
10
-
11
-
12
-
13
-
14
-
15
-
16
-
17
-
18
-
19
-
20
-
21
-
22
-
23
-
24
-
25
-
26
-
27
-
28
-
29
-
30
-
31
-
32
-
33
-
34
-
35
-
36
-
37
-
38
-
39
-
40
-
41
-
42
-
43
-
44
-
45
-
46
-
47
-
48
-
49
-
50
-
51
-
52
-
53
-
54
-
55
-
56
-
57
-
58
-
59
-
60
-
61
-
62
-
63
-
64
-
65
-
66
-
67
-
68
-
69
-
70
-
71
-
72
-
73
-
74
-
75
-
76
-
77
-
78
-
79
-
80
-
81
-
82
-
83
-
84
-
85
-
86
-
87
-
88
-
89
-
90
-
91
-
92
-
93
-
94
-
95
-
96
-
97
-
98
-
99
-
100
-
101
-
 102
102 -
 103
103 -
 104
104 -
 105
105 -
 106
106 -
 107
107 -
 108
108 -
 109
109 -
 110
110 -
 111
111 -
 112
112 -
113
-
114
-
115
-
116
-
117
-
118
-
119
-
120
-
121
-
122
-
123
-
124
-
125
-
126
-
127
-
128
-
129
-
130
-
131
-
132
-
133
-
134
-
135
-
136
-
137
-
138
-
139
-
140
-
141
-
142
-
143
-
144
-
145
-
146
-
147
-
148
-
149
-
150
-
151
-
152
-
153
-
154
-
155
-
156
-
157
-
158
-
159
-
160
-
161
-
162
-
163
-
164
-
165
-
166
-
167
-
168
-
169
-
170
-
171
-
172
 |
 |