Dell Dimension 9200 Owner's Manual - Page 86
Cards, PCI Cards
 |
View all Dell Dimension 9200 manuals
Add to My Manuals
Save this manual to your list of manuals |
Page 86 highlights
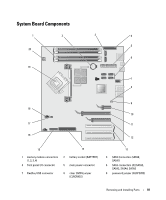
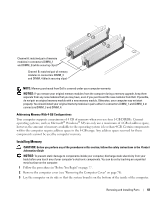
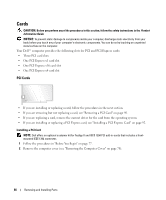
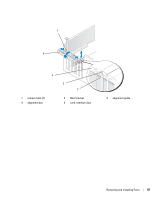
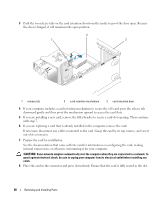
Cards CAUTION: Before you perform any of the procedures in this section, follow the safety instructions in the Product Information Guide. NOTICE: To prevent static damage to components inside your computer, discharge static electricity from your body before you touch any of your computer's electronic components. You can do so by touching an unpainted metal surface on the computer. Your Dell™ computer provides the following slots for PCI and PCI Express cards: • Three PCI card slots • One PCI Express x1 card slot • One PCI Express x16 card slot • One PCI Express x4 card slot PCI Cards • If you are installing or replacing a card, follow the procedures in the next section. • If you are removing but not replacing a card, see "Removing a PCI Card" on page 90. • If you are replacing a card, remove the current driver for the card from the operating system. • If you are installing or replacing a PCI Express card, see "Installing a PCI Express Card" on page 92. Installing a PCI Card NOTE: Dell offers an optional customer kit for Audigy II and IEEE 1394 PCI add-in-cards that includes a frontmounted IEEE 1394 connector. 1 Follow the procedures in "Before You Begin" on page 77. 2 Remove the computer cover (see "Removing the Computer Cover" on page 78). 86 Removing and Installing Parts
-
 1
1 -
2
-
3
-
4
-
5
-
6
-
7
-
8
-
9
-
10
-
11
-
12
-
13
-
14
-
15
-
16
-
17
-
18
-
19
-
20
-
21
-
22
-
23
-
24
-
25
-
26
-
27
-
28
-
29
-
30
-
31
-
32
-
33
-
34
-
35
-
36
-
37
-
38
-
39
-
40
-
41
-
42
-
43
-
44
-
45
-
46
-
47
-
48
-
49
-
50
-
51
-
52
-
53
-
54
-
55
-
56
-
57
-
58
-
59
-
60
-
61
-
62
-
63
-
64
-
65
-
66
-
67
-
68
-
69
-
70
-
71
-
72
-
73
-
74
-
75
-
76
-
77
-
78
-
79
-
80
-
 81
81 -
 82
82 -
 83
83 -
 84
84 -
 85
85 -
 86
86 -
 87
87 -
 88
88 -
 89
89 -
 90
90 -
 91
91 -
92
-
93
-
94
-
95
-
96
-
97
-
98
-
99
-
100
-
101
-
102
-
103
-
104
-
105
-
106
-
107
-
108
-
109
-
110
-
111
-
112
-
113
-
114
-
115
-
116
-
117
-
118
-
119
-
120
-
121
-
122
-
123
-
124
-
125
-
126
-
127
-
128
-
129
-
130
-
131
-
132
-
133
-
134
-
135
-
136
-
137
-
138
-
139
-
140
-
141
-
142
-
143
-
144
-
145
-
146
-
147
-
148
-
149
-
150
-
151
-
152
-
153
-
154
-
155
-
156
-
157
-
158
-
159
-
160
-
161
-
162
-
163
-
164
-
165
-
166
-
167
-
168
-
169
-
170
-
171
-
172
 |
 |