Dell E521 Owner's Manual
Dell E521 - Dimension Motherboard UW457 0UW457 Manual
 |
UPC - 015561600385
View all Dell E521 manuals
Add to My Manuals
Save this manual to your list of manuals |
Dell E521 manual content summary:
- Dell E521 | Owner's Manual - Page 1
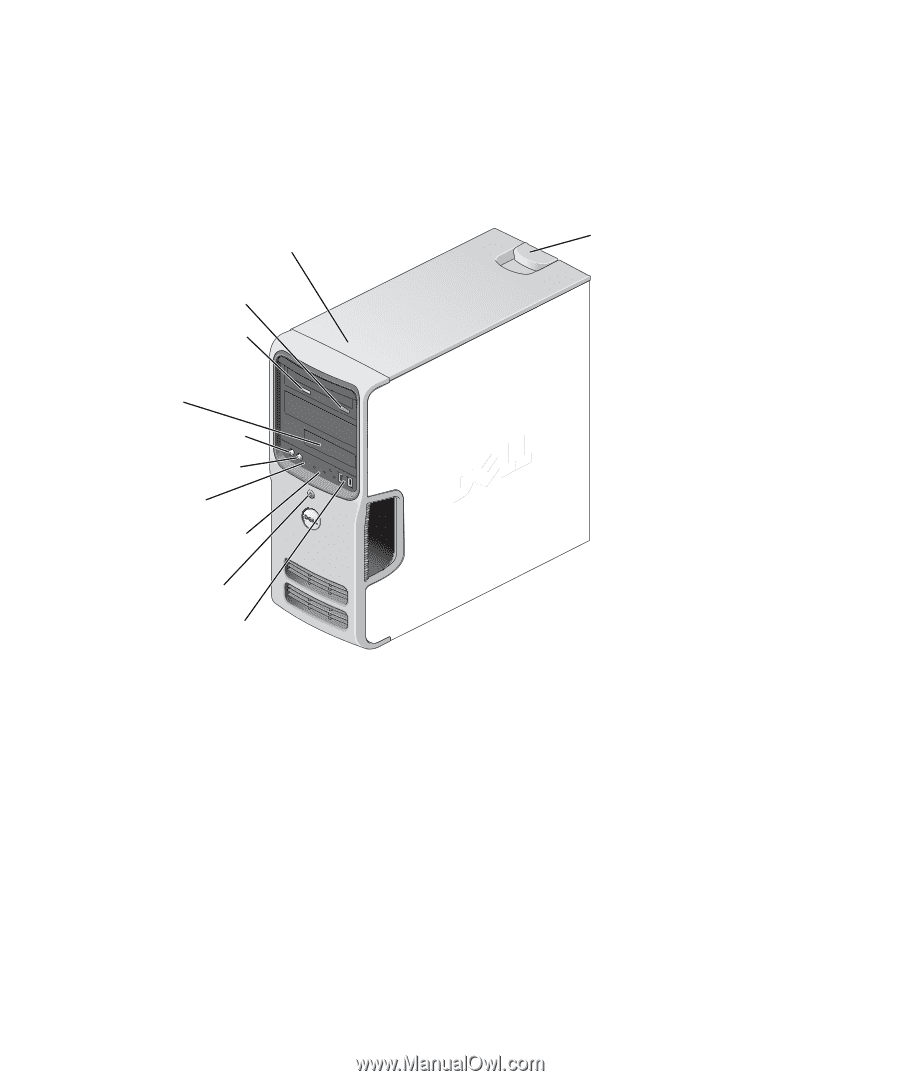
Dell™ Dimension™ E521 Owner's Manual Service Tag CD or DVD eject button CD or DVD activity light FlexBay for optional floppy drive or Media Card Reader microphone connector headphone connector diagnostic lights hard-drive activity light power button/ power activity light USB 2.0 connectors (2) - Dell E521 | Owner's Manual - Page 2
, Inspiron, Dell Precision, Dimension, OptiPlex, Latitude, PowerEdge, PowerVault, PowerApp, DellNet, Dell TravelLite, Strike Zone, and PowerConnect are trademarks of Dell Inc.; Bluetooth is a registered trademark owned by Bluetooth SIG, Inc. and is used by Dell under license; Microsoft, Windows, and - Dell E521 | Owner's Manual - Page 3
Up and Using Your Computer 11 Front View of the Computer 11 Back View of the Computer 13 Back Panel Connectors 20 Using Blank CDs and DVDs 20 Helpful Tips 21 Using a Media Card Reader (Optional 22 Connecting Two Monitors 23 Connecting Two Monitors With VGA Setup Wizard 26 Contents 3 - Dell E521 | Owner's Manual - Page 4
31 2 Solving Problems 33 Troubleshooting Tips 33 Battery Problems 33 Drive Problems 34 CD and DVD drive problems 34 Hard drive problems 35 E-Mail, Modem, and Internet Problems 35 Error Messages 36 Keyboard Problems 37 Lockups and Software Problems 38 The computer does not start - Dell E521 | Owner's Manual - Page 5
Power Problems 43 Printer Problems 44 Scanner Problems 45 Sound and Speaker Problems 46 No sound from speakers 46 No sound from headphones 47 Video and Monitor Problems 47 If the screen is blank 47 If the screen is difficult to read 48 3 Troubleshooting Tools 49 Diagnostic Lights 49 Dell - Dell E521 | Owner's Manual - Page 6
a Hard Drive 88 Adding a Second Hard Drive 91 Floppy Drive 92 Removing a Floppy Drive 92 Installing a Floppy Drive 94 Media Card Reader 96 Removing a Media Card Reader 96 Installing a Media Card Reader 98 CD/DVD Drive 100 Removing a CD/DVD Drive 100 Installing a CD/DVD Drive 102 Battery - Dell E521 | Owner's Manual - Page 7
111 Entering System Setup 111 System Setup Options 112 Boot Sequence 116 Clearing Forgotten Passwords 118 Clearing CMOS Settings 119 Cleaning Your Computer 119 Computer, Keyboard, and Monitor 119 Mouse 120 Floppy Drive 120 CDs and DVDs 120 Dell Technical Support Policy (U.S. Only 120 - Dell E521 | Owner's Manual - Page 8
8 Contents - Dell E521 | Owner's Manual - Page 9
Information Guide • How to set up my computer Setup Diagram • Service Tag and Express Service Code • Microsoft Windows License Label Service Tag and Microsoft® Windows® License These labels are located on your computer. •Use the Service Tag to identify your computer when you use support.dell.com - Dell E521 | Owner's Manual - Page 10
updates • Desktop System Software (DSS)- If you reinstall the To download Desktop System Software: operating system for your computer, you should also reinstall the DSS utility. DSS provides critical updates for your operating system and support for Dell™ 3.5-inch USB floppy drives, optical drives - Dell E521 | Owner's Manual - Page 11
to remove the cover. See "Removing the Computer Cover" on page 63. Use the Service Tag to identify your computer when you access the Dell Support website or call technical support. Press to eject a disk from the CD or DVD drive. The drive light is on when the computer reads data from the CD or DVD - Dell E521 | Owner's Manual - Page 12
the card. Use the headphone connector to attach headphones and most kinds of speakers. Use the lights to help you troubleshoot a computer problem based on the diagnostic code. For more information, see "Diagnostic Lights" on page 49. The hard drive activity light is on when the computer reads data - Dell E521 | Owner's Manual - Page 13
3 back panel connectors 4 card slots 4 See the safety instructions in the Product Information Guide for more information. Insert the power cable. Plug USB, audio, and other devices into the appropriate connector. See "Back Panel Connectors" on page 14 for more information. Access connectors for any - Dell E521 | Owner's Manual - Page 14
traffic may make this light appear to be in a steady "on" state. Use the black surround connector to attach multichannel-capable speakers. Use the blue line-in connector to attach a record/playback device such as a cassette player, CD player, or VCR. On computers with a sound card, use the connector - Dell E521 | Owner's Manual - Page 15
connector 9 center/subwoofer connector 10 USB 2.0 connectors (4) 11 VGA video connector Use the silver connector to provide enhanced surround audio for computers with 7.1 speakers. On computers with a sound card, the microphone connector is on the card. Use the yellow connector to attach a speaker - Dell E521 | Owner's Manual - Page 16
1 2 3 1 USB connector on computer 2 USB printer cable 3 USB connector on printer 3 Turn on the printer and then turn on the computer. If the Add New Hardware Wizard window appears, click Cancel. 4 Install the printer driver if necessary. See the documentation that came with your printer. - Dell E521 | Owner's Manual - Page 17
any open files, and exit any open programs. 2 Double-click the ISP icon on the Microsoft® Windows® desktop. 3 Follow the instructions on the screen to complete the setup. If you do not have an ISP icon on your desktop or if you want to set up an Internet connection with a different ISP: 1 Save and - Dell E521 | Owner's Manual - Page 18
you open or close it. Keep the tray closed when you are not using the drive. NOTICE: Do not move the computer when you are playing CDs or DVDs. 1 Press the eject button on the front of the drive. 2 Place the disc, label side up, in the center of the tray. 3 Press the eject - Dell E521 | Owner's Manual - Page 19
. For more information on volume control options, click Help in the Volume Control window. Adjusting the Picture If an error message notifies you that the current resolution and color depth are using too much memory and preventing DVD playback, adjust the display properties: 1 Click the Start button - Dell E521 | Owner's Manual - Page 20
and you experience recording problems, check for available software patches on the Sonic support website at www.sonic.com. The DVD-writable drives installed in Dell™ computers can write to and read DVD+/-R, DVD+/-RW and DVD+R DL (dual layer) media, but cannot write to and may not read DVD-RAM or DVD - Dell E521 | Owner's Manual - Page 21
or update information on that disc later. CD-Writable Drives Media Type CD-R CD-RW Read Yes Yes Write Yes Yes Rewritable No Yes DVD-Writable Drives Media You cannot create audio DVDs with Sonic DigitalMedia. • Music MP3 files can be played only on MP3 players or on computers that have MP3 - Dell E521 | Owner's Manual - Page 22
Reader to transfer data directly to your computer. The Media Card Reader supports the following memory types: • xD-Picture Card • SmartMedia (SMC) • CompactFlash Type I and II (CF I/II) • MicroDrive Card • SecureDigital Card (SD) • MultiMediaCard (MMC) • Memory Stick (MS/MS Pro) For information on - Dell E521 | Owner's Manual - Page 23
any of the procedures in this section, follow the safety instructions in the Product Information Guide. If you purchased a graphics card that supports dual monitors, follow these instructions to connect and enable your monitors. The instructions tell you how to connect either two monitors (each with - Dell E521 | Owner's Manual - Page 24
the procedures in "Before You Begin" on page 61. 2 Connect one end of the S-video cable to the optional TV-OUT connector on the back of the computer. 3 Connect the other end of the S-video cable to the S-video input connector on your TV. 4 Connect the VGA or DVI monitor. 24 Setting Up and - Dell E521 | Owner's Manual - Page 25
button, click Help and Support, click User and system guides, click Device guides, and then click the guide for your graphics card). Setting Up a Home and Office Network Connecting to a Network Adapter NOTICE: Plug the network cable into the network adapter connector on the computer. Do not plug - Dell E521 | Owner's Manual - Page 26
the Network Setup Wizard and follow the instructions on the screen. Power Management The Microsoft® Windows® XP power management features can reduce the amount of electricity your computer uses when it is on and you are not using it. You can reduce power to just the monitor or the hard drive, or you - Dell E521 | Owner's Manual - Page 27
space to store the contents of the computer memory, Dell creates an appropriately sized hibernate mode file before shipping the computer to you. If the computer's hard drive becomes corrupted, Windows XP recreates the hibernate file automatically. Power Options Properties Define your standby mode - Dell E521 | Owner's Manual - Page 28
To avoid this problem, always set the monitor to time-out before the hard drive. Advanced Tab The Advanced tab allows you to: • Place the power options icon in the Windows taskbar for quick access. • Set the computer to prompt you for your Windows password before the computer exits from standby - Dell E521 | Owner's Manual - Page 29
purchased your computer. Your computer supports RAID level 1. A RAID level 1 is recommended for users that desire a high level of data integrity. The drives in a hard drive 2 If a drive failure occurs, subsequent read and write operations are directed to the surviving drive. A replacement drive - Dell E521 | Owner's Manual - Page 30
for each applicable hard drive on your computer (see "Setting Your Computer to RAIDEnabled Mode" on page 30). 2 Restart the computer. 3 Press when prompted to enter the RAID BIOS. NOTE: If the operating system logo appears, continue to wait until you see the Microsoft Windows desktop, then - Dell E521 | Owner's Manual - Page 31
field to the Array Disks field. Repeat for each disk you want to include in the RAID array. NOTE: Your computer supports a maximum of two drives per RAID 1 array. 7 After assigning the hard drives to an array, press . The Clear disk data prompt appears. NOTICE: You will lose all data on the - Dell E521 | Owner's Manual - Page 32
32 Setting Up and Using Your Computer - Dell E521 | Owner's Manual - Page 33
when you troubleshoot your computer: • If you added or removed a part before the problem started, review the installation procedures and ensure that the part is correctly installed. • If a peripheral device does not work, ensure that the device is properly connected. • If an error message appears - Dell E521 | Owner's Manual - Page 34
Drive Problems CAUTION: Before you begin any of the procedures in this section, follow the safety instructions in the Product Information Guide. E N S U R E T H A T M I C R O S O F T ® W I N D O W S ® R E C O G N I Z E S T H E D R I V E - Click the Start button and click My Computer. If the floppy, - Dell E521 | Owner's Manual - Page 35
Power Options. 4 From the Power Schemes tab, select Always On. Hard drive problems RUN CHECK DISK - 1 Click the Start button and click My Computer. 2 Right-click Local Disk C:. 3 Click Properties. 4 Click the Tools tab. 5 Under Error-checking, click Check Now. 6 Click Scan for and attempt recovery - Dell E521 | Owner's Manual - Page 36
instructions on the screen to identify and resolve modem problems. (Modem Helper is not available on all computers.) VERIFY THAT THE MODEM IS COMMUNICATING WITH WINDOWS Diagnostics tab, and then click Query Modem to verify that the modem is communicating with Windows service provider. Error Messages - Dell E521 | Owner's Manual - Page 37
follow the safety instructions in the Product Information Guide. CHECK THE KEYBOARD CABLE - • Ensure that the keyboard cable is firmly connected to the computer. • Shut down the computer (see "Turning Off Your Computer" on page 61), reconnect the keyboard cable as shown on the setup diagram for your - Dell E521 | Owner's Manual - Page 38
and Software Problems CAUTION: Before you begin any of the procedures in this section, follow the safety instructions in the Product Information Guide. The computer does not start up C H E C K T H E D I A G N O S T I C L I G H T S - See "Diagnostic Lights" on page 49. ENSURE THAT THE POWER CABLE IS - Dell E521 | Owner's Manual - Page 39
program is installed and configured properly. • Verify that the device drivers do not conflict with the program. • If necessary, uninstall and then reinstall the program. BACK UP YOUR FILES IMMEDIATELY USE A VIRUS-SCANNING PROGRAM TO CHECK THE HARD DRIVE, FLOPPY DISKS, OR CDS Solving Problems 39 - Dell E521 | Owner's Manual - Page 40
in the system. If the next logical drive after the physical drives is mapped to a network drive, Windows XP does not automatically assign a drive letter to the Media Card Reader. To manually assign a drive for the Media Card Reader: 1 Right-click My Computer and select Manage. 2 Select the Disk - Dell E521 | Owner's Manual - Page 41
information about the type of memory supported by your computer, see "Memory" on page 107. • Run the Dell Diagnostics (see "Dell Diagnostics" on page 52). Mouse Problems CAUTION: Before you begin any of the procedures in this section, follow the safety instructions in the Product Information Guide - Dell E521 | Owner's Manual - Page 42
Drivers" on page 54. R U N T H E H A R D W A R E TR O U B L E S H O O T E R - See "Resolving Software and Hardware Incompatibilities" on page 55. Network Problems CAUTION: Before you begin any of the procedures in this section, follow the safety instructions in the Product Information Guide - Dell E521 | Owner's Manual - Page 43
" on page 55. Power Problems CAUTION: Before you begin any of the procedures in this section, follow the safety instructions in the Product Information Guide. I F T H E P O W E R L I G H T I S G R E E N A N D T H E C O M P U T E R I S N O T R E S P O N D I N G - See "Diagnostic Lights" on page 49 - Dell E521 | Owner's Manual - Page 44
cables • Too many devices on a power strip • Multiple power strips connected to the same electrical outlet Printer Problems CAUTION: Before you begin any of the procedures in this section, follow the safety instructions in the Product Information Guide. NOTE: If you need technical assistance - Dell E521 | Owner's Manual - Page 45
port(s): setting is USB. R E I N S T A L L T H E P R I N T E R D R I V E R - See the printer documentation for instructions. Scanner Problems CAUTION: Before securely connected to the scanner and the computer. VERIFY THAT THE SCANNER IS RECOGNIZED BY MICROSOFT WINDOWS - 1 Click the Start button, - Dell E521 | Owner's Manual - Page 46
Problems CAUTION: Before you begin any of the procedures in this section, follow the safety instructions in the Product Information Guide. No sound from speakers NOTE: The volume control in some MP3 players overrides the Windows setup diagram supplied with the speakers. If you purchased a sound card, - Dell E521 | Owner's Manual - Page 47
instructions in the Product Information Guide. NOTE: See the monitor documentation for troubleshooting procedures. If the screen is blank CHECK THE MONITOR CABLE CONNECTION - • Ensure that the graphics cable is connected as shown on the setup diagram for your computer. If an optional video card - Dell E521 | Owner's Manual - Page 48
difficult to read C H E C K T H E M O N I T O R S E T T I N G S - See the monitor documentation for instructions on adjusting A L P O W E R S O U R C E S - Fans, fluorescent lights, halogen lamps, and other electrical devices can cause the screen image to appear "shaky." Turn off THE WINDOWS DISPLAY - Dell E521 | Owner's Manual - Page 49
Troubleshooting Tools Diagnostic Lights CAUTION: Before you begin any of the procedures in this section, follow the safety instructions in the Product Information Guide. To help you troubleshoot a problem, your computer has four lights labeled "1," "2," "3," and "4" on the front panel (see "Front - Dell E521 | Owner's Manual - Page 50
Light Pattern Problem Description A possible graphics card failure has occurred. A possible floppy or hard drive failure has occurred. Suggested Resolution • If the computer has a graphics card, remove the card, reinstall it (see "PCI Express Cards" on page 76), and then restart the computer. • If - Dell E521 | Owner's Manual - Page 51
an error message on your screen identifying a problem with a device (such as the floppy drive or hard drive), check the device to ensure that it is functioning properly. • If the problem persists, contact Dell (see "Contacting Dell" on page 122). After POST is complete, all four diagnostic lights - Dell E521 | Owner's Manual - Page 52
the error code and problem description and follow the instructions on the screen. If you cannot resolve the error condition, contact Dell (see "Contacting Dell" on page 122). NOTE: The Service Tag for your computer is located at the top of each test screen. If you contact Dell, technical support - Dell E521 | Owner's Manual - Page 53
conditions encountered, error codes, and the problem description. Describes the test and may indicate requirements for running the test. Displays your hardware configuration for the selected device. The Dell Diagnostics obtains configuration information for all devices from system setup, memory, and - Dell E521 | Owner's Manual - Page 54
resolve the problem, then use System Restore to return your computer to the operating state that existed before you installed the new driver (see "Using Microsoft Windows XP System Restore" on page 56). Manually Reinstalling Drivers 1 After copying the required driver files to your hard drive, click - Dell E521 | Owner's Manual - Page 55
ways: • Microsoft® Windows® XP System Restore returns your computer to an earlier operating state without affecting data files. Use System Restore as the first solution for restoring your operating system and preserving data files. • Dell PC Restore by Symantec restores your hard drive to the - Dell E521 | Owner's Manual - Page 56
and click Help and Support. 2 Click the task for System Restore. 3 Follow the instructions on the screen. Restoring the Computer to an Earlier Operating State If problems occur after you install a device driver, use Device Driver Rollback (see "Using Windows XP Device Driver Rollback" on page 54 - Dell E521 | Owner's Manual - Page 57
deletes all data on the hard drive and removes any applications or drivers installed after you received your computer. If possible, back up the data before using PC Restore. Use PC Restore only if System Restore did not resolve your operating system problem. NOTE: Dell PC Restore is not available in - Dell E521 | Owner's Manual - Page 58
on the hard drive. 6 Right-click Local Disk (C) in Windows Explorer, click Properties, and verify that the additional disk space is available as indicated by the increased value for Free Space. 7 Click Finish to close the PC Restore Removal window. 8 Restart the computer. 58 Troubleshooting Tools - Dell E521 | Owner's Manual - Page 59
on your hard drive. Therefore, do not reinstall Windows XP unless a Dell technical support representative instructs you to do so. 1 Save and close any open files and exit any open programs. 2 Insert the Operating System CD. Click Exit if the Install Windows XP message appears. 3 Restart the computer - Dell E521 | Owner's Manual - Page 60
60 Troubleshooting Tools - Dell E521 | Owner's Manual - Page 61
Computer and Before Working Inside Your Computer. • You have read the safety information in your Dell™ Product Information Guide BIOS executable update program on support.dell.com. Turning Off Your Computer Turn Off Computer. b In the Turn off computer window, click Turn off. The computer turns off - Dell E521 | Owner's Manual - Page 62
in this section, follow the safety instructions in the Product Information Guide. CAUTION: Handle components and cards with care. Do not touch the components or contacts on a card. Hold a card by its edges or by its metal mounting bracket. Hold a component such as a processor by its edges, not by - Dell E521 | Owner's Manual - Page 63
Cover CAUTION: Before you begin any of the procedures in this section, follow the safety instructions in the Product Information Guide. CAUTION: To guard against electrical shock, always unplug your computer from the electrical outlet before removing the cover. 1 Follow the procedures in "Before You - Dell E521 | Owner's Manual - Page 64
Before you begin any of the procedures in this section, follow the safety instructions in the Product Information Guide. 3 4 2 *1 *May not be present on all computers. 1 floppy drive or Media Reader 4 system board 2 CD or DVD drive 5 hard drive 5 3 power supply 64 Removing and Installing Parts - Dell E521 | Owner's Manual - Page 65
(FAN_CPU1) 2 processor socket (CPU) 4 power connector (PW_12V_A1) 7 front-panel connector (FRONTPANEL) 10 USB connectors (2) (USB2_BACK1) 5 serial ATA drive connectors (SATA2, SATA3) 8 power connector (POWER1) 11 network connector and USB connectors (2) (NIC_USB1) 3 memory module connectors - Dell E521 | Owner's Manual - Page 66
22 floppy drive connector (FLOPPY1) 14 battery socket (BT1) 17 standby power indicator (AUX_PWR_LED) 20 PCI connector (SLOT4) 15 Internal USB connector (USB1) 18 PCI Express x1 connector (SLOT2) 21 password jumper (PSWD) Memory You can increase your computer memory by installing memory modules on - Dell E521 | Owner's Manual - Page 67
2 or DIMM connectors 3 and 4. NOTE: Memory purchased from Dell is covered under your computer warranty. Addressing Memory With 4-GB Configurations Your computer supports a maximum of 4 GB of memory when you use four 1-GB DIMMs. Current 32-bit operating systems, such as Microsoft® Windows® XP, can - Dell E521 | Owner's Manual - Page 68
Installing Memory CAUTION: Before you begin any of the procedures in this section, follow the safety instructions in the Product Information Guide. NOTICE: To prevent static damage to components inside your computer, discharge static electricity from your body before you touch any of your computer's - Dell E521 | Owner's Manual - Page 69
correctly, check the amount of memory (RAM) listed. Removing Memory CAUTION: Before you begin any of the procedures in this section, follow the safety instructions in the Product Information Guide. NOTICE: To prevent static damage to components inside your computer, discharge static electricity from - Dell E521 | Owner's Manual - Page 70
PCI Cards Your computer supports two PCI cards. • If you are installing or replacing a card, follow the procedures in the next section. • If you are removing but not replacing a PCI card, see "Removing a PCI Card" on page 75. • If you are replacing a card, remove the current driver for the card from - Dell E521 | Owner's Manual - Page 71
If you are installing a new card, remove the filler bracket to create a card-slot opening. Then continue with step 5. 4 If you are replacing a card that is already installed in the computer, remove the card. If necessary, disconnect any cables connected to the card. Grasp the card by its top corners - Dell E521 | Owner's Manual - Page 72
fully seated in the slot. 3 4 2 5 6 1 1 alignment bar 4 alignment guide 2 fully-seated card 5 bracket within slot 3 not fully seated card 6 bracket caught outside of slot 7 Before you close the card retention door, ensure that: • The tops of all cards and filler brackets are flush with the - Dell E521 | Owner's Manual - Page 73
2 3 4 1 alignment guide 4 card retention door 2 alignment bar 3 release tab 8 Close the card retention door by snapping it into place to secure the cards. NOTICE: Do not route card cables over or behind the cards. Cables routed over the cards can prevent the computer cover from closing properly - Dell E521 | Owner's Manual - Page 74
plug it into the computer. 10 Replace the computer cover, reconnect the computer and devices to electrical outlets, and then turn them on. 11 If you installed a sound card: a Enter system setup (see "System Setup" on page 111), go to Onboard Devices and select Integrated Audio, and then change the - Dell E521 | Owner's Manual - Page 75
cover, reconnect the computer and devices to electrical outlets, and then turn them on. 7 Remove the card's driver from the operating system. 8 If you removed a sound card: a Enter system setup (see "System Setup" on page 111), go to Onboard Devices and select Integrated Audio, and then change - Dell E521 | Owner's Manual - Page 76
PCI Express Cards Your computer supports one PCI Express x16 card and one PCI Express x1 card. • If you are installing or replacing a PCI Express card, follow the procedures in the next section. • If you are removing but not replacing a card, see "Removing a PCI Express Card" on page 80. • If you - Dell E521 | Owner's Manual - Page 77
to a network. To guard against electrical shock, be sure to unplug your computer from its electrical outlet before installing any cards. 8 If you are installing the card into the x16 card connector, position the card so the securing slot is aligned with the securing tab. Removing and Installing - Dell E521 | Owner's Manual - Page 78
seated in the slot. 3 4 2 5 1 6 1 alignment bar 4 alignment guide 2 fully seated card 5 bracket within slot 3 not fully seated card 6 bracket caught outside of slot 10 If you replaced a card that was already installed in the computer and you removed the retention mechanism, reinstall the - Dell E521 | Owner's Manual - Page 79
it into the computer. 11 Before you close the card retention door, ensure that: • The tops of all cards and filler brackets are flush with the alignment bar. • The notch in the top of the card or filler bracket fits around the alignment guide. 1 2 3 1 alignment guide 4 card - Dell E521 | Owner's Manual - Page 80
cable connections. 14 Replace the computer cover, reconnect the computer and devices to electrical outlets, and then turn them on. 15 If you installed a sound card: a Enter system setup (see "System Setup" on page 111), go to Onboard Devices and select Integrated Audio, and then change the setting - Dell E521 | Owner's Manual - Page 81
cover, reconnect the computer and devices to electrical outlets, and then turn them on. 9 Remove the card's driver from the operating system. 10 If you removed a sound card: a Enter system setup (see "System Setup" on page 111), go to Onboard Devices and select Integrated Audio, and then change - Dell E521 | Owner's Manual - Page 82
open position. NOTE: This sliding plate secures and releases the drive panel and helps to secure the drives. 4 By pushing from the inside and pivoting the drive panel to the left, you can release the drive panel from its side hinges. 5 Set the drive panel aside. 82 Removing and Installing Parts - Dell E521 | Owner's Manual - Page 83
releasing the tab, pivot the drive-panel insert out and away from the drive panel. 3 Set the drive-panel insert aside in a secure location. Replacing the Drive-Panel Insert 2 1 3 4 1 center drive-panel tab 4 drive-panel insert 2 drive panel 3 drive-panel insert tab Removing and Installing - Dell E521 | Owner's Manual - Page 84
tab on the drive panel. Replacing the Drive Panel 1 Align the drive panel tabs with the side hinges. 1 2 3 4 5 1 sliding plate lever 4 drive panel tabs (3) 2 sliding plate 5 side hinges 3 drive panel 2 Rotate the drive panel toward the computer until it snaps into place on the front panel. 84 - Dell E521 | Owner's Manual - Page 85
Drives Your computer supports a combination of these devices: • Up to two serial ATA hard drives • One optional floppy drive or an optional Media Card Reader • Up to two CD or DVD drives 1 2 3 1 CD/DVD drive 2 FlexBay for optional floppy drive or Media Card Reader 3 hard drive Recommended - Dell E521 | Owner's Manual - Page 86
Cables When you install a drive, you connect two cables-a DC power cable and a data cable-to the back of the drive. Power Connector 1 2 1 power cable 2 power input connector Drive Interface Connectors The drive cable connectors are keyed for correct insertion. Properly align the cable connector - Dell E521 | Owner's Manual - Page 87
Hard Drives CAUTION: Before you begin any of the procedures in this section, follow the safety instructions in the Product Information Guide. CAUTION: To guard against electrical shock, always unplug your computer from the electrical outlet before removing the cover. NOTICE: To avoid damage to the - Dell E521 | Owner's Manual - Page 88
on each side of the drive and slide the drive up and out of the computer. 1 2 1 tabs (2) 2 hard drive 4 If removing this drive changes the drive configuration, then be sure to reflect these changes in system setup. When you restart your computer, enter system setup (see "System Setup" on page 111 - Dell E521 | Owner's Manual - Page 89
with the guides in the hard drive bay. 1 2 3 1 hard-drive bracket 2 hard drive 3 guide in hard-drive bay 5 Gently slide the drive into place until you feel a click or the drive is securely installed. Take care not to let the drive free-fall into the drive bay. 6 Connect the power and data - Dell E521 | Owner's Manual - Page 90
then plug it into the computer. 9 Connect your computer and devices to electrical outlets, and then turn them on. 10 See the documentation that came with the drive for instructions on installing any software required for drive operation. 11 Check the System Setup for drive configuration changes (see - Dell E521 | Owner's Manual - Page 91
Adding a Second Hard Drive CAUTION: Before you begin any of the procedures in this section, follow the safety instructions in the Product Information Guide. CAUTION: To guard against electrical shock, always unplug your computer from the electrical outlet before removing the cover. NOTICE: To avoid - Dell E521 | Owner's Manual - Page 92
in this section, follow the safety instructions in the Product Information Guide. CAUTION: To guard against electrical shock, always unplug your computer from the electrical outlet before removing the cover. NOTE: If you are adding a floppy drive, see "Installing a Floppy Drive" on page 94. Removing - Dell E521 | Owner's Manual - Page 93
this card before disconnecting the floppy-drive cables (see "Removing a PCI Express Card" on page 80) 4 Slide the drive latch release toward the bottom of the computer and, without releasing the drive latch release, slide the floppy drive out through the front of the computer. 1 2 3 1 drive latch - Dell E521 | Owner's Manual - Page 94
to be installed, insert the shoulder screws located in the back of the drive panel insert into the drive, and then slide the drive back into place. 4 Attach the power and data cables to the floppy drive. 5 Connect the other end of the data cable to the connector labeled "FLOPPY1" on the system board - Dell E521 | Owner's Manual - Page 95
with the drive for instructions on installing any software required for drive operation. 11 Enter system setup (see "System Setup" on page 111) and select the appropriate Diskette Drive option. 12 Verify that your computer works correctly by running the Dell Diagnostics (see "Dell Diagnostics" on - Dell E521 | Owner's Manual - Page 96
the safety instructions in the Product Information Guide. CAUTION: To guard against electrical shock, always unplug your computer from the electrical outlet before removing the cover. Removing a Media Card Reader 1 Follow the procedures in "Before You Begin" on page 61. 2 Remove the drive panel (see - Dell E521 | Owner's Manual - Page 97
toward the bottom of the computer and, without releasing the drive latch release, slide the Media Card Reader out through the front of the computer. 5 If you are not replacing the Media Card Reader, reinstall the drive panel insert, as needed (see "Replacing the Drive-Panel Insert" on page 83 - Dell E521 | Owner's Manual - Page 98
Reader into place until you feel a click or feel the drive securely installed. Ensure that the Media Card Reader is installed before the FlexBay cable is connected. 5 Connect the USB cable to the back of the Media Card Reader and to the USB connector on the system board (see "System Board Components - Dell E521 | Owner's Manual - Page 99
Board Components" on page 65). 2 1 3 1 Media Card Reader 2 USB cable 3 USB connector 7 Route the FlexBay USB cable through the cable routing clip. 8 Replace the computer cover (see "Replacing the Computer Cover" on page 105). 9 Connect your computer and devices to electrical outlets, and then - Dell E521 | Owner's Manual - Page 100
the procedures in this section, follow the safety instructions located in the Product Information Guide. CAUTION: To guard against electrical shock, always unplug your computer from the electrical outlet before removing the cover. Removing a CD/DVD Drive 1 Follow the procedures in "Before You Begin - Dell E521 | Owner's Manual - Page 101
latch 2 sliding plate 3 CD/DVD drive 7 Replace the computer cover (see "Replacing the Computer Cover" on page 105). 8 Connect your computer and devices to electrical outlets, and then turn them on. 9 Configure the drives in System Setup (see "Entering System Setup" on page 111). Removing and - Dell E521 | Owner's Manual - Page 102
are installing a new CD/DVD drive rather than replacing a drive, remove the appropriate drive- panel insert (see "Removing the Drive-Panel Insert" on page 83). 3 Gently slide the drive into place until you feel a click or feel the drive securely installed. 4 Connect the power and data cables to the - Dell E521 | Owner's Manual - Page 103
came with the drive for instructions on installing any software required for drive operation. 9 Enter system setup (see "System Setup" on page 111) and select the appropriate Drive option. 10 Verify that your computer works correctly by running the Dell Diagnostics (see "Dell Diagnostics" on page 52 - Dell E521 | Owner's Manual - Page 104
according to the manufacturer's instructions. To replace the battery: 1 Record all the screens in system setup (see "System Setup" on page 111) so that you can restore the correct settings in step 9. 2 Follow the procedures in "Before You Begin" on page 61. 3 Remove the computer cover (see "Removing - Dell E521 | Owner's Manual - Page 105
Connect your computer and devices to electrical outlets, and then turn them on. 9 Enter system setup (see "System Setup" on page 111) and restore the settings you recorded in step 1. Then go to the Maintenance section and clear the low battery and other errors associated with the battery replacement - Dell E521 | Owner's Manual - Page 106
106 Removing and Installing Parts - Dell E521 | Owner's Manual - Page 107
Level 2 (L2) cache Memory Type Memory connectors Memory capacities Minimum memory Maximum memory Computer Information Chipset RAID Support DMA channels Interrupt levels BIOS chip (NVRAM) NIC Video Type AMD Athlon 64 X2 dual-core processor AMD Athlon 64 processor AMD Sempron processor Up to 1 MB per - Dell E521 | Owner's Manual - Page 108
lanes Drives Externally accessible: Bays Available devices Internally accessible: one 3.5-inch drive bay (FlexBay) two 5.25-inch drive bays Serial ATA drives (4), floppy drive, USB memory devices, CD/DVD drive, and Media Card Reader two bays for 1-inch high serial ATA hard drives 108 Appendix - Dell E521 | Owner's Manual - Page 109
: Video Network adapter USB Audio System board connectors: Serial ATA Internal USB device Floppy drive Fan PCI 2.3 PCI Express x1 PCI Express x16 Front panel Processor Memory Power 12V Power Controls and Lights Front of computer: Power button Power light Diagnostic lights Standby power light Hard - Dell E521 | Owner's Manual - Page 110
light) - The computer is not detecting a physical connection to the network. yellow blinking light Power DC power supply: Wattage 305 W Maximum heat dissipation 1041 BTU/hr NOTE: Heat dissipation is calculated by using the power supply wattage rating. Voltage (see the safety instructions 90 - Dell E521 | Owner's Manual - Page 111
computer • To set or change a user-selectable option such as the user password • To read the current amount of memory or set the type of hard drive installed Before you use system setup Windows® desktop. Then, shut down your computer (see "Turning Off Your Computer" on page 61) and try again. - Dell E521 | Owner's Manual - Page 112
NOTE: If you insert a boot device and restart the computer, this option appears in the system setup menu. To boot from a USB memory device, select the USB device and move it so it becomes the first device in the list. Lists the order that the BIOS will search the available hard drives in the system - Dell E521 | Owner's Manual - Page 113
hard drive controller. • RAID Off - No RAID support • RAID On - SATA is configured for RAID on every boot. This setting determines whether integrated drive errors are reported or not during system startup. Onboard Devices Integrated NIC (On default) Integrated Audio (On default) USB Controller - Dell E521 | Owner's Manual - Page 114
increase in data transfer rates. NOTE: Changing the acoustics setting does not alter your hard drive image. Security Unlock Setup When an administrator password is being used, allows the user access to modify system setup settings. Enter the administrator password at the prompt to unlock system - Dell E521 | Owner's Manual - Page 115
components; however, system memory remains active for both settings Maintenance Service Tag Load Defaults Event Log Displays the service tag for your computer. Restores system setup options to their factory defaults. Allows you to view the Event Log. Entries are marked R for Read and U for Unread - Dell E521 | Owner's Manual - Page 116
system setup. When set to Do Not Report (disabled) and an error is detected during POST, the BIOS will display the error message and continue booting the system. Boot Sequence This feature allows you to change the boot sequence for devices. Option Settings • Bootable Hard Drive - The computer - Dell E521 | Owner's Manual - Page 117
your computer to a USB device, such as a floppy drive, memory key, or CD-RW drive. NOTE: If you are booting to a USB floppy drive, you must first set Diskette Interface to Disabled in system setup (see "System Setup" on page 111). 1 If you are booting to a USB device, connect the USB device to a USB - Dell E521 | Owner's Manual - Page 118
, follow the safety instructions located in the Product Information Guide. 1 Follow the Windows® desktop appears on your computer, shut down the computer (see "Turning Off Your Computer" on page 61). 6 Turn off the monitor and disconnect it from the electrical outlet. 7 Disconnect the computer power - Dell E521 | Owner's Manual - Page 119
instructions located in the Product Information Guide. Computer, Keyboard, and Monitor CAUTION: Before you clean your computer, disconnect the computer from the electrical outlet. Clean your computer antiglare coating. • To clean your monitor screen, lightly dampen a soft, clean cloth with water. If - Dell E521 | Owner's Manual - Page 120
use on DVDs. Dell Technical Support Policy (U.S. Only) Technician-assisted technical support requires the cooperation and participation of the customer in the troubleshooting process and provides for restoration of the operating system, software programs, and hardware drivers to the original default - Dell E521 | Owner's Manual - Page 121
support service contract purchased with the computer. 2 All Dell-standard components included in a Custom Factory Integration (CFI) project are covered by the standard Dell limited warranty for your computer. However, Dell with the manufacturer's instruction manual, may cause interference with - Dell E521 | Owner's Manual - Page 122
: Company name: Dell™ Dimension™ E521 DCSM Dell Inc. Worldwide Regulatory Compliance & Environmental Affairs One Dell Way Round Rock, TX 78682 USA 512-338-4400 NOTE: For Further regulatory information, see your Product Information Guide. Contacting Dell You can contact Dell through the Internet - Dell E521 | Owner's Manual - Page 123
Service Technical Support - Dell PowerApp™, Dell PowerEdge™, Dell PowerConnect™, and Dell PowerVault™ Technical Support Services Sales Online Support Technical Support, Customer Service, Sales Australia (Sydney) Online Support International Access Code: 0011 Country Code: 61 Technical Support - Dell E521 | Owner's Manual - Page 124
Access Code: 00 Country Code: 32 City Code: 2 Bermuda Technical Support, Customer Service, Sales Online Support General Support General Support Fax Customer Service Corporate Sales Fax Switchboard Online Support Bolivia Technical Support, Customer Service, Sales Online Support Technical Support - Dell E521 | Owner's Manual - Page 125
Access Code: 011 Online Support AutoTech (automated Hardware and Warranty Support) Customer Service Home/Home Office Small Business Medium/Large Business, Government, Education Hardware Warranty Phone Support Computers for Home/Home Office Computers 1012 www.dell.ca/ostatus support.ca.dell.com toll- - Dell E521 | Owner's Manual - Page 126
Country (City) International Access Code Country Code City Code Cayman Islands Chile (Santiago) Country Code: 56 City Code: 2 Service Type Online Support Technical Support, Customer Service, Sales Online Support Sales and Customer Support Area Codes, Local Numbers, and Toll-Free Numbers Web and E- - Dell E521 | Owner's Manual - Page 127
Access Code Country Code City Code China (Xiamen) Country Code: 86 City Code: 592 Colombia Service Type Online Support Technical Support E-mail Customer Service E-mail Technical Support Fax Technical Support - Dell™ Dimension™ and Dell Inspiron™ Technical Support - Dell OptiPlex™, Dell - Dell E521 | Owner's Manual - Page 128
Code City Code Costa Rica Service Type Online Support Czech Republic (Prague) International Access Code: 00 Country Code: 420 Denmark (Copenhagen) International Access Code: 00 Country Code: 45 Dominica Technical Support, Customer Service, Sales Online Support Technical Support Customer Service - Dell E521 | Owner's Manual - Page 129
(City) International Access Code Country Code City Code El Salvador Service Type Online Support Technical Support, Customer Service, Sales Finland (Helsinki) Online Support International Access Code: 990 Country Code: 358 Technical Support City Code: 9 Customer Service Switchboard Fax - Dell E521 | Owner's Manual - Page 130
International Access Code Country Code City Code Germany (Frankfurt) International Access Code: 00 Country Code: 49 City Code: 69 Greece International Access Code: 00 Country Code: 30 Grenada Guatemala Guyana Service Type Online Support Technical Support Home/Small Business Customer Service Global - Dell E521 | Owner's Manual - Page 131
Country (City) International Access Code Country Code City Code Service Type Hong Kong Online Support International Access Code: 001 Country Code: 852 Technical Support - Dimension and Inspiron Technical Support - OptiPlex, Latitude, and Dell Precision Technical Support - Servers and Storage - Dell E521 | Owner's Manual - Page 132
Country (City) International Access Code Country Code City Code India Service Type Online Support Portable and Desktop Support Desktop Support E-mail Portable Support E-mail Phone Numbers Server Support E-mail Phone Numbers Gold Support Only E-mail Phone Numbers Customer Service Home and Small - Dell E521 | Owner's Manual - Page 133
Country (City) International Access Code Country Code City Code Ireland (Cherrywood) International Access Code: 00 Country Code: 353 City Code: 1 Service Type Online Support Technical Support Business computers Home computers At Home Support Sales Home Small Business Medium Business Large Business - Dell E521 | Owner's Manual - Page 134
Access Code Country Code City Code Italy (Milan) International Access Code: 00 Country Code: 39 City Code: 02 Jamaica Service Type Online Support Home and Small Business Technical Support Customer Service Fax Switchboard Corporate Technical Support Customer Service Fax Switchboard Online Support - Dell E521 | Owner's Manual - Page 135
International Access Code Country Code City Code Service Type Japan (Kawasaki) Online Support International Access Code: 001 Country Code: 81 City Code: 44 Technical Support - Dimension and Inspiron Technical Support outside of Japan - Dimension and Inspiron Technical Support - Dell Precision - Dell E521 | Owner's Manual - Page 136
Code: 00 Country Code: 352 Malaysia (Penang) International Access Code: 00 Country Code: 60 City Code: 4 Online Support Support Home/Small Business Sales Corporate Sales Customer Service Fax Online Support Technical Support - Dell Precision, OptiPlex, and Latitude Technical Support - Dimension - Dell E521 | Owner's Manual - Page 137
Access Code: 00 Country Code: 31 City Code: 20 New Zealand International Access Code: 00 Country Code: 64 Nicaragua Online Support Technical Support, Customer Service, Sales Online Support Technical Support, Customer Service, Sales Online Support Technical Support Technical Support Fax - Dell E521 | Owner's Manual - Page 138
Online Support International Access Code: 00 Technical Support Country Code: 351 Customer Service Sales Puerto Rico Fax Online Support Technical Support Customer Service and Sales 138 Appendix Area Codes, Local Numbers, and Toll-Free Numbers Web and E-mail Address support.euro.dell.com - Dell E521 | Owner's Manual - Page 139
Dimension, Inspiron, and Electronics and Accessories Technical Support - OptiPlex, Latitude, and Dell Precision Technical Support - PowerApp, PowerEdge, PowerConnect, and PowerVault Customer Service Transaction Sales Corporate Sales Slovakia (Prague) Online Support International Access Code - Dell E521 | Owner's Manual - Page 140
Access Code: 00 Country Code: 34 City Code: 91 Sweden (Upplands Vasby) International Access Code: 00 Country Code: 46 City Code: 8 Service Type Online Support Gold Queue Technical Support Customer Service Sales Fax Switchboard Technical Support, Customer Service 722 95 83 support.euro.dell.com 08 - Dell E521 | Owner's Manual - Page 141
202 Customer Service - Corporate 0848 821 721 Main 0848 335 599 Fax 022 799 01 90 Sales 022 799 01 01 Taiwan Online Support support.ap.dell.com International Access Code: 002 support.dell.com.cn/email Country Code: 886 Technical Support - OptiPlex, Latitude, Inspiron, Dimension, and - Dell E521 | Owner's Manual - Page 142
Country (City) International Access Code Country Code City Code Turks and Caicos Islands U.K. (Bracknell) International Access Code: 00 Country Code: 44 City Code: 1344 Uruguay Service Type Area Codes, Local Numbers, and Toll-Free Numbers Web and E-mail Address Online Support www.dell.com/tc la - Dell E521 | Owner's Manual - Page 143
(City) International Access Code Country Code City Code Service Type U.S.A. (Austin, Texas) Dell Services for the Deaf, Hard-of-Hearing, International Access Code: 011 or Speech-Impaired Country Code: 1 Fax Technical Support Home and Home Office Portable and Desktop AutoTech Small Business - Dell E521 | Owner's Manual - Page 144
) International Access Code Country Code City Code U.S. Virgin Islands Venezuela Service Type Online Support Technical Support, Customer Service, Sales Online Support Technical Support, Customer Service, Sales Area Codes, Local Numbers, and Toll-Free Numbers Web and E-mail Address www.dell.com/vi - Dell E521 | Owner's Manual - Page 145
between the video circuitry and the computer memory. AHCI - Advanced Host Controller Interface - An interface for a SATA hard drive Host Controller which allows the storage driver to enable technologies such as Native Command Queuing (NCQ) and hot plug. ALS - ambient light sensor - A feature - Dell E521 | Owner's Manual - Page 146
400 MHz. device - Hardware such as a disk drive, printer, or keyboard that is installed in or connected to your computer. device driver - See driver. DIMM - dual in-line memory module - A circuit board with memory chips that connects to a memory module on the system board. DIN connector - A round - Dell E521 | Owner's Manual - Page 147
common types of ExpressCards. ExpressCards support both the PCI Express and USB 2.0 standard. Express Service Code - A numeric code located on a sticker on your Dell™ computer. Use the Express Service Code when contacting Dell for assistance. Express Service Code service may not be available in some - Dell E521 | Owner's Manual - Page 148
operate on the Windows operating systems are GUIs. H hard drive - A drive that reads and writes data on a hard disk. The terms hard drive and hard disk are often used interchangeably. heat sink - A metal plate on some processors that helps dissipate heat. hibernate mode - A power management mode - Dell E521 | Owner's Manual - Page 149
to hard drive storage, the term is often rounded to 1,000,000 bytes. MB/sec - megabytes per second - One million bytes per second. This measurement is typically used for data transfer ratings. media bay - A bay that supports devices such as optical drives, a second battery, or a Dell TravelLite - Dell E521 | Owner's Manual - Page 150
random access memory - A type of memory that stores data when the computer is turned off or loses its external power source. NVRAM is used for maintaining computer configuration information such as date, time, and other system setup options that you can set. O optical drive - A drive that - Dell E521 | Owner's Manual - Page 151
. POST - power-on self-test - Diagnostics programs, loaded automatically by the BIOS, that perform basic tests on the major computer components, such as memory, hard drives, and video. If no problems are detected during POST, the computer continues the start-up. processor - A computer chip that - Dell E521 | Owner's Manual - Page 152
the video controller and its drivers, and the amount of video memory installed in the computer. S-video TV-out - A connector used to attach a TV or digital audio device to the computer. SXGA - super-extended graphics array - A video standard for video cards and controllers that supports resolutions - Dell E521 | Owner's Manual - Page 153
super-extended graphics array plus - A video standard for video cards and controllers that supports resolutions up to 1400 x 1050. system board - The main circuit board in your computer. Also known as the motherboard. system setup - A utility that serves as an interface between the computer hardware - Dell E521 | Owner's Manual - Page 154
resolutions up to 1280 x 800. X XGA - extended graphics array - A video standard for video cards and controllers that supports resolutions up to 1024 x 768. Z ZIF - zero insertion force - A type of socket or connector that allows a computer chip to be installed or removed with no stress applied to - Dell E521 | Owner's Manual - Page 155
audio. See sound B battery problems, 33 replacing, 104 BIOS, 111 boot sequence about, 115 changing, 117 option settings, 116 booting to a USB device, 117 C cards installing PCI, 71 installing PCI Express, 76 PCI, 70 PCI Express, 76 removing PCI, 75 removing PCI Express, 80 slots, 70 types supported - Dell E521 | Owner's Manual - Page 156
Microsoft Windows, 9 Service Tag, 9, 11 latch release cover, 11 lights back of computer, 49 diagnostic, 12, 49 hard drive activity, 12 M Media Card Reader installing, 96, 98 problems, 40 removing, 96 using, 22 memory 4-GB configurations, 67 installing, 68 problems, 41 removing, 69 type supported, 66 - Dell E521 | Owner's Manual - Page 157
hard drive, 35 Internet, 35 keyboard, 37 Media Card Reader, 40 memory, 41 modem, 35 monitor is blank, 47 monitor is hard to read, 48 mouse, 41 network, 42 power, 43 power light conditions, 43 printer, 44 program crashes, 39 program stops responding, 38 programs and Windows compatibility, 39 restore - Dell E521 | Owner's Manual - Page 158
, 52 diagnostic lights, 49 Hardware Troubleshooter, 55 Help and Support Center, 10 restore to previous state, 55-56 tips, 33 TV connect to computer, 23-24 U USB booting to devices, 117 connectors, 12 V vents, 12 front panel, 12 volume adjusting, 46 W warranty information, 9 Windows XP Device Driver
-
 1
1 -
 2
2 -
 3
3 -
 4
4 -
 5
5 -
 6
6 -
 7
7 -
8
-
9
-
10
-
11
-
12
-
13
-
14
-
15
-
16
-
17
-
18
-
19
-
20
-
21
-
22
-
23
-
24
-
25
-
26
-
27
-
28
-
29
-
30
-
31
-
32
-
33
-
34
-
35
-
36
-
37
-
38
-
39
-
40
-
41
-
42
-
43
-
44
-
45
-
46
-
47
-
48
-
49
-
50
-
51
-
52
-
53
-
54
-
55
-
56
-
57
-
58
-
59
-
60
-
61
-
62
-
63
-
64
-
65
-
66
-
67
-
68
-
69
-
70
-
71
-
72
-
73
-
74
-
75
-
76
-
77
-
78
-
79
-
80
-
81
-
82
-
83
-
84
-
85
-
86
-
87
-
88
-
89
-
90
-
91
-
92
-
93
-
94
-
95
-
96
-
97
-
98
-
99
-
100
-
101
-
102
-
103
-
104
-
105
-
106
-
107
-
108
-
109
-
110
-
111
-
112
-
113
-
114
-
115
-
116
-
117
-
118
-
119
-
120
-
121
-
122
-
123
-
124
-
125
-
126
-
127
-
128
-
129
-
130
-
131
-
132
-
133
-
134
-
135
-
136
-
137
-
138
-
139
-
140
-
141
-
142
-
143
-
144
-
145
-
146
-
147
-
148
-
149
-
150
-
151
-
152
-
153
-
154
-
155
-
156
-
157
-
158
 |
 |
www.dell.com | support.dell.com
Dell™ Dimension™ E521
Owner’s Manual
Model DCSM
FlexBay for optional
floppy drive or Media
Card Reader
hard-drive activity light
microphone connector
headphone connector
CD or DVD activity light
CD or DVD eject button
diagnostic lights
USB 2.0 connectors (2)
cover latch
release
Service Tag
power button/
power activity light