Dell External OEMR R620 Owners Manual - Page 112
Disabling A Forgotten Password, before you assign a new system and/or setup password
 |
View all Dell External OEMR R620 manuals
Add to My Manuals
Save this manual to your list of manuals |
Page 112 highlights
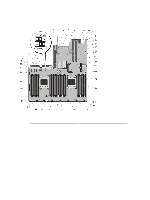
Disabling A Forgotten Password The system's software security features include a system password and a setup password. The password jumper enables these password features or disables them and clears any password(s) currently in use. CAUTION: Many repairs may only be done by a certified service technician. You should only perform troubleshooting and simple repairs as authorized in your product documentation, or as directed by the online or telephone service and support team. Damage due to servicing that is not authorized by Dell is not covered by your warranty. Read and follow the safety instructions that came with the product. 1. Turn off the system, including any attached peripherals, and disconnect the system from the electrical outlet. 2. Open the system. 3. Move the jumper on the system-board jumper from pins 4 and 6 to pins 2 and 4. 4. Close the system. The existing passwords are not disabled (erased) until the system boots with the Jumper on pins 2 and 4. However, before you assign a new system and/or setup password, you must move the jumper back to pins 4 and 6. NOTE: If you assign a new system and/or setup password with the jumper on pins 2 and 4, the system disables the new password(s) the next time it boots. 5. Reconnect the system to its electrical outlet and turn the system on, including any attached peripherals. 6. Turn off the system, including any attached peripherals, and disconnect the system from the electrical outlet. 7. Open the system. 8. Move the jumper on the system-board jumper from pins 2 and 4 to pins 4 and 6. 9. Close the system. 10. Reconnect the system to its electrical outlet and turn the system on, including any attached peripherals. 11. Assign a new system and/or setup password. 112
-
 1
1 -
2
-
3
-
4
-
5
-
6
-
7
-
8
-
9
-
10
-
11
-
12
-
13
-
14
-
15
-
16
-
17
-
18
-
19
-
20
-
21
-
22
-
23
-
24
-
25
-
26
-
27
-
28
-
29
-
30
-
31
-
32
-
33
-
34
-
35
-
36
-
37
-
38
-
39
-
40
-
41
-
42
-
43
-
44
-
45
-
46
-
47
-
48
-
49
-
50
-
51
-
52
-
53
-
54
-
55
-
56
-
57
-
58
-
59
-
60
-
61
-
62
-
63
-
64
-
65
-
66
-
67
-
68
-
69
-
70
-
71
-
72
-
73
-
74
-
75
-
76
-
77
-
78
-
79
-
80
-
81
-
82
-
83
-
84
-
85
-
86
-
87
-
88
-
89
-
90
-
91
-
92
-
93
-
94
-
95
-
96
-
97
-
98
-
99
-
100
-
101
-
102
-
103
-
104
-
105
-
106
-
 107
107 -
 108
108 -
 109
109 -
 110
110 -
 111
111 -
 112
112 -
 113
113 -
 114
114 -
 115
115 -
 116
116 -
 117
117 -
118
-
119
-
120
-
121
-
122
-
123
-
124
-
125
-
126
-
127
-
128
-
129
-
130
-
131
-
132
-
133
 |
 |