Dell External OEMR R620 Owners Manual - Page 61
Internal Dual SD Module, Removing The Internal Dual SD Module
 |
View all Dell External OEMR R620 manuals
Add to My Manuals
Save this manual to your list of manuals |
Page 61 highlights
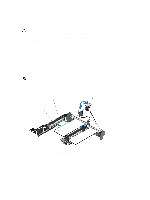
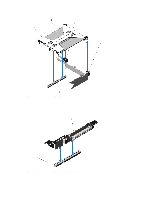
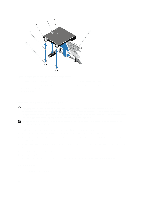
1. SD vFlash card 2. SD vFlash card slot 4. To install the SD vFlash card, with the label side facing up, insert the contact-pin end of the SD card into the card slot on the module. NOTE: The slot is keyed to ensure correct insertion of the card. 5. Press inward on the card to lock it into the slot. Internal Dual SD Module NOTE: When the Redundancy option is set to Mirror Mode in the Integrated Devices screen of the System Setup, the information is replicated from one SD card to another. Removing The Internal Dual SD Module CAUTION: Many repairs may only be done by a certified service technician. You should only perform troubleshooting and simple repairs as authorized in your product documentation, or as directed by the online or telephone service and support team. Damage due to servicing that is not authorized by Dell is not covered by your warranty. Read and follow the safety instructions that came with the product. 1. Turn off the system, including any attached peripherals, and disconnect the system from the electrical outlet and peripherals. 2. Open the system. 3. Locate the internal dual SD module installed on the J_RIPS connector on the system board. 4. If applicable, remove the SD card(s). 5. Holding the tab, pull the dual SD module to remove it from the system board. 6. Close the system. 7. Reconnect the system to its electrical outlet and turn the system on, including any attached peripherals. 61
-
 1
1 -
2
-
3
-
4
-
5
-
6
-
7
-
8
-
9
-
10
-
11
-
12
-
13
-
14
-
15
-
16
-
17
-
18
-
19
-
20
-
21
-
22
-
23
-
24
-
25
-
26
-
27
-
28
-
29
-
30
-
31
-
32
-
33
-
34
-
35
-
36
-
37
-
38
-
39
-
40
-
41
-
42
-
43
-
44
-
45
-
46
-
47
-
48
-
49
-
50
-
51
-
52
-
53
-
54
-
55
-
 56
56 -
 57
57 -
 58
58 -
 59
59 -
 60
60 -
 61
61 -
 62
62 -
 63
63 -
 64
64 -
 65
65 -
 66
66 -
67
-
68
-
69
-
70
-
71
-
72
-
73
-
74
-
75
-
76
-
77
-
78
-
79
-
80
-
81
-
82
-
83
-
84
-
85
-
86
-
87
-
88
-
89
-
90
-
91
-
92
-
93
-
94
-
95
-
96
-
97
-
98
-
99
-
100
-
101
-
102
-
103
-
104
-
105
-
106
-
107
-
108
-
109
-
110
-
111
-
112
-
113
-
114
-
115
-
116
-
117
-
118
-
119
-
120
-
121
-
122
-
123
-
124
-
125
-
126
-
127
-
128
-
129
-
130
-
131
-
132
-
133
 |
 |
