Dell Force10 S25N-S50N Basic Layer 2 Setup and Buffer Tuning of the S50N for S
Dell Force10 S25N-S50N Manual
 |
View all Dell Force10 S25N-S50N manuals
Add to My Manuals
Save this manual to your list of manuals |
Dell Force10 S25N-S50N manual content summary:
- Dell Force10 S25N-S50N | Basic Layer 2 Setup and Buffer Tuning of the S50N for S - Page 1
Setting up passwords for managing the switch. For details on management, see the Management chapter in the FTOS Configuration Guide for the S-Series and the Control and from the Documentation tab of iSupport at the Force10 Networks website: https://www.force10networks.com/CSPortal20/KnowledgeBase/ - Dell Force10 S25N-S50N | Basic Layer 2 Setup and Buffer Tuning of the S50N for S - Page 2
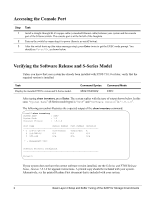
7590004800 B 0 S50-PWR-AC N/A N/A N/A 0 S50-FAN N/A N/A N/A * - Management Unit Software Protocol Configured Force10> If your system does not have the correct software version installed, see the S-Series and FTOS Release Notes, Version 7.8.1.0 for upgrade instructions. A printed copy - Dell Force10 S25N-S50N | Basic Layer 2 Setup and Buffer Tuning of the S50N for S - Page 3
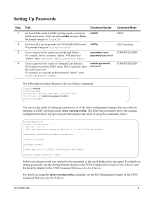
the part that displays the result of using the commands, above: Force10#show run Current Configuration ... ! Version 7.8.1.0 ! Last configuration change setting passwords, see the Getting Started chapter in the FTOS Configuration Guide for the S-Series and the Security chapter in the FTOS Command - Dell Force10 S25N-S50N | Basic Layer 2 Setup and Buffer Tuning of the S50N for S - Page 4
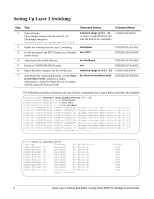
ID is 0. (A space is required before and The prompt changes to: after the dash in the command.) Force10(conf-if-range-gi-0/1-24)# 2 Enable the selected ports for Layer 2 switching. switchport INTERFACE RANGE 3 Set the maximum Link MTU (frame size) to handle mtu 9252 Jumbo frames. INTERFACE - Dell Force10 S25N-S50N | Basic Layer 2 Setup and Buffer Tuning of the S50N for S - Page 5
your switch allocates buffers from its available memory, and helps prevent packet drops during a temporary burst of traffic. Force10 recommends Ethernet Pause Frames, see that Release Notes document and the FTOS Configuration Guide for the S-Series. Figure 1 Buffer Carving for 1Gig Interfaces in a - Dell Force10 S25N-S50N | Basic Layer 2 Setup and Buffer Tuning of the S50N for S - Page 6
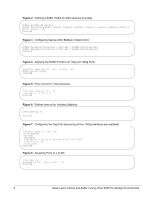
queue3 3 queue4 3 queue5 3 queue6 3 queue7 3 buffer dynamic 1257 Force10# Figure 3 Configuring Internal ASIC Buffers in Stack Unit 0 ! buffer fp- hig buffer fp-uplink stack-unit 0 port-set 1 buffer-policy eql-hig Force10# Figure 4 Applying the Buffer Profile to all 1Gig and 10Gig Ports ! interface range - Dell Force10 S25N-S50N | Basic Layer 2 Setup and Buffer Tuning of the S50N for S - Page 7
model, see Basic Layer 2 Setup and Buffer Tuning of the S50N for Storage Environments. Step 1 2 3 4 5 6 7 8 9 10 Task Command Syntax Command Mode Apply the "eql-hig" buffer profile to another stack member. Select all ports on the switch. Apply the "eql-fp" buffer profile to the ports selected - Dell Force10 S25N-S50N | Basic Layer 2 Setup and Buffer Tuning of the S50N for S - Page 8
8 Basic Layer 2 Setup and Buffer Tuning of the S25P for Storage Environments
-
 1
1 -
 2
2 -
 3
3 -
 4
4 -
 5
5 -
 6
6 -
 7
7 -
8
 |
 |

101-00337-00
1
Basic Layer 2 Setup and Buffer Tuning of the
S25P for Storage Environments
Introduction
This document is intended for the users of S-Series S25P switches running FTOS 7.8.1.0 and configured
for use in a storage environment. This document describes:
•
Using the console port to enable all ports on the switch for Layer 2 switching
•
Verifying that the installed FTOS software is FTOS 7.8.1.0
•
Setting up passwords for managing the switch. For details on management, see the Management
chapter in the
FTOS Configuration Guide for the S-Series
and the Control and Monitoring chapter in
the
FTOS Command Reference
for the S-Series
.
•
Optimizing the buffer for use in pure storage environments
This document does not cover:
•
Installing optional modules. For installation details, see the document
Installing S25P Systems
. For a
configuration example, see
Figure 7 on page 6
here.
•
Adding the switch to an S-Series stack. For stacking configuration details, see the Stacking chapters in
the
Configuration Guide
and the
Command Reference
listed above.
•
Layer 3 (IP addressing) configuration. For details, see the Interfaces and IP Addressing chapters in the
Configuration Guide
and Interface Commands chapter in the
Command Reference
listed above.
The full S-Series documentation set is available on the Technical Documentation CD-ROM and from the
Documentation tab of iSupport at the Force10 Networks website:
This document contains the following sections:
•
Accessing the Console Port on page 2
•
Setting Up Passwords on page 3
•
Setting Up Layer 2 Switching on page 4
•
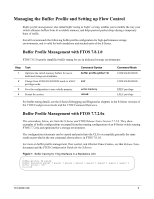
Managing the Buffer Profile and Setting up Flow Control on page 5