Dell Force10 S55T Quick Start Guide
Dell Force10 S55T Manual
 |
View all Dell Force10 S55T manuals
Add to My Manuals
Save this manual to your list of manuals |
Dell Force10 S55T manual content summary:
- Dell Force10 S55T | Quick Start Guide - Page 1
Dell Force10 S55 and S60 Systems Quick Start Guide Regulatory Model: S55/S60 - Dell Force10 S55T | Quick Start Guide - Page 2
- Dell Force10 S55T | Quick Start Guide - Page 3
Dell Force10 S55 and S60 Systems Quick Start Guide Regulatory Model: S55/S60 - Dell Force10 S55T | Quick Start Guide - Page 4
instructions are not followed. WARNING: A WARNING indicates a potential for property damage, personal injury, or death. If you purchased a Dell © 2011 Dell Inc. All Dell Inc. is strictly forbidden. Trademarks used in this text: Dell™, the DELL logo, Dell Dell Inc. disclaims any proprietary interest in trademarks - Dell Force10 S55T | Quick Start Guide - Page 5
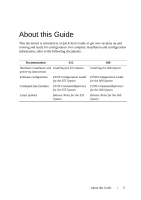
as a Quick Start Guide to get new systems up and running and ready for configuration. For complete installation and configuration information, refer to the following documents: Documentation S55 Hardware installation and Installing the S55 System power-up instructions Software configuration FTOS - Dell Force10 S55T | Quick Start Guide - Page 6
4 About this Guide - Dell Force10 S55T | Quick Start Guide - Page 7
systems, Dell Force10 recommends that you complete the installation procedures in the order presented below. NOTE: Unless stated otherwise, the installation instructions below apply to both the S55 and S60 chassis. Always handle the system and its components with care. Avoid dropping the switch or - Dell Force10 S55T | Quick Start Guide - Page 8
" faces the PSU and the outside of the chassis. S55 Power Supply/Fan Module View from Chassis Rear Connect to Rack/Cabinet (ears) Screws S60 View from Chassis Front Screws Power Supply/Fan Module Connect to Rack/Cabinet (ears) Power Supply View from chassis rear - Dell Force10 S55T | Quick Start Guide - Page 9
The system is shipped with necessary 10-32 screw(s) for attaching a ground cable to the chassis. The cable itself is not included. Dell Force10 recommends a 6AWG one-hole (for the S55) or two-hole (for the S60) lug, #10 hole size, 63" spacing (not included in shipping) to properly ground the chassis - Dell Force10 S55T | Quick Start Guide - Page 10
internal tooth lock washer. Each screw should be torqued to 20 in-lbs. S55 S60 1 2 4 Attach the other end of the ground cable to a for attaching a ground cable to the chassis. The cable itself is not included. Dell Force10 recommends a 6AWG two-hole lug, #10 hole size, 63" spacing (not - Dell Force10 S55T | Quick Start Guide - Page 11
S55 has 4 SFP optical ports in the PSU side of the chassis in addition to the optional SFP+ optical modules. • The S60 has 4 SFP optical ports in the front of the chassis in addition to the optional SFP+ optical modules place. NOTE: For details on Dell Force10 supported optics, refer to http://www. - Dell Force10 S55T | Quick Start Guide - Page 12
devices are used. • All protective covers are in place. • Blank panels are installed if optional modules are not installed. • Blank panels are installed if redundant power supplies are not installed on the S55. NOTE: A US AC power cable is included in the shipping container for powering up an - Dell Force10 S55T | Quick Start Guide - Page 13
cover over the DC connectors. 4 Turn the power switch on. Power Supplies The S55 and S60 chassis are designed to support two hot-swappable power supplies with integrated fans that provide the cooling for the chassis. There are two types of power supplies (AC or DC) and there are two air-flow - Dell Force10 S55T | Quick Start Guide - Page 14
the PSU or as an independent fan module), the system will shut down in 1 minute. The S55 and the S60 both support two airflow direction options. Only a new equipment installation). Specifications Chassis Physical Design Parameter S55 Specifications S60 Specifications Height 1.73 inches (4.4 cm - Dell Force10 S55T | Quick Start Guide - Page 15
Bellcore GR-63 AC Power Requirements Parameter S55 Specifications Nominal Input Voltage 100 to 240 VAC, 47-63 Hz Maximum AC Power 5 A System Power Input 135 W 225W Power Supplies The S55 and the S60 are designed to support two hot-swappable power supplies with integrated fans that - Dell Force10 S55T | Quick Start Guide - Page 16
cable from the modules prior to removing the module itself. Power supply and screw terminals that attach to the main power. Dell Force10 recommends using a longer cable, to ensure sufficient room. the AC power connections must use a surge protection device (SPD) to protect the AC power supplies - Dell Force10 S55T | Quick Start Guide - Page 17
into a slot. This may damage the power supply or the chassis. S55 S60 PSU0 Fan Module Optional Module Cable Connector PSU1 Grab Handle Securing Screw Fans and Filters PSU0 Grab Handle PSU1 DC Power Connector Power Switch Step Task 1 Take the power supply unit out of the shipping box - Dell Force10 S55T | Quick Start Guide - Page 18
16 Installing the Hardware - Dell Force10 S55T | Quick Start Guide - Page 19
Console Access NOTE: You must have a password configured on a virtual terminal line before you can acts exactly as the console port. By default, the S55/S60 sends system messages to the serial console port. port is also connected. You can switch between console connections by physically connecting or - Dell Force10 S55T | Quick Start Guide - Page 20
-45 Console Port S60 Console Port Step Task 1 Install an RJ-45 copper cable into the console port.Use a rollover (crossover) cable to connect the S55 or S60 console port to a terminal server. 2 Connect the other end of the cable to the DTE terminal server. 3 Terminal settings on the console port - Dell Force10 S55T | Quick Start Guide - Page 21
NC 7 2 4 DTR CTS 8 1 7 RTS USB-B Console The USB-B connector port is labeled on the S55/S60 chassis. It is to the left of the management ports, as you face the rear of the chassis (internet connection required). Contact Dell Force10 TAC for CD, if necessary. Installing the Software 19 - Dell Force10 S55T | Quick Start Guide - Page 22
8 You will see the message below when you are connected to the chassis. Default Configuration A version of the Dell Force10 Operating System (FTOS) is pre-loaded onto the chassis, however the system is not configured when you power up for the first time (except for the default hostname, which is - Dell Force10 S55T | Quick Start Guide - Page 23
Task Command Syntax Create a new host name. hostname name Command Mode CONFIGURATION Access the System Remotely You can configure the system to be accessed remotely by Telnet. Both the S55 and the S60 has a dedicated management port and a management routing table that is separate from the IP - Dell Force10 S55T | Quick Start Guide - Page 24
using a DES encryption method. • enable secret is stored in the running/startup configuration in using a stronger, MD5 encryption method. Dell Force10 recommends using the enable secret password. Task Command Syntax Create a password to enable [password | secret] [level level] access - Dell Force10 S55T | Quick Start Guide - Page 25
vlan vlan-id vlan-id is different from the Default VLAN ID) and enter INTERFACE VLAN mode. CONFIGURATION NOTE: After you create a VLAN, you must assign interfaces in Layer 2 mode to the VLAN to activate the VLAN. Use the show vlan command in the EXEC privilege mode to view the configured VLANs - Dell Force10 S55T | Quick Start Guide - Page 26
: An IP address cannot be assigned to the Default VLAN, which, by default, is VLAN 1. To assign another VLAN ID to the Default VLAN, use the default vlan-id vlan-id command. Task Command Syntax Configure an IP address and mask on ip address ip-address the interface. mask [secondary] Command - Dell Force10 S55T | Quick Start Guide - Page 27
- Dell Force10 S55T | Quick Start Guide - Page 28
Printed in the U.S.A. www.dell.com | support.dell.com
-
 1
1 -
 2
2 -
 3
3 -
 4
4 -
 5
5 -
 6
6 -
 7
7 -
8
-
9
-
10
-
11
-
12
-
13
-
14
-
15
-
16
-
17
-
18
-
19
-
20
-
21
-
22
-
23
-
24
-
25
-
26
-
27
-
28
 |
 |
Dell Force10
S55 and S60 Systems
Quick Start Guide
Regulatory Model: S55/S60