Dell G2410 Setup Guide
Dell G2410 - 24" LCD Monitor Manual
 |
UPC - 042397589447
View all Dell G2410 manuals
Add to My Manuals
Save this manual to your list of manuals |
Dell G2410 manual content summary:
- Dell G2410 | Setup Guide - Page 1
Menu/ OK button 3. OSD-Menu-Taste/OK-Taste 4. Back/ Exit button 4. Zuriick-/Beenden-Taste 5. Power button 5. Stromschalter (with power light indicator) 6. FuBentfernungstaste 6. Stand removal button 7. Sicherheitsverschlussschlitz 7. Security lock slot 8. Dell Soundbar-Tragbiigel 8. Dell - Dell G2410 | Setup Guide - Page 2
Menu/ OK button 3. OSD-Menu-Taste/OK-Taste 4. Back/ Exit button 4. Zurikk-/Beenden-Taste 5. Power button 5. Stromschalter (with power light indicator) 6. FuBentfernungstaste 6. Stand removal button 7. Sicherheitsverschlussschlitz 7. Security lock slot 8. Dell Soundbar-Tragbiigel 8. Dell
-
 1
1 -
 2
2
 |
 |

Setting
Up
Your
onitor
Einrichten
des
Monitors
I
Installation
de
votre
moniteur
I
Configurar
su
monitor
I
Ustawianie
monitora
I
Configuragao
de
seu
monitor
I
Configurazione
del
monitor
!
CAUTION:
Before
setting
up
your
DeIITM
monitor,
see
the
safety
instructions
that
ship
with
your
monitor.
!
VORSICHT:
Bevor
Sie
Ihren
DeIITM-Computer
einrichten
und
in
Betrieb
nehmen,
beachten
Sie
bitte
die
Sicherheitsanweisungen,
die
mit
Ihrem
Computer
mitgeliefert
werden.
!
ATTENTION
:
Avant
de
configurer
et
d'utiliser
votre
ordinateur
DeIITM,
consultez
les
precautions
de
securite
livrees
avec
votre
moniteur.
PRECAUCION:
Antes
de
configurar
y
utilizar
su
equipo
DeIITM,
consulte
las
instrucciones
de
seguridad
que
se
entregan
con
el
mismo.
!
OSTRZEZENIE:
Przed
ustawieniem
i
uruchomieniem
komputera
DeIITM,
sprawdz
instrukcje
bezpieczenstwa
dostarczone
razem
z
monitorem.
11:101:1;
!
CUIDADO:
Antes
de
voce
ajustar
e
operarseu
computador
DeIITM,
veja
as
instrugoes
de
seguranga
que
sao
enviadas
corn
seu
monitor.
!
ATTENZIONE:
Prima
di
installare
ed
usare
it
computer
DeIITM,
leggere
le
istruzioni
di
sicurezza
fornite
in
dotazione
al
monitor.
DeIITM
G2210
Flat
Panel
Monitor
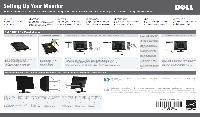
1
Remove
the
cover
and
place
the
monitor
on
it
2
Attach
the
stand
to
the
monitorA
3
Connect
the
monitor
using
ONLY
ONE
of
the
following
cables:
the
Blue
VGA
cable
or
the
White
DVI
cable
NOTE:
It
is
recommended
that
you
connect
the
monitor
using
the
White
DVI
cable
for
better
performance.
Imo
4
Connect
the
power
cable
and
press
the
power
button
Nehmen
Sie
die
Abdeckung
ab,
und
stellen
Sie
den
Monitor
darauf
Enlevez
le
cache
et
placez
le
moniteur
dessus
Extraiga
la
cubierta
y
coloque
el
monitor
sobre
ella
Zdejmij
pokrywe
i
ustaw
na
niej
monitor
Retire
a
cobertura
e
coloque
o
monitor
sobre
a
mesma
Rimuovere
la
copertura
e
collocarvi
spora
it
monitor
z
FuB
am
Monitor
befestigen
Accrochez
le
support
sur
le
moniteur
Acople
la
base
al
monitor
Podtqcz
podstawk
do
monitora
Anexe
o
suporte
no
monitor.
Fissare
it
supporto
al
monitor
im=
‘._-)
Or
SchlieRen
Sie
den
Monitor
nur
mit
einem
der
folgenden
Kabel
an:
dem
blauen
VGA-Kabel
und
dem
weillen
DVI-Kabel
Branchez
le
moniteur
en
utilisant
UN
SEUL
des
cables
suivants
:
le
cable
VGA
bleu
ou
le
cable
DVI
blanc
Conecte
el
monitor
utilizando
SOLO
UNO
de
los
siguientes
cables:
el
cable
VGA
azul
o
el
cable
DVI
blanco
Poduz
monitor
uzywajqc
VVYIACZNIEJEDNEGO
z
nastepujqcych
kabli:
Niebieski
kabel
VGA
lub
bialy
kabel
DVI
Ligue
o
monitor
usando
APENAS
UM
dos
seguintes
cabos:
o
cabo
Azul
VGA
ou
o
cabo
Branco
DVI
Collegare
it
monitor
usando
SOLO
UNO
dei
seguenti
cavi:
it
cavo
VGA
di
colore
blu
oppure
it
cavo
DVI
di
colore
bianco
HINWEIS:
Wir
empfehlen,
den
Monitor
uber
das
weiBe
DVI-Kabel
anzuschlieBen;
so
erzielen
Sie
eine
bessere
Leistung.
REMARQUE
:
Nous
vous
recommandons
d'utiliser
le
cable
DVI
avec
le
moniteur
pour
obtenir
de
meilleures
performances.
NOTA:
se
recomienda
conectar
el
monitor
utilizando
el
cable
DVI
blanco
para
conseguir
un
mejor
rendimiento.
UWAGA:
Dla
uzyskania
lepszej
wydajnoSci
zaleca
sig,
aby
monitor
podlgczya
bialym
kablem
DVI.
■
OBS.:
E
reconnendavel
que
ligue
o
monitor
usando
a
cabo
DVI
Branco
para
uma
melhor
performance.
NOTA:
si
consiglia
di
collegare
it
monitor
usando
it
cavo
DVI
bianco,
per
ottenere
una
prestazione
migliore.
SchlieRen
Sie
das
Netzkabel
an,
und
drucken
Sie
den
Netzschalter.
Branchez
le
cable
d'alimentation
et
appuyez
sur
le
bouton
d'alimentation
Conecte
el
cable
de
alimentaciOn
y
presione
el
boton
de
encendido
Podfqcz
kabel
zasilajqcy
i
naci
nij
przycisk
zasilania
Conecte
o
cabo
de
energia
e
pressione
o
both()
de
energia
Collegare
it
cavo
d'alimentazione
e
premere
it
tasto
d'accensione
About
Your
Monitor
I
Info
zum
Monitor
I
A
propos
de
votre
moniteur
I
Acerca
de
su
monitor
I
Informacje
o
monitorze
I
Sobre
seu
monitor
I
Informazioni
sul
monitor
Finding
Information
For
more
information
see
the
Weitere
Informationen
Weitere
Informationen
linden
Rechercher
des
informations
Pour
plus
d'informations,
reportez-
Busqueda
de
information
Para
mas
information,
consulte
el
Wyszukiwanie
informacji
Dodatkowe
informacje,
patrz
Encontrar
informacoes
Para
obter
mais
informacoes
tr i)
User's
Guide
on
the
Drivers
and
Sie
in
dem
Benutzerhandbuch
vous
au
Guide
de
l'utilisateur
sur
le
manual
del
usuario
en
los
medios
Przewodnik
urytkownika
na
consulte
o
guia
de
usuario
no
Documentation
media.
auf
dem
Treiber-
und
Dokumentationsmedium.
CD
Pilotes
et
Documentation.
de
controladores
y
documentation.
no.Oliku
ze
sterownikami
i
dokumentacja.
CD
do
drive
e
documentacao.
8
1.
Short
Cut
Key
1
1.
Schnelltaste
1
1.
Touche
de
raccourci
1
1.
Boton
de
Acceso
Directo
1
1.
Klawisz
skrotu
1
1.Tecla
de
Atalho
1
1.
Tasto
di
scelta
rapida
1
/
Up
button
/Aufwartstaste
/
Bouton
Haut
/
Baton
Arriba
/
przycisk
w
gorq
/
botdo
Cima
/
pulsante
Su
2.
Short
Cut
Key
2
2.
Schnelltaste
2
2.
Touche
de
raccourci
2
2.
Boton
de
Acceso
Directo
2
2.
Klawisz
skrotu
2
2.Tecla
de
Atalho
2
2.
Tasto
di
scelta
rapida
2
/
Down
button
/Aufwartstaste
/
Bouton
Haut
/
Boton
Arriba
/
przycisk
w
gorc
/
both
Cima
/
pulsante
Su
3.
OSD
Menu/
OK
button
3.
OSD-Menu-Taste/OK-Taste
3.
Bouton
Menu
OSD
/
OK
3.
Boton
del
menu
OSD
/
Boton
Aceptar
3.
Przycisk
menu
OSD/przycisk
OK
3.
Both
de
menu
OSD
/
both
OK
3.
Pulsante
menu
OSD
/
pulsante
OK
4.
Back/
Exit
button
4.
Zuriick-/Beenden-Taste
4.
Bouton
Retour
/
Quitter
4.
Boton
Atras/
Salir
4.
Przycisk
Wstecz/Zakoricz
4.
botao
Voltar/
Sair
4.
Pulsante
lndietro/
Esci
5.
Power
button
5.
Stromschalter
5.
Bouton
marche/arret
5.
Boton
de
Encendido
5.
Przycisk
zasilania
5.
Botao
Alimentacao
5.
Pulsante
accensione
(with
power
light
indicator)
6.
FuBentfernungstaste
6.
Bouton
depose
du
support
6.
Boton
para
extraction
de
la
base
6.
Przycisk
odt4czania
stojaka
6.
Botao
re
remocao
da
base
6.
Pulsante
smontaggio
support
6.
Stand
removal
button
7.
Sicherheitsverschlussschlitz
7.
Fente
du
verrouillage
de
securite
7.
Ranura
de
bloqueo
de
seguridad
7.
Gniazdo
blokady
bezpieczenstwa
7.
Fenda
de
bloqueio
de
seguranca
7.
Apertura
blotto
di
sicurezza
7.
Security
lock
slot
8.
Dell
Soundbar-Tragbiigel
8.
Supports
de
montage
de
la
8.
Soportes
de
montaje
Dell
8.
Uchwyty
monta2owe
panelu
8.
Suportes
de
montagem
da
barra
8.
Staffe
di
montaggio
Soundbar
8.
Dell
Soundbar
mounting
brackets
9.
Kabelfuhrungsoffnung
barre
de
son
Dell
Soundbar
diwiqkowego
Dell
de
som
Dell
9.
Cable
management
slot
9.
Fente
de
gestion
des
cables
9.
Ranura
para
el
manejo
de
los
cables.
9.
Szczelina
zarz4dzania
kablami
9.
Fenda
de
controle
do
cabo
9.
Apertura
passacavi
Printed
in
China
Information
In
this
docurneM
Is
subIecl
to
change
irdheut
notice.
20D8
Doll
Inc
MI
rights
reserved.
DOLL.
Roprosseen
ol
too
materials
In
ary
manner
wha:suever
w
thou:
the
written
permission
of
Dell
Inc.
is
strictly
forbidden
1)95
ant
the
OH
f
logo
are
trade
-
larks
et
Dell
Inc..
De
disclaims
proonelary
rteres:
in
:he
marl.
and
rameS
et
Otter).
January
2009
Les
Intormallons
mines
dans
ce
document
sant
',sidles
a
modifications
sans
preasis.
O2098
Dell
Inc
loos
darns
reserves.
I
a
royoductIrr
de
COS
CCIlent,
de
C.MIQu0
lam
sirs
la
permission
acne
de
Dell
Inc.
eStl
Stroternont
Mterdte.
La
Inlormaclon
de
act,
document°
so
oncuanna
nista
a
cambios
sin
arise
previa.
O2008
Bail
in,
Todos
los
earaches
reservadoz.
tar
eproduccl0n
dllhos
ratola
as
sin
°onion
10
mrito
de
Dell
Inc.
[meta
erminelemente
oreltiOrla
tied
e1
1e
logo
sc.!
des
marques
aposees
de
Vell
descalga
lodo
oeres
de
propiedad
SG0M
Dell
Inc..
DO
moonce
,)
foul
inter&
de
propfiet6
dans
/as
MaJCdS
y
norribres
de
otras
einmsas.
les
marques
et
noms
des
airtres.
Januar
2009
JenvIer
2009
As
Intormaess
caste
documerrto
est.
Waite,
a
alteracno
tam
3Y190.
O2008
Dell
Inc.
Todo
os
dlrellos
resersados.
A
reproducAo
dostos
materials
ornoualguermanea
sem
a
porissno
escrila
da
Oell
Inc.
a
esuita
.
nenle nano
da.
Dec
o
iogohpo
DELL
sao
17,310)
COMV67/S
da
Dell
Inc..
A
no
neva
valve,
interests
de
propfiedade
em
marcas
c
comes
de
forums.
Enera
2009
Inform*
mood°
or
nInlejosym
dokurnencle
pedlegaje
smianom
bes
upaedsenra.
O2008
Doll
Inc.
Wasystkle
prawn
zatrzateno.
Powielnnie
tych
materiat0w
fi
krtuilwiek
510000
be,
pisemnej
zgody
Dell
Inc.
jest
wows,
sabronione.
Doll
i
logo
()ELL
sa
zasIrcoionymi
znakami
Mwamwyrni
0611
Inc..
Amor,
Doll
Opl7eC70
nuntocesowoniu
prOwhmi
wkasnoaci
do
marok
i
narw
naM.tacych
do
innych.
Styczen
2009
La
Inlormealonl
dl
[motto
documonlo
some
S0ggotte
a
cambiamenb
sena
prearyiso.
O2008
Dell
Inc.
Tuttl
I
dIrIttl
sand
Hornell
.
0ua
00
dprcc.mlono
dl
pee
=torte,
sirso
'auturiaatione
soils
della
Dell
Inc.
O
sever
-
ante
-
le
Yuibita
Dolled
d
logo
DELL
saw
marchi
di
labbficco
rogystrati
della
Deli
Inc..
Vek
nap
op
imeresse
di
propiem
in
Mara
e
n0,79
Smear
dal
mow.
Janeiro
2009
www
dell.com
I
support.dell.com
1111
7730203890B0A
(DELL
P/N
D482M
Rev.
A00)
Dove
trovare
le
informazioni
Tutte
le
altre
informazioni
si
trovano
sul
supporto
the
contiene
la
Guida
all'uso,i
Drivere
la
Documentazione.
Anderung
dor
Inlarmallonen
In
diocese
0okumonl
jederzeil
verbehalten.
rT,
2008
Dell
Inc
Alle
Rechto
vorbehalten
Ole
Flopmc.mlorung
closer
Mator
alien
untor
Imondo
"sr
Fonn
ohm
d
a
son
-
III
one
Edaubnis
VOA
Dell
Inc.
iel
strengstlens
yorsoten
hell
trod
das
fop
sia0
Waren.;chen
von
Dell
Inc..
Ded
bat
Reine
EigentumsrecIde
Ober
/Oaken
utpd
AMR
andererfnhabef.
Dermal°
2008
-gf
vd
efr
ENERGY
STAR