Dell Inspiron 15R 5537 Owner's Manual - Page 64
Replacing the Display Panel, Procedure, Postrequisites
 |
View all Dell Inspiron 15R 5537 manuals
Add to My Manuals
Save this manual to your list of manuals |
Page 64 highlights
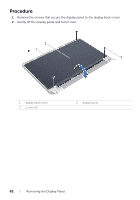
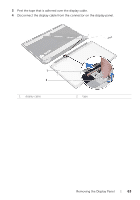
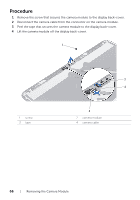
Replacing the Display Panel WARNING: Before working inside your computer, read the safety information that shipped with your computer and follow the steps in "Before You Begin" on page 7. After working inside your computer, follow the instructions in "After Working Inside Your Computer" on page 9. For additional safety best practices information, see the Regulatory Compliance Homepage at dell.com/regulatory_compliance. Procedure 1 Connect the display cable to the connector on the display panel. 2 Adhere the tape that secures the display cable. 3 Gently place the display panel on the display back cover. 4 Align the screw holes on the display panel with the screw holes on the display back-cover. 5 Replace the screws that secure the display panel to the display back-cover. Postrequisites 1 Replace the display hinges. See "Replacing the Display Hinges" on page 60. 2 Replace the display bezel. See "Replacing the Display Bezel" on page 57. 3 Replace the display assembly. See "Replacing the Display Assembly" on page 54. 4 Replace the palm-rest. See "Replacing the Palm-Rest" on page 27. 5 Replace the keyboard. See "Replacing the Keyboard" on page 23. 6 Replace the optical-drive assembly. See "Replacing the Optical-Drive Assembly" on page 17. 7 Replace the hard-drive assembly. See "Replacing the Hard-Drive Assembly" on page 20. 8 Follow the instructions from step 3 and step 4 in "Replacing the Memory Module(s)" on page 14. 9 Replace the battery. See "Replacing the Battery" on page 11. 64 | Replacing the Display Panel
-
 1
1 -
2
-
3
-
4
-
5
-
6
-
7
-
8
-
9
-
10
-
11
-
12
-
13
-
14
-
15
-
16
-
17
-
18
-
19
-
20
-
21
-
22
-
23
-
24
-
25
-
26
-
27
-
28
-
29
-
30
-
31
-
32
-
33
-
34
-
35
-
36
-
37
-
38
-
39
-
40
-
41
-
42
-
43
-
44
-
45
-
46
-
47
-
48
-
49
-
50
-
51
-
52
-
53
-
54
-
55
-
56
-
57
-
58
-
 59
59 -
 60
60 -
 61
61 -
 62
62 -
 63
63 -
 64
64 -
 65
65 -
 66
66 -
 67
67 -
 68
68
 |
 |