Dell Inspiron 530S Owner's Manual - Page 140
Drive to the correct configuration., enter system setup see System Setup on then go to
 |
View all Dell Inspiron 530S manuals
Add to My Manuals
Save this manual to your list of manuals |
Page 140 highlights
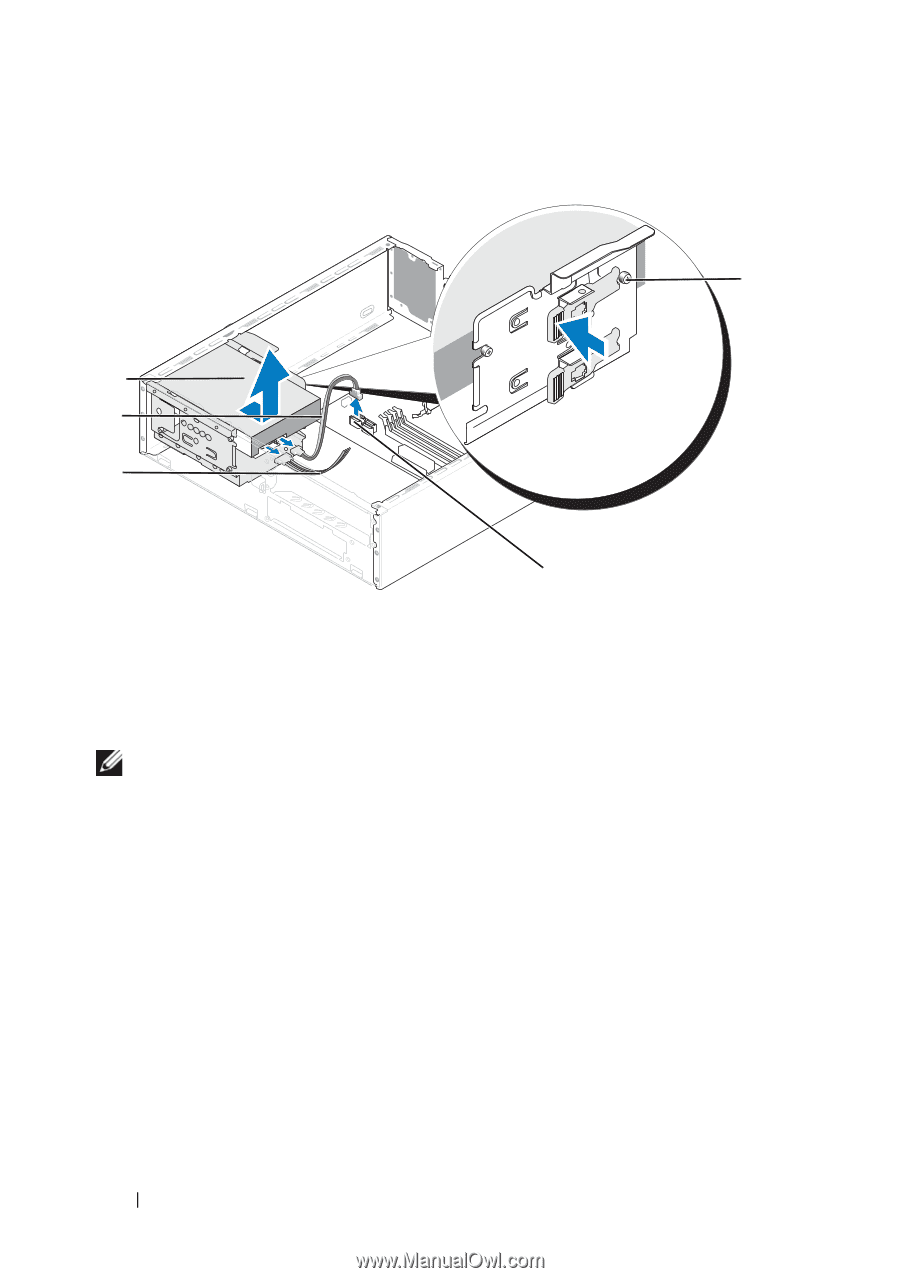
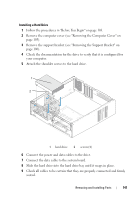
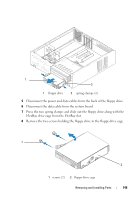
1 5 4 3 2 1 shoulder screws (4) 4 serial ATA data cable 2 system board connector 5 hard drive 3 power cable NOTE: The location of connectors on the system board may vary depending on your compute. See "Inside View of Your Computer" on page 108. 6 Press in on the securing tab on the side of the drive and slide the drive up and out. 7 If removing this drive changes the drive configuration, then be sure to reflect these changes in system setup. When you restart your computer, enter system setup (see "System Setup" on page 185), then go to the "Drives" section of the System Setup and under Drive 0 through 3, set the Drive to the correct configuration. 8 Replace the support bracket (see "Replacing the Support Bracket" on page 173). 9 Replace the computer cover (see "Replacing the Computer Cover" on page 174). 10 Connect computer and other devices to an electrical outlet. 140 Removing and Installing Parts
-
 1
1 -
2
-
3
-
4
-
5
-
6
-
7
-
8
-
9
-
10
-
11
-
12
-
13
-
14
-
15
-
16
-
17
-
18
-
19
-
20
-
21
-
22
-
23
-
24
-
25
-
26
-
27
-
28
-
29
-
30
-
31
-
32
-
33
-
34
-
35
-
36
-
37
-
38
-
39
-
40
-
41
-
42
-
43
-
44
-
45
-
46
-
47
-
48
-
49
-
50
-
51
-
52
-
53
-
54
-
55
-
56
-
57
-
58
-
59
-
60
-
61
-
62
-
63
-
64
-
65
-
66
-
67
-
68
-
69
-
70
-
71
-
72
-
73
-
74
-
75
-
76
-
77
-
78
-
79
-
80
-
81
-
82
-
83
-
84
-
85
-
86
-
87
-
88
-
89
-
90
-
91
-
92
-
93
-
94
-
95
-
96
-
97
-
98
-
99
-
100
-
101
-
102
-
103
-
104
-
105
-
106
-
107
-
108
-
109
-
110
-
111
-
112
-
113
-
114
-
115
-
116
-
117
-
118
-
119
-
120
-
121
-
122
-
123
-
124
-
125
-
126
-
127
-
128
-
129
-
130
-
131
-
132
-
133
-
134
-
 135
135 -
 136
136 -
 137
137 -
 138
138 -
 139
139 -
 140
140 -
 141
141 -
 142
142 -
 143
143 -
 144
144 -
 145
145 -
146
-
147
-
148
-
149
-
150
-
151
-
152
-
153
-
154
-
155
-
156
-
157
-
158
-
159
-
160
-
161
-
162
-
163
-
164
-
165
-
166
-
167
-
168
-
169
-
170
-
171
-
172
-
173
-
174
-
175
-
176
-
177
-
178
-
179
-
180
-
181
-
182
-
183
-
184
-
185
-
186
-
187
-
188
-
189
-
190
-
191
-
192
-
193
-
194
-
195
-
196
-
197
-
198
-
199
-
200
-
201
-
202
-
203
-
204
-
205
-
206
-
207
-
208
-
209
-
210
-
211
-
212
-
213
-
214
-
215
-
216
-
217
-
218
-
219
-
220
-
221
-
222
 |
 |