Dell Inspiron 530S Owner's Manual - Page 148
Replace the CD or DVD drive see Installing a CD/DVD Drive on, Check all cable connections
 |
View all Dell Inspiron 530S manuals
Add to My Manuals
Save this manual to your list of manuals |
Page 148 highlights
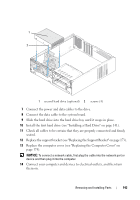
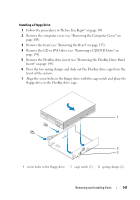
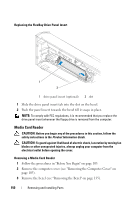
8 Tighten the two screws on the other side to secure the floppy drive in the FlexBay drive cage. 9 Slide the FlexBay drive cage along with the floppy drive in the FlexBay slot till it snaps in place. 10 Attach the power and data cables to the floppy drive. 11 Connect the other end of the data cable to the connector labeled "FLOPPY" on the system board (see "System Board Components" on page 109). 1 1 floppy drive 12 Check all cable connections, and fold cables out of the way to avoid blocking airflow between the fan and cooling vents. 13 Replace the CD or DVD drive (see "Installing a CD/DVD Drive" on page 155). 14 Replace the bezel (see "Replacing the Bezel" on page 136). 148 Removing and Installing Parts
-
 1
1 -
2
-
3
-
4
-
5
-
6
-
7
-
8
-
9
-
10
-
11
-
12
-
13
-
14
-
15
-
16
-
17
-
18
-
19
-
20
-
21
-
22
-
23
-
24
-
25
-
26
-
27
-
28
-
29
-
30
-
31
-
32
-
33
-
34
-
35
-
36
-
37
-
38
-
39
-
40
-
41
-
42
-
43
-
44
-
45
-
46
-
47
-
48
-
49
-
50
-
51
-
52
-
53
-
54
-
55
-
56
-
57
-
58
-
59
-
60
-
61
-
62
-
63
-
64
-
65
-
66
-
67
-
68
-
69
-
70
-
71
-
72
-
73
-
74
-
75
-
76
-
77
-
78
-
79
-
80
-
81
-
82
-
83
-
84
-
85
-
86
-
87
-
88
-
89
-
90
-
91
-
92
-
93
-
94
-
95
-
96
-
97
-
98
-
99
-
100
-
101
-
102
-
103
-
104
-
105
-
106
-
107
-
108
-
109
-
110
-
111
-
112
-
113
-
114
-
115
-
116
-
117
-
118
-
119
-
120
-
121
-
122
-
123
-
124
-
125
-
126
-
127
-
128
-
129
-
130
-
131
-
132
-
133
-
134
-
135
-
136
-
137
-
138
-
139
-
140
-
141
-
142
-
 143
143 -
 144
144 -
 145
145 -
 146
146 -
 147
147 -
 148
148 -
 149
149 -
 150
150 -
 151
151 -
 152
152 -
 153
153 -
154
-
155
-
156
-
157
-
158
-
159
-
160
-
161
-
162
-
163
-
164
-
165
-
166
-
167
-
168
-
169
-
170
-
171
-
172
-
173
-
174
-
175
-
176
-
177
-
178
-
179
-
180
-
181
-
182
-
183
-
184
-
185
-
186
-
187
-
188
-
189
-
190
-
191
-
192
-
193
-
194
-
195
-
196
-
197
-
198
-
199
-
200
-
201
-
202
-
203
-
204
-
205
-
206
-
207
-
208
-
209
-
210
-
211
-
212
-
213
-
214
-
215
-
216
-
217
-
218
-
219
-
220
-
221
-
222
 |
 |
148
Removing and Installing Parts
8
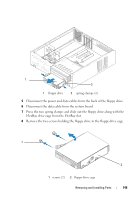
Tighten the two screws on the other side to secure the floppy drive in the
FlexBay drive cage.
9
Slide the FlexBay drive cage along with the floppy drive in the FlexBay slot
till it snaps in place.
10
Attach the power and data cables to the floppy drive.
11
Connect the other end of the data cable to the connector labeled
"FLOPPY" on the system board (see "System Board Components" on
page 109).
12
Check all cable connections, and fold cables out of the way to avoid
blocking airflow between the fan and cooling vents.
13
Replace the CD or DVD drive (see "Installing a CD/DVD Drive" on
page 155).
14
Replace the bezel (see "Replacing the Bezel" on page 136).
1
floppy drive
1