Dell Inspiron 530S Owner's Manual - Page 16
NOTICE, Media Card Reader, see Media Card Reader
 |
View all Dell Inspiron 530S manuals
Add to My Manuals
Save this manual to your list of manuals |
Page 16 highlights
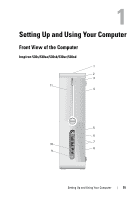
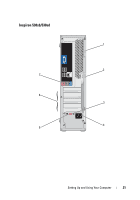
1 Service Tag (located on Use the Service Tag to identify your computer top of the chassis when you access the Dell Support website or call towards the back) technical support. 2 eject button for CD/DVD Press here to open/close the CD/DVD drive. drive 3 Flexbay open/close Press here to open or close the floppy/media card reader panel 4 FlexBay drive Can contain an optional floppy drive or optional Media Card Reader. For information on using the Media Card Reader, see "Media Card Reader" on page 150. 5 power button Press the power button to turn on the computer. NOTICE: To avoid losing data, do not use the power button to turn off the computer. Instead, perform an operating system shutdown. 6 power light The light in the center of this button indicates power state. 7 USB 2.0 connectors (2) Use the front USB connectors for devices that you connect occasionally, such as joysticks or cameras, or for bootable USB devices (see "System Setup Options" on page 186 for more information on booting to a USB device). It is recommended that you use the back USB connectors for devices that typically remain connected, such as printers and keyboards. 8 microphone connector Use the microphone connector to attach a personal computer microphone for voice or musical input into a sound or telephony program. On computers with a sound card, the microphone connector is on the card. 9 drive activity light The drive activity light is on when the computer reads data from or writes data to the hard drive. The light might also be on when a device such as a CD player is operating. 10 headphone connector Use the headphone connector to attach headphones and most kinds of speakers. 11 CD/DVD drive panel This panel covers the CD/DVD drive. 16 Setting Up and Using Your Computer
-
 1
1 -
2
-
3
-
4
-
5
-
6
-
7
-
8
-
9
-
10
-
 11
11 -
 12
12 -
 13
13 -
 14
14 -
 15
15 -
 16
16 -
 17
17 -
 18
18 -
 19
19 -
 20
20 -
 21
21 -
22
-
23
-
24
-
25
-
26
-
27
-
28
-
29
-
30
-
31
-
32
-
33
-
34
-
35
-
36
-
37
-
38
-
39
-
40
-
41
-
42
-
43
-
44
-
45
-
46
-
47
-
48
-
49
-
50
-
51
-
52
-
53
-
54
-
55
-
56
-
57
-
58
-
59
-
60
-
61
-
62
-
63
-
64
-
65
-
66
-
67
-
68
-
69
-
70
-
71
-
72
-
73
-
74
-
75
-
76
-
77
-
78
-
79
-
80
-
81
-
82
-
83
-
84
-
85
-
86
-
87
-
88
-
89
-
90
-
91
-
92
-
93
-
94
-
95
-
96
-
97
-
98
-
99
-
100
-
101
-
102
-
103
-
104
-
105
-
106
-
107
-
108
-
109
-
110
-
111
-
112
-
113
-
114
-
115
-
116
-
117
-
118
-
119
-
120
-
121
-
122
-
123
-
124
-
125
-
126
-
127
-
128
-
129
-
130
-
131
-
132
-
133
-
134
-
135
-
136
-
137
-
138
-
139
-
140
-
141
-
142
-
143
-
144
-
145
-
146
-
147
-
148
-
149
-
150
-
151
-
152
-
153
-
154
-
155
-
156
-
157
-
158
-
159
-
160
-
161
-
162
-
163
-
164
-
165
-
166
-
167
-
168
-
169
-
170
-
171
-
172
-
173
-
174
-
175
-
176
-
177
-
178
-
179
-
180
-
181
-
182
-
183
-
184
-
185
-
186
-
187
-
188
-
189
-
190
-
191
-
192
-
193
-
194
-
195
-
196
-
197
-
198
-
199
-
200
-
201
-
202
-
203
-
204
-
205
-
206
-
207
-
208
-
209
-
210
-
211
-
212
-
213
-
214
-
215
-
216
-
217
-
218
-
219
-
220
-
221
-
222
 |
 |