Dell Latitude 12 Rugged 7202 Dell Latitude 12 Rugged Tablet-7202\u0026#160; Us
Dell Latitude 12 Rugged 7202 Manual
 |
View all Dell Latitude 12 Rugged 7202 manuals
Add to My Manuals
Save this manual to your list of manuals |
Dell Latitude 12 Rugged 7202 manual content summary:
- Dell Latitude 12 Rugged 7202 | Dell Latitude 12 Rugged Tablet-7202\u0026#160; Us - Page 1
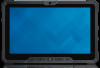
Dell Latitude 12 Rugged Tablet-7202 User's Guide Regulatory Model: T03H Regulatory Type: T03H001 - Dell Latitude 12 Rugged 7202 | Dell Latitude 12 Rugged Tablet-7202\u0026#160; Us - Page 2
damage to hardware or loss of data and tells you how to avoid the problem. WARNING: A WARNING indicates a potential for property damage, personal injury, or death. © 2015 Dell Inc. All Rights Reserved. Trademarks used in this text: Dell™, the DELL logo, Venue™, and Wi-Fi Catcher™ are trademarks of - Dell Latitude 12 Rugged 7202 | Dell Latitude 12 Rugged Tablet-7202\u0026#160; Us - Page 3
Using power buttonUsing Charms 8 3 Using Your Tablet 9 Screen Orientation...9 How to lock / unlock the screen orientation 9 Adjusting the screen brightness...9 Gestures...10 Right-Click...12 The Windows Start Screen...12 Customizing the Applications...12 How to access the Start screen...13 Get - Dell Latitude 12 Rugged 7202 | Dell Latitude 12 Rugged Tablet-7202\u0026#160; Us - Page 4
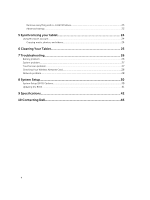
6 Cleaning Your Tablet 25 7 Troubleshooting 26 Battery problem...26 System problem...27 Touchscreen problem...27 Checking Your Wireless Network Card 28 Network problem...28 8 System Setup...30 System Setup (BIOS) Options...30 Updating the BIOS ...41 9 Specifications...42 10 Contacting Dell 46 4 - Dell Latitude 12 Rugged 7202 | Dell Latitude 12 Rugged Tablet-7202\u0026#160; Us - Page 5
only perform troubleshooting and simple repairs as authorized in your product documentation, or as directed by the online or telephone service and support team. Damage due to servicing that is not authorized by Dell is not covered by your warranty. Read and follow the safety instructions that came - Dell Latitude 12 Rugged 7202 | Dell Latitude 12 Rugged Tablet-7202\u0026#160; Us - Page 6
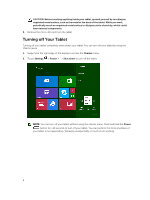
static electricity, which could harm internal components. 6. Remove the micro-SD card from the tablet. Turning off Your Tablet Turning off your tablet completely shuts down your tablet. You can turn off your tablet by using the charms menu: 1. Swipe from the right edge of the display to access - Dell Latitude 12 Rugged 7202 | Dell Latitude 12 Rugged Tablet-7202\u0026#160; Us - Page 7
icon Description Battery is fully charged and AC adapter is connected. Battery is charging with AC adapter. Your tablet is running on battery power and the battery is discharging. Your tablet is plugged in, and either no battery is detected or the battery is not working correctly. Battery is - Dell Latitude 12 Rugged 7202 | Dell Latitude 12 Rugged Tablet-7202\u0026#160; Us - Page 8
your finger from the bottom of the display to switch to the login screen, and then enter the password to log in to Windows. The tablet is ready for use after the Windows Start screen displays. NOTE: If the login screen is not enabled in Windows 8.1, you will be taken directly - Dell Latitude 12 Rugged 7202 | Dell Latitude 12 Rugged Tablet-7202\u0026#160; Us - Page 9
viewing experience, the screen orientation changes automatically to portrait or landscape format depending on how you hold the tablet. NOTE: Some applications may not support automatic screen rotation to portrait or landscape format. How to lock / unlock the screen orientation 1. Swipe from the - Dell Latitude 12 Rugged 7202 | Dell Latitude 12 Rugged Tablet-7202\u0026#160; Us - Page 10
to operate the tablet. Gesture Actions Touch Tap gently on the display with your fingertip. Functions • Select items on the screen, including options, entries, images, and icons • Start applications • Touch buttons on the screen • Input text using the on-screen keyboard Touch and Hold Touch - Dell Latitude 12 Rugged 7202 | Dell Latitude 12 Rugged Tablet-7202\u0026#160; Us - Page 11
Gesture Actions Functions Drag and Drop Move item such as images and icons on the screen 1. Touch and hold your finger on an item on the screen 2. Keeping your finger in contact with the display, move your fingertip to the desired location 3. Take your finger off the display to drop the item in - Dell Latitude 12 Rugged 7202 | Dell Latitude 12 Rugged Tablet-7202\u0026#160; Us - Page 12
and then move the fingers in a clockwise or counterclockwise arc Right-Click To perform a right-click on your tablet, Touch and Hold your finger for 2 seconds on any section of the screen or an icon and then release the available applications on the Start screen. To customize the applications: 12 - Dell Latitude 12 Rugged 7202 | Dell Latitude 12 Rugged Tablet-7202\u0026#160; Us - Page 13
1. Swipe from the right edge of the display to access the Charms bar, and then touch the Start icon . NOTE: You can also press the Windows button to go to the Start screen. 2. Swipe up from the middle of the display to get the Apps view. 3. Swipe from the top or bottom of the display to access the - Dell Latitude 12 Rugged 7202 | Dell Latitude 12 Rugged Tablet-7202\u0026#160; Us - Page 14
of the display reveals the Charms bar. Charms provide access to the system commands, such as Start, Search, Share, Devices, and Settings options. If your tablet is running on an application or performing actions, pressing the Start icon takes you back to the Start screen. If you are at the Start - Dell Latitude 12 Rugged 7202 | Dell Latitude 12 Rugged Tablet-7202\u0026#160; Us - Page 15
You can also enable the camera (front), when the screen is in lock mode. To enable the camera when the screen is in lock mode: 1. Swipe from the right edge of the display to access the Charms bar. 2. Click Settings → Change PC Settings → PC and Devices 3. Scroll down and navigate to Camera. 4. - Dell Latitude 12 Rugged 7202 | Dell Latitude 12 Rugged Tablet-7202\u0026#160; Us - Page 16
the AC adapter from the electrical outlet and the tablet, disconnect the modem from the wall connector and tablet, and remove any other external cables from the tablet. WARNING: Not for use in hazardous locations. See installation instructions. 1. To remove the battery: a. Unlock the battery release - Dell Latitude 12 Rugged 7202 | Dell Latitude 12 Rugged Tablet-7202\u0026#160; Us - Page 17
NOTE: There are two battery release buttons for removing Battery 1 and Battery 2 on the tablet . 2. Lift the batteries away from the tablet. Installing the Battery 1. Slide the battery into its slot until it clicks into place. 2. Lock the battery by sliding the latch away from it. Installing - Dell Latitude 12 Rugged 7202 | Dell Latitude 12 Rugged Tablet-7202\u0026#160; Us - Page 18
3. Install the battery into the battery bay. 4. Slide the battery release latch in an upwards direction, and then to the right to lock it. 18 - Dell Latitude 12 Rugged 7202 | Dell Latitude 12 Rugged Tablet-7202\u0026#160; Us - Page 19
4 Managing your tablet settings Wi-Fi setting Turning On/Off Wi-Fi 1. Swipe from the right edge of the display to access the Charms bar. 2. Touch Settings → Change - Dell Latitude 12 Rugged 7202 | Dell Latitude 12 Rugged Tablet-7202\u0026#160; Us - Page 20
icon left or right to turn mobile broadband on or off. Connecting to a mobile broadband network 1. Ensure an active SIM card is inserted into the tablet. 2. Swipe from the right edge of the display to access the Charms bar. 20 - Dell Latitude 12 Rugged 7202 | Dell Latitude 12 Rugged Tablet-7202\u0026#160; Us - Page 21
network 1. Swipe from the right edge of the display to access the Charms bar. 2. Touch Setting → Network → Your Service Provider → Disconnect. NOTE: Once your tablet has disconnected from mobile broadband, the option Connect automatically will be disabled as well. Mobile broadband options 1. Swipe - Dell Latitude 12 Rugged 7202 | Dell Latitude 12 Rugged Tablet-7202\u0026#160; Us - Page 22
your SIM card will be locked. To unlock the SIM card, contact your service provider to get a Personal Unblocking Key (PUK) to unlock the SIM card ready. Refreshing / Recovering / Re-setting your tablet You can refresh / recover / restore your tablet to original factory settings. 1. Swipe from the - Dell Latitude 12 Rugged 7202 | Dell Latitude 12 Rugged Tablet-7202\u0026#160; Us - Page 23
. 3. Click Refresh. Click Cancel to cancel this action. Remove everything and re-install Windows This option enables you to recycle or start over your tablet completely, and you can reset to its default / factory settings. If you want to perform this action: 1. Click Get Started. The Reset your PC - Dell Latitude 12 Rugged 7202 | Dell Latitude 12 Rugged Tablet-7202\u0026#160; Us - Page 24
a Micro-SD card to the computer and copy the required files. 2. After the copy is complete, use the Safely Remove Hardware wizard to remove your tablet from the computer. 3. You can also use the Skydrive feature of Win 8.1 to copy music, photos, and videos. 24 - Dell Latitude 12 Rugged 7202 | Dell Latitude 12 Rugged Tablet-7202\u0026#160; Us - Page 25
surface of the tablet until it is clean. Do not allow water from the cloth to seep down to the tablet ports and surrounding Windows button. NOTE: To avoid damaging the tablet or display, follow the instructions that are included with the product. NOTE: Do not clean the keyboard with a moist cloth - Dell Latitude 12 Rugged 7202 | Dell Latitude 12 Rugged Tablet-7202\u0026#160; Us - Page 26
7 Troubleshooting Battery problem Problems Battery does not charge Battery drains quickly even when the tablet is in Standby mode Possible causes Possible solutions • Unplug the Dell AC power adapter from the wall and verify that the outlet is functioning. • Try to connect with another Dell AC - Dell Latitude 12 Rugged 7202 | Dell Latitude 12 Rugged Tablet-7202\u0026#160; Us - Page 27
for 11 seconds to perform a hard shut down. 1. Shut down and restart your tablet. 2. Refresh the tablet. 3. Contact Dell's support service. Go to dell.com/ support or dell.com/ contactdell. Restart your tablet. Software updates may have been downloaded in the background. Swipe from the right edge - Dell Latitude 12 Rugged 7202 | Dell Latitude 12 Rugged Tablet-7202\u0026#160; Us - Page 28
the Windows Help and Support Center: 1. Click Start → Help and Support→ Use Tools to view your computer information and diagnose problems. On the My page if using a public network. 5. Contact your internet service provider for help. 1. Check if the mobile broadband is turned on. See - Dell Latitude 12 Rugged 7202 | Dell Latitude 12 Rugged Tablet-7202\u0026#160; Us - Page 29
• No signal from the service provider. 2. Move your tablet to a different location for better signal reception. Contact your service provider to change your broadband plan. 29 - Dell Latitude 12 Rugged 7202 | Dell Latitude 12 Rugged Tablet-7202\u0026#160; Us - Page 30
the system setup options (BIOS): 1. Connect your tablet to the keyboard dock or connect a USB enabled keyboard to your tablet. 2. Press the Power on your tablet. button to turn on your tablet or restart your tablet, if you have already turned 3. Press F2 after the Dell logo appears. NOTE: You - Dell Latitude 12 Rugged 7202 | Dell Latitude 12 Rugged Tablet-7202\u0026#160; Us - Page 31
of manufacture Displays the ownership date. Displays the Express Service code of the tablet. Displays the memory installed on the tablet. Displays the memory available on the tablet. Displays the memory speed. Displays the memory capacities on the tablet. Displays new type of device file in Linux - Dell Latitude 12 Rugged 7202 | Dell Latitude 12 Rugged Tablet-7202\u0026#160; Us - Page 32
Displays the video controller used in the tablet. Displays the BIOS version number of the tablet. Displays the video memory of the tablet. Displays the panel type used in the tablet. Displays the resolution of the tablet. Displays the audio controller used in the tablet. Displays the Wi-Fi device in - Dell Latitude 12 Rugged 7202 | Dell Latitude 12 Rugged Tablet-7202\u0026#160; Us - Page 33
date. Displays the system time and allows to change the system time. Function Allows you to configure the integrated USB controller. The options: • Enable Boot Support • Enable USB3.0 Controller • Enable External USB Port 33 - Dell Latitude 12 Rugged 7202 | Dell Latitude 12 Rugged Tablet-7202\u0026#160; Us - Page 34
illumination feature. The options are: • Disabled. Default: Enabled • Dim • Bright Allows you to configure the RGB keyboard backlight feature. Allows you to configure the Stealth Mode Feature. The options are: • Enable Stealth Mode • Disable onboard LCD screen • Disable onboard fans • Disable - Dell Latitude 12 Rugged 7202 | Dell Latitude 12 Rugged Tablet-7202\u0026#160; Us - Page 35
• Enter the new password • Confirm the new password Click OK after entering the password details. Allows you to set, change, or delete the tablet password (previously called the primary password). The drive does not have a password set by default. To add a new password: • Enter the old password - Dell Latitude 12 Rugged 7202 | Dell Latitude 12 Rugged Tablet-7202\u0026#160; Us - Page 36
visible to the operating system. TPM Security (Default) • TPM ACPI Support • Deactivate • Activate NOTE: Activation, deactivation, and clear options are you activate / de-activate or disable the BIOS module interface of the optional Computrace Service from Absolute Software. • Deactivate (Default) - Dell Latitude 12 Rugged 7202 | Dell Latitude 12 Rugged Tablet-7202\u0026#160; Us - Page 37
Option OROM Keyboard Access Admin Setup Lockout Description This option determines whether you are able to enter Option ROM Configuration screen through hotkeys, during the system boot. The - Dell Latitude 12 Rugged 7202 | Dell Latitude 12 Rugged Tablet-7202\u0026#160; Us - Page 38
Enabled Table 11. Power Management Option AC Behavior Description Allows the tablet to power-on automatically, when AC adapter is plugged. The • Disabled (Default) • Every Day • Weekdays • Select Days USB Wake Support Wake on LAN/WLAN Allows you to enable the USB devices to wake the system - Dell Latitude 12 Rugged 7202 | Dell Latitude 12 Rugged Tablet-7202\u0026#160; Us - Page 39
Standard • ExpressCharge Table 12. POST Behavior Option Adapter Warnings MEBx Hotkey Fastboot Extended BIOS POST Time Description will prevent F2 BIOS access through USB or Thin / Travel keyboard. You can still access the BIOS Setup, by pressing the Volume Up button after the Dell logo screen - Dell Latitude 12 Rugged 7202 | Dell Latitude 12 Rugged Tablet-7202\u0026#160; Us - Page 40
Table 13. Virtualization Support Option Description Virtualization This option specifies whether 15. Maintenance Option Service Tag Asset Tag BIOS Downgrade Table 16. System Logs Option BIOS events Thermal events Power events Description Displays the service tag of your tablet. Allows you to - Dell Latitude 12 Rugged 7202 | Dell Latitude 12 Rugged Tablet-7202\u0026#160; Us - Page 41
. 1. Restart the tablet. 2. Go to dell.com/support. 3. Enter the Service Tag or Express Service Code and click Submit. NOTE: To locate the Service Tag, click Where is my Service Tag? NOTE: If you cannot find your Service Tag, click Detect My Product. Proceed with the instructions on screen. 4. If - Dell Latitude 12 Rugged 7202 | Dell Latitude 12 Rugged Tablet-7202\u0026#160; Us - Page 42
only those required by law to ship with your computer. For more information about the configuration of your computer, go to Help and Support in your Windows operating system and select the option to view information about your computer. System Information Chipset Integrated in the CPU DRAM bus - Dell Latitude 12 Rugged 7202 | Dell Latitude 12 Rugged Tablet-7202\u0026#160; Us - Page 43
Bluetooth 4.0 LE NOTE: The optional I/O expansion module, if purchased with the tablet, comes equipped with an additional Network port (Ethernet). Ports and Connectors Audio Video .0 mm (10.59 inches) 29.38 mm (1.15 inches) 256.12 mm×144 mm 1366 x 768 pixels 730 nits 0° (closed) to 180° 60 Hz 43 - Dell Latitude 12 Rugged 7202 | Dell Latitude 12 Rugged Tablet-7202\u0026#160; Us - Page 44
Display Feature Minimum viewing angles: Horizontal Vertical Pixel pitch Front camera Type Resolution Rear camera Type Resolution Storage Storage Battery Type Dimensions Length Height Width Weight Voltage Temperature range Operating Non-Operating Coin-cell battery AC Adapter Type Input voltage 44 - Dell Latitude 12 Rugged 7202 | Dell Latitude 12 Rugged Tablet-7202\u0026#160; Us - Page 45
W 2.31 A 19.5 VDC 0 °C to 40 °C (32 °F to 104 °F) -40 °C to 70 °C (-40 °F to 158 °F) 312.20 mm (12.29 inches) 203.00 mm (7.99 inches) 24.40 mm (0.96 inch) 318.20 mm (12.53 inches) 209.00 mm (8.23 inches) 28.90 mm (1.14 inches) 1620 grams (3.57 lb) -29 °C to - Dell Latitude 12 Rugged 7202 | Dell Latitude 12 Rugged Tablet-7202\u0026#160; Us - Page 46
options. Availability varies by country and product, and some services may not be available in your area. To contact Dell for sales, technical support, or customer service issues: 1. Go to support.dell.com. 2. Select your support category. 3. Verify your country or region in the Choose a Country
-
 1
1 -
 2
2 -
 3
3 -
 4
4 -
 5
5 -
 6
6 -
 7
7 -
8
-
9
-
10
-
11
-
12
-
13
-
14
-
15
-
16
-
17
-
18
-
19
-
20
-
21
-
22
-
23
-
24
-
25
-
26
-
27
-
28
-
29
-
30
-
31
-
32
-
33
-
34
-
35
-
36
-
37
-
38
-
39
-
40
-
41
-
42
-
43
-
44
-
45
-
46
 |
 |

Dell Latitude 12 Rugged Tablet-7202
User’s Guide
Regulatory Model: T03H
Regulatory Type: T03H001