Dell Latitude CPi User Guide
Dell Latitude CPi Manual
 |
View all Dell Latitude CPi manuals
Add to My Manuals
Save this manual to your list of manuals |
Dell Latitude CPi manual content summary:
- Dell Latitude CPi | User Guide - Page 1
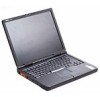
Dell™ Latitude™ CPi A-Series System User's Guide Introduction Setup and Operation Powering Your Computer Traveling With Your Computer Drivers Customizing Your Computer Removing and Replacing Parts Troubleshooting Technical Specifications Getting Help Information in this document is subject to change - Dell Latitude CPi | User Guide - Page 2
Back to Contents Page Introduction: Dell™ Latitude™ CPi A-Series System User's Guide Overview | Hardware Features | Available Options | Getting Help Overview The Dell Latitude CPi A-Series portable computer is an expandable multimedia system designed around an Intel® microprocessor with Peripheral - Dell Latitude CPi | User Guide - Page 3
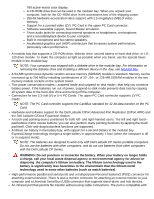
pad buttons 14 Battery bay Figure 2. Back View of the Computer 1 Fan 2 Parallel connector 3 USB connector 4 Status indicator panel 5 Docking connector 6 Docking connector door 7 Serial connector 8 Monitor connector 9 PS/2 connector 10 Infrared port 11 PC card slot 12 Hard-disk drive 13 Security - Dell Latitude CPi | User Guide - Page 4
the hard-disk drive and turning off the computer. Connectors for two 3.3-volt (V) or 5-V PC Cards. The upper PC Card connector supports ZV PC Cards. NOTE: The PC Card controller supports the CardBus standard for 32-bit data transfer on the PC Card. Hardware and software support for the Dell Latitude - Dell Latitude CPi | User Guide - Page 5
, headphones, and microphones Printers Hard-disk drives Second hard-disk drive for the modular bay LS-120 drive modules AC adapter PC Cards 32-, 64-, and 128-MB memory modules Carrying case Instructions for connecting or installing these options are included in the upgrade kit you receive from Dell. - Dell Latitude CPi | User Guide - Page 6
Getting Help If at any time you don't understand a procedure described in this guide, or if your computer does not perform as expected, Dell provides a number of tools to help you. For more information on these help tools, see Getting Help. Back to Contents Page - Dell Latitude CPi | User Guide - Page 7
Back to Contents Page Setup and Operation: Dell™ Latitude™ CPi A-Series System User's Guide AC Adapter Batteries CD-ROM Drive Display Diskette Drive Keyboard PC Cards Modular Bay Touch Pad Securing Your Computer Connecting External Devices I/O Connectors - Dell Latitude CPi | User Guide - Page 8
Back to Contents Page Powering Your Computer: Dell™ Latitude™ CPi A-Series System User's Guide AC Adapter Power Management Settings Batteries - Dell Latitude CPi | User Guide - Page 9
Page Traveling With Your Computer: Dell™ Latitude™ CPi A-Series System User's Guide Identifying Your Computer | Preparing Your Computer for Travel | Travel Tips Identifying Your Computer As an antitheft measure, assign a primary password and a hard-disk drive password to prohibit unauthorized - Dell Latitude CPi | User Guide - Page 10
button is flush with the computer case. 2. To make the computer as light as possible, remove the diskette drive or CD-ROM drive from the modular bay and install the travel module. 3. To maximize battery life, check the charge on your battery. Then fully charge the battery and any spares you plan - Dell Latitude CPi | User Guide - Page 11
and modem cable adapters for foreign telephone networks CD-ROM drive Diskette drive and parallel cable for using the drive as an external device Travel module Traveling by Air Notify airport security in advance that you are bringing a portable computer. Be sure to have a charged battery or the AC - Dell Latitude CPi | User Guide - Page 12
they offer to users of portable computers. Many companies provide services that help you solve problems, such as quickly locating 3.5-inch diskettes or providing a directdial telephone line for your modem connection. CAUTION: Do not use the CD-ROM drive while the computer is in motion. Doing so - Dell Latitude CPi | User Guide - Page 13
Back to Contents Page Drivers: Dell™ Latitude™ CPi A-Series System User's Guide Installing Microsoft® Windows® 95 and Windows 98 Drivers Installing Microsoft Windows NT® Drivers - Dell Latitude CPi | User Guide - Page 14
Back to Contents Page Customizing Your Computer: Dell™ Latitude™ CPi A-Series System User's Guide Using the System Setup Program Power Management Settings Suspend-to-Disk Utility - Dell Latitude CPi | User Guide - Page 15
and Replacing Parts: Dell™ Latitude™ CPi A-Series System User's Guide Installing a Primary Hard-Disk Drive | Installing Memory Modules Installing a Primary Hard-Disk Drive CAUTION: To prevent data loss, turn off your computer before removing the hard-disk drive. Do not remove the hard-disk drive if - Dell Latitude CPi | User Guide - Page 16
format the hard-disk drive. Installing Memory Modules NOTES: If necessary, print these instructions for reference before proceeding. CAUTION: If you install a combination of extended-data out (EDO) and SDRAM memory modules, your computer will not operate. To prepare the computer to remove or install - Dell Latitude CPi | User Guide - Page 17
unlock icon. When the door pops up, slide it back and remove it. 2. If you are replacing a memory module, remove the old one. Carefully spread apart the inner metal tabs of the memory module socket just far enough for the memory module to disengage from the socket (it should pop up slightly). Then - Dell Latitude CPi | User Guide - Page 18
is correct. 8. Run the RAM test group of the Dell Diagnostics to confirm that all installed memory modules are operating correctly. 9. Use the Suspend-to-Disk utility to update the S2D partition on your hard-disk drive. The S2D partition stores system data while the computer is in suspend-to-disk - Dell Latitude CPi | User Guide - Page 19
Back to Contents Page Troubleshooting Your Computer: Dell™ Latitude™ CPi A-Series System User's Guide Running the Dell Diagnostics Diagnostic Video Tests Error Messages and Flash Codes - Dell Latitude CPi | User Guide - Page 20
Back to Contents Page Technical Specifications: Dell™ Latitude™ CPi A-Series System User's Guide System chip set Microprocessor data bus width DRAM bus width Address bus width Flash EPROM AGP bus PCI bus CardBus controller PC Card connectors Cards supported PC Card connector size Data width ( - Dell Latitude CPi | User Guide - Page 21
Standard RAM Maximum RAM Memory access time: tRAC one 64-MB memory module 256 MB 60 ns tCAC 15 ns BIOS address Serial (DTE) Parallel Video PS/2 Infrared Audio USB Docking Audio type Audio controller Stereo conversion Interfaces: Internal F000:0000-F000:FFFF Connectors one 16,550-compatible, 16- - Dell Latitude CPi | User Guide - Page 22
Video type Data bus Video controller Video memory Type Dimensions (active area): Height volume can be controlled through key combinations, software application menus, or the Speaker window in the Dell Control Center (Windows 95 only) Video 256-bit hardware-accelerated AGP NeoMagic 2200 2.5 MB - Dell Latitude CPi | User Guide - Page 23
(closed) to 180° Dot pitch 0.26 mm Power consumption: Panel (typical) 1.7 W Backlight 2.6 W Controls Number of keys brightness can be controlled through a key combination, the Display window in the Dell Control Center (Windows 95 only), or the System Setup program Keyboard 87 (U.S., Canada - Dell Latitude CPi | User Guide - Page 24
mm (0.75 inch ± 0.012 inch) Battery lithium ion 21.5 mm (0.83 inch) Computer off 1 hour Life span (approximate)2 Temperature range: Charge 500 discharge/charge cycles 0° to 40°C (32° to 104°F) Storage -20° to 60°C (-4° to 140°F) Input voltage Input current (maximum) Input frequency AC Adapter - Dell Latitude CPi | User Guide - Page 25
Weight3 Temperature: Operating Physical 38.6 mm (1.52 inches) 306.0 mm (12.05 inches) 241.0 mm (9.49 inches) 2.63 kg (5.8 lb) Environmental (Computer) 0° to 40°C (32° to 104°F) Storage -20° to 60°C (-4° to 140°F) Relative humidity (maximum): Operating 10% to 90% (noncondensing) Storage 5% to - Dell Latitude CPi | User Guide - Page 26
Storage Maximum shock:4 Operating Storage Altitude (maximum): Operating Storage Interface X/Y position resolution (graphics table mode) Size: Thickness Width (sensoractive area) Height Weight Power: Supply voltage Supply current 1.3 GRMS using a random-vibration spectrum that simulates air/truck - Dell Latitude CPi | User Guide - Page 27
bay, and one memory module. Your computer might weigh more or less, depending on its configuration. The maximum weight of the Dell Latitude CPi A366XT is 2.81 kg (6.2 lb), which includes a hard-disk drive, two batteries, and two memory modules. The minimum weight of a Latitude CPi A300ST is 2.4 kg - Dell Latitude CPi | User Guide - Page 28
Back to Contents Page Getting Help: Dell™ Latitude™ CPi A-Series System User's Guide Overview | Technical Assistance | Help Tools | Problems With Your Order | Product Information | Returning Items for Warranty Repair or Credit | Before You Call | Dell Contact Numbers Overview This file describes the - Dell Latitude CPi | User Guide - Page 29
Support Service [email protected] [email protected] (for Asian/Pacific countries only) support.euro.dell.com (for Europe only) Electronic Quote Service [email protected] [email protected] (for Asian/Pacific countries only) Electronic Information Service [email protected] AutoTech Service Dell - Dell Latitude CPi | User Guide - Page 30
question. Our technical support staff use computer-based diagnostics to provide fast, accurate answers to questions. To contact Dell's technical support service, first refer to Before You Call and then call the number for your country as listed in Dell Contact Numbers. Problems With Your Order If - Dell Latitude CPi | User Guide - Page 31
various codes required to make long-distance and international calls. Table 2, Dell Contact Numbers, provides local telephone numbers, area codes, toll-free numbers, and E-mail addresses, if applicable, for each department or service available in various countries around the world. If you are making - Dell Latitude CPi | User Guide - Page 32
required 22 Not required 11 1 8 22 - - 1344 Not required Table 2. Dell Contact Numbers Country (City) Australia (Sydney) Austria* (Vienna) Area Local Number or Department Name or Service Code Toll-Free Number Customer Technical Support toll free: 1-800-633-559 Customer Care toll free: 1-800-819 - Dell Latitude CPi | User Guide - Page 33
Switchboard 02 481 91 00 Web site: support.euro.dell.com/be E-mail: [email protected] Brunei NOTE: Customers in Brunei call Malaysia for sales, customer, and technical assistance. Customer Technical Support (Penang, Malaysia) 810 4966 Customer Service (Penang, Malaysia) 810 4949 Transaction Sales - Dell Latitude CPi | User Guide - Page 34
Care 06103 971-500 TechConnect BBS 06103 971-666 Switchboard 06103 971-0 Web site: support.euro.dell.com/de E-mail: [email protected] Hong Kong Technical Support toll free: 800 96 4107 Customer Service (Penang, Malaysia) 810 4949 NOTE: Customers in Hong Kong call Malaysia for customer - Dell Latitude CPi | User Guide - Page 35
6061 99 Sales 22 60 61 99 Fax 22 60 61 998 Switchboard 22 60 61 999 Web site: support.euro.dell.com/pl E-mail: [email protected] Technical Support toll free: 800 6011 051 Customer Service (Penang, Malaysia) 04 810 4949 Transaction Sales toll free: 800 6011 054 Corporate Sales toll free: 800 6011 - Dell Latitude CPi | User Guide - Page 36
01 90 Switchboard 022 799 01 01 Web site: support.euro.dell.com/ch E-mail: [email protected] Taiwan NOTE: Customers in Taiwan call Malaysia for customer assistance. Technical Support toll free: 0080 651 226/0800 33 557 Customer Service (Penang, Malaysia) 810 4949 Transaction Sales toll free: 0080 - Dell Latitude CPi | User Guide - Page 37
International (systems purchased by governmental agencies [local, state, or federal] or educational institutions): Customer Service and Technical Support (Return Material Authorization Numbers) toll free: 1-800234-1490 Dell Sales toll free: 1-800-289-3355 1-800-879-3355 Spare Parts Sales toll free - Dell Latitude CPi | User Guide - Page 38
Bay: Dell™ Latitude™ CPi A-Series System User's Guide Using the Modular Bay | Installing Devices in the Modular Bay | Setting Up a Second Hard-Disk Drive Using the Modular Bay Your computer comes with a diskette drive installed in the modular bay. You can also install a battery, a CDROM drive, a LS - Dell Latitude CPi | User Guide - Page 39
CD-ROM drive LS-120 drive Second hard-disk drive Battery CD-ROM drive Diskette drive Second hard-disk drive Travel module Battery CD-ROM drive Diskette drive LS-120 drive Travel module Battery Diskette drive Procedure 1. If your computer is docked, turn it off and undock it. 2. Remove the battery - Dell Latitude CPi | User Guide - Page 40
Travel module CD-ROM drive LS-120 drive Second hard-disk drive 4. Dock the computer and turn it on, if necessary. 1. Turn off and undock the computer. 2. Remove the travel module. 3. Install the new device. 4. Dock the computer and turn it on. Setting Up a Second Hard-Disk Drive The first time - Dell Latitude CPi | User Guide - Page 41
Back to Contents Page Using the System Setup Program: Dell™ Latitude™ CPi A-Series System User's Guide Overview | Entering the System Setup Program | Using the System Setup Program | System Setup Options Overview Each time you turn on your computer, it compares the installed hardware with the system - Dell Latitude CPi | User Guide - Page 42
to load into memory, let the system complete the load operation; then shut down the computer and try BIOS). Options The box on the left half of screens 1, 2, and 4 lists options that define the installed hardware in your computer and the power conservation and security features for your computer - Dell Latitude CPi | User Guide - Page 43
currently assigned. The administrator password is designed for use by system administrators and service technicians in corporate environments. If an administrator password is assigned, you can use it to access the computer even if you do not know the primary password. CAUTION: The password features - Dell Latitude CPi | User Guide - Page 44
your computer. A service technician may ask you for this version number if you call Dell for technical assistance. NOTE: Dell may periodically offer revisions of the BIOS that add features or solve specific problems. Because the BIOS for your computer is stored on a reprogrammable flash-memory chip - Dell Latitude CPi | User Guide - Page 45
are: Internal HDD (the default) - Causes your computer to attempt to boot from the hard-disk drive. Diskette Drive - Causes your computer to attempt to boot from the diskette drive. CD-ROM Drive - Causes your computer to attempt to boot from a bootable CD-ROM disk. Modular Bay HDD - Attempts to boot - Dell Latitude CPi | User Guide - Page 46
not required). Date Date resets the date on the computer's internal calendar. Your computer automatically displays the day of the week corresponding to Out lets you determine how long your hard-disk drive remains idle before the drive motor turns off to conserve battery power. The AC category is set - Dell Latitude CPi | User Guide - Page 47
, using a higher time-out setting may save battery power and time by minimizing the number of times the hard-disk drive must power up. NOTE: Set Disk Time-Out to Disabled if using it causes compatibility problems with your software. A change to the Disk Time-Out option takes effect immediately - Dell Latitude CPi | User Guide - Page 48
battery operating time, set Display Time-Out to a lower number of minutes. NOTE: Set the Display Time-Out option to Disabled if using it causes compatibility problems the computer is attached to a Dell Latitude C/Port to take advantage of the computer's Fast IR support. Settings for this option - Dell Latitude CPi | User Guide - Page 49
controlled by the setting in the Click Volume option. Settings for this option are Disabled (the default) and Enabled. A change to the Keyboard Click option takes effect immediately (rebooting is not required). Modular Bay Modular Bay identifies the kind of device-Diskette Drive, Battery, or CD-ROM - Dell Latitude CPi | User Guide - Page 50
ECP mode may come with special drivers that need to be installed in upgrade the configuration. Pointing Device Pointing Device enables and disables the computer computer is being powered by a battery or AC power. If you want to use any of the time-out options while using battery power, the Battery - Dell Latitude CPi | User Guide - Page 51
, other than a modem, is connected to your computer. In order for the Ring/Event Resume option to work properly, this feature must be enabled in the device driver for your modem PC Card. All drivers supplied by Dell with your computer are configured to allow the computer to resume normal operation - Dell Latitude CPi | User Guide - Page 52
. Service Tag Service Tag displays the computer's five-character service code, which was programmed into NVRAM by Dell during the manufacturing process. Be prepared to supply this identification during technical assistance or service calls. The service tag is also accessed by certain Dell support - Dell Latitude CPi | User Guide - Page 53
settings for this option. The amount of memory displayed changes if you install or remove a memory module. Time Time resets the time on the computer's internal clock. Time is kept in a 24-hour format (hours:minutes:seconds). NOTE: If a network server controls the time reflected by the Time option - Dell Latitude CPi | User Guide - Page 54
Connect The Universal Connect option functions with the Dell Latitude C/Port APR if the computer uses Windows 95. Set this category to Enabled (the default) if you often use more than one C/Port APR and want to minimize the initialization time when you connect the replicator to the computer - Dell Latitude CPi | User Guide - Page 55
Back to Contents Page AC Adapter: Dell™ Latitude™ CPi A-Series System User's Guide Using the AC Adapter | Connecting the AC Adapter Using the AC Adapter The AC adapter converts AC power to the DC power required by the computer. The AC adapter kit includes two cables: the AC adapter cable and an AC - Dell Latitude CPi | User Guide - Page 56
Back to Contents Page - Dell Latitude CPi | User Guide - Page 57
Page Batteries: Dell™ Latitude™ CPi A-Series System User's Guide About the Batteries | Charging a Hot Battery | Battery Usage | Installing a Battery | Battery Charge Gauge | First Low-Battery Warning | Second Low-Battery Warning | Charging the Battery | Detecting Battery Problems | Battery Disposal - Dell Latitude CPi | User Guide - Page 58
of factors affect battery operating time: Power conservation features that you use Type of display and microprocessor your computer has Use of the CD-ROM drive Number and type of PC Cards and other external devices you use Kinds of application programs you run Capacity of the memory modules you - Dell Latitude CPi | User Guide - Page 59
and undock it. 2. If there is a battery in the modular bay, go to step 4. 3. If the only battery in the computer is in the battery bay and that is the battery you want to replace, preserve your data in one of these ways and then proceed to step 4: Connect the computer to AC power, and then continue - Dell Latitude CPi | User Guide - Page 60
see no indicators. If you install such a battery into the computer, the amber battery indicator on the computer flashes rapidly. To purchase a new battery, call Dell or access the Dell World Wide Web server at http://www.dell.com/. Dispose of the old battery properly. Percentage of Charge If one - Dell Latitude CPi | User Guide - Page 61
2 Drive access indicator 3 Battery indicator CAUTION: When you see a low-battery warning, save your work immediately. Then replace the battery or connect your computer to AC power. After the first low-battery warning, if no input/output (I/O) activity occurs within 75 seconds, the computer activates - Dell Latitude CPi | User Guide - Page 62
amber, the battery is too hot to charge. Turn off the computer, and let the battery and computer cool to room temperature. If the battery indicator flashes amber for 4 seconds when you connect or disconnect the AC adapter or when you press the power button, you need to replace the battery. To avoid - Dell Latitude CPi | User Guide - Page 63
, you often trade some of the performance of the computer for increased battery operating time. For example, if you turn off the hard-disk drive, you may experience a delay the next time the computer tries to access the hard-disk drive. Other power conservation features, such as suspend mode, stop - Dell Latitude CPi | User Guide - Page 64
CD-ROM Drive: Dell™ Latitude™ CPi A-Series System User's Guide Using the CD-ROM Drive | Caring for CDs | Types of Supported Discs Using the CD-ROM Drive The CD-ROM drive is a read-only device that lets you play most commercially available 8- or 12-centimeter (cm) sound and video CDs on the computer - Dell Latitude CPi | User Guide - Page 65
to use the CD-ROM drive. See the operating system user's guide for instructions on changing the Auto Insert Notification option. Caring for CDs Never use a damaged or warped CD. Always hold the CD by its edges. Do not touch the surface of the disc. Use a clean, dry cloth to remove dust, smudges, or - Dell Latitude CPi | User Guide - Page 66
Back to Contents Page Display: Dell™ Latitude™ CPi A-Series System User's Guide Adjusting the Brightness | Expanded Video Mode | Video Drivers and Video Resolution | Customizing Video Resolution | Dual-Display Mode | If You Have Display Problems Adjusting the Brightness To accommodate local lighting - Dell Latitude CPi | User Guide - Page 67
best performance on your computer. Dell recommends that you use only these drivers with your factory-installed operating system. Table 2 lists the combinations of resolutions and colors that the computer supports. Table 2. Combinations of Resolutions and Colors Supported Resolution 640 x 480 800 - Dell Latitude CPi | User Guide - Page 68
, reopen the Display icon in the Control Panel. 11. Click the Settings tab . If You Have Display Problems If your computer is receiving power, but nothing battery light is blinking, connect the AC adapter to the computer or replace the battery. 3. Adjust the brightness or contrast. 4. If your computer - Dell Latitude CPi | User Guide - Page 69
to Contents Page Diskette Drive: Dell™ Latitude™ CPi A-Series System User's Guide Your computer was shipped with a 3.5-inch diskette drive (see Figure 1) in the modular bay. To use another device in the modular bay, first remove the diskette drive. For detailed instructions on installing devices in - Dell Latitude CPi | User Guide - Page 70
Contents Page Keyboard: Dell™ Latitude™ CPi A-Series System User's Guide Embedded Numeric Keypad | Display Key Combinations | Power Conservation Key Combinations | Processing Speed Key Combinations | Speaker Key Combinations | System Function Key Combinations | CD-ROM Drive Key Combinations Embedded - Dell Latitude CPi | User Guide - Page 71
contrast (no effect on an active-matrix display). Toggles the computer's display between regular video mode and reverse video mode ( French keyboards Function Turns off the built-in display* Turns off the hard-disk drive* Activates suspend or standby mode. Activates suspend-to-disk mode* * This - Dell Latitude CPi | User Guide - Page 72
the System Setup program. Table 6. System Function Key Combinations Key Combinations * Function Restarts (reboots) the computer in MS-DOS mode. In the Microsoft® Windows® 95, Windows 98, and Windows NT® operating systems, click the Start button and click Shut - Dell Latitude CPi | User Guide - Page 73
CD-ROM Drive Key Combinations NOTE: On an external keyboard, use with the appropriate keys if the External Hot Key option is enabled in the System Setup program. Table 7. CD-ROM Drive Key Combination Key Combinations Function Ejects the CD tray Back to Contents Page - Dell Latitude CPi | User Guide - Page 74
Page PC Cards: Dell™ Latitude™ CPi A-Series System User's Guide About PC Cards | Installing PC Cards | Removing PC Cards About PC Cards The computer has a slot into which you can install up to two PC Cards if the PC Cards comply with Release 2.01 of the Personal Computer Memory Card International - Dell Latitude CPi | User Guide - Page 75
In Windows NT, close all applications that use the PC Card before you remove it. If you receive a message that the card is not supported in Plug and Play mode, shut down the computer before you remove the PC Card. To remove a PC Card (see Figure 2), perform the following steps: 1. Press the PC Card - Dell Latitude CPi | User Guide - Page 76
it is available on the hard-disk drive If drivers are not available on the hard-disk drive, prompts you to install them using the device driver diskette that came with the card The operating system automatically detects a PC Card and opens the Add New Hardware menu from the Control Panel. See the PC - Dell Latitude CPi | User Guide - Page 77
Dell™ Latitude™ CPi A-Series System User's Guide Using the Touch Pad | Customizing the Touch Pad Using the Touch Pad The Personal System/2 (PS/2) touch pad (see Figure 1) detects the position of your finger over a touchsensitive area and provides the computer , and click Control Panel. 2. Double - Dell Latitude CPi | User Guide - Page 78
Computer: Dell™ Latitude™ CPi A-Series System User's Guide About Passwords | Using a Primary Password | Using an Adminstrator Password | Using a Hard-Disk Drive Password | Physically Securing the Computer and the Hard-Disk Drive , call Dell. For your protection, Dell's technical support staff will - Dell Latitude CPi | User Guide - Page 79
the password for the primary hard-disk drive. NOTE: Only hard-disk drives purchased from Dell for use with the Latitude CP Series systems support the hard-disk drive password option. After assigning a hard-disk drive password, you must enter it each time you turn on the computer and each time you - Dell Latitude CPi | User Guide - Page 80
for portable computers usually include a segment of metal-stranded cable with an attached locking device and associated key. Complete instructions for installing this kind of antitheft device are usually included with the device. To prevent unauthorized removal of the hard-disk drive, insert the - Dell Latitude CPi | User Guide - Page 81
asset tag number that you or your company assigns to the computer. The default System Setup screens do not show the asset tag log-on screen and with the primary password prompt. To view existing asset tag and service tag numbers, perform the following steps: 1. Click the Start button, point to - Dell Latitude CPi | User Guide - Page 82
The system displays the new owner tag. To delete the owner tag without assigning a new one, perform the following steps: 1. Click the Start button, point to Programs, and click MS-DOS Prompt. 2. Type asset /o /d and press . NOTE: For security, you cannot set, change, or delete the owner tag - Dell Latitude CPi | User Guide - Page 83
External Devices: Dell™ Latitude™ CPi A-Series System User's Guide Connector Illustration | Audio | Keyboard | Keypad | Mouse | Diskette Drive | Connecting an External Monitor | Using an External Monitor Connector Illustration Use Figure 1 to locate the connectors on the back of the computer. Figure - Dell Latitude CPi | User Guide - Page 84
Record/Playback (line-out/audio-in) 4 AC adapter connector NOTE: The C/Port Advanced Port Replicator (APR) also has a headphones/speaker jack. The C/Dock Expansion Station has all three jacks. You can control the sound on your computer through the Dell Control Center Speaker window, the System Setup - Dell Latitude CPi | User Guide - Page 85
device drivers that Dell installed on your hard-disk drive work with a PS/2 mouse from Dell. If you did not receive your mouse from Dell, you must install device drivers in order to use the mouse. This software is usually included with mouse upgrade kits. When you attach a PS/2 mouse to the computer - Dell Latitude CPi | User Guide - Page 86
work, install the drivers from the diskette that came with the mouse and reboot the computer. You can also connect an external mouse to the C/Port APR or the C/Dock Expansion Station. Diskette Drive The diskette drive can be used as an external device if you have a CD-ROM drive, battery, or travel - Dell Latitude CPi | User Guide - Page 87
or place objects on top of it; doing so could damage the drive motor. Connecting an External Monitor The computer's video connector is used to connect an external monitor to the computer. To attach an external monitor, perform the following steps: 1. Make sure that the external monitor is turned - Dell Latitude CPi | User Guide - Page 88
an external monitor is connected to the computer, the video image automatically appears on the external monitor's screen when you boot your computer. To toggle the at a resolution greater than the display supports, the simultaneous display feature is disabled. To use the display, switch to - Dell Latitude CPi | User Guide - Page 89
Page I/O Connectors: Dell™ Latitude™ CPi A-Series System User's Guide About the I/O Connectors | Parallel Connector | Serial Connector | USB Connector | Video Connector | PS/2 Connector | Infrared Port | Connecting External Devices About the I/O Connectors You can connect external devices to the - Dell Latitude CPi | User Guide - Page 90
a bidirectional port for devices such as a network adapter. Table 1 lists the pin assignments. The computer's built-in parallel port is designated as LPT1. format (one bit at a time over one line). This port supports a variety of devices that require serial data transmission, including a serial - Dell Latitude CPi | User Guide - Page 91
Use the 15-hole video connector to attach an external monitor to the computer. Table 3 lists the pin assignments. If you reconfigure your hardware, you NC N/A No connection 5-8 GND N/A Signal ground 9 NC N/A No connection 10 GND N/A Signal ground 11 NC N/A No connection 12 NC - Dell Latitude CPi | User Guide - Page 92
to another infrared-compatible device without using cable connections. An infrared data stream is transmitted through a lens in the computer up to a distance of 1 m (3.3 ft). This light is received by a compatible computer, printer, mouse, or remote control. The default address of the infrared port - Dell Latitude CPi | User Guide - Page 93
system. The Microsoft Windows NT® 4.0 operating system does not support the use of infrared devices. NOTES: Make sure that computer and device are misaligned. Move the device or computer to bring them into the 30-degree cone. Connecting External Devices To connect an external device to the computer - Dell Latitude CPi | User Guide - Page 94
Management Settings: Dell™ Latitude™ CPi A-Series System User's Guide Experimenting With computer may be in suspend mode. Press the power button to resume normal operation.) To activate, press . * Automatically deactivates when the hard-disk drive is accessed. NOTE: If a modular hard drive - Dell Latitude CPi | User Guide - Page 95
computer is to close the display when the computer is not in use. When you close the display and an external monitor is not connected, the computer computer unattended. Suspend mode conserves battery power by turning off the microprocessor clock, the display, the hard-disk drive, the CD-ROM drive - Dell Latitude CPi | User Guide - Page 96
. CAUTION: Windows 98 saves data to random-access memory (RAM), not to your hard-disk drive, before entering standby mode. If the computer enters standby mode while running on battery power, data loss from RAM can occur if the battery discharges completely. You can activate standby mode by pressing - Dell Latitude CPi | User Guide - Page 97
, which allows you to set the Low Battery and Critical Battery alarms to alert you when the system battery falls below a certain percentage. When you received your computer, the Low Battery and Critical Battery alarms check boxes were not checked. Dell recommends that you do not select these options - Dell Latitude CPi | User Guide - Page 98
System Drivers: Dell™ Latitude™ CPi A-Series System User's Guide General Instructions | Installing Video Drivers for Windows 95 | Installing Video Drivers for Windows 98 | Installing Audio Drivers | Installing Software Wavetable | Installing Touch Pad Drivers | Installing MS-DOS CD-ROM Drivers - Dell Latitude CPi | User Guide - Page 99
computer at the end of this procedure to complete the installation. 2. Insert the video drivers diskette into the diskette drive. 3. Click the Start button, point to Settings, and then click Control Panel. The Control while the driver files are copied to your hard-disk drive. After the drivers are - Dell Latitude CPi | User Guide - Page 100
, because you will need to restart your computer at the end of this procedure to complete the installation. 2. Insert the video drivers diskette into the diskette drive. 3. Click the Start button, point to Settings, and then click Control Panel. The Control Panel window appears. 4. Double-click the - Dell Latitude CPi | User Guide - Page 101
pad drivers diskette into the diskette drive. 3. Click the Start button, and then click Run... . The Run dialog box appears. 4. Type a:\setup and then click OK or press to install the utility on your hard-disk drive. 5. Restart your computer to activate the drivers. Installing MS-DOS® CD-ROM - Dell Latitude CPi | User Guide - Page 102
installation. 2. Insert the CD-ROM drivers diskette into the diskette drive. 3. Click the Start button, and then click Run... . The Run dialog box appears. 4. Type a:\setup, and then click OK or press to install the utility on your hard-disk drive. 5. Follow the instructions on your screen - Dell Latitude CPi | User Guide - Page 103
you inserted in step 2. 11. Follow the instructions on your screen to complete the installation. 12. After the driver is updated, close the Device Manager and open Windows Explorer. 13. With the Infrared Drivers diskette still in the diskette drive, click drive A. 14. Right-click the smcirlap.inf - Dell Latitude CPi | User Guide - Page 104
Microsoft® Windows NT® Operating System Drivers: Dell™ Latitude™ CPi A-Series System User's Guide Installing Video Drivers | Installing the Power Management Utility | Installing the PC Card Utility | Installing Audio Drivers | Installing Touch Pad Drivers | Installing System Utilities | Installing - Dell Latitude CPi | User Guide - Page 105
computer to activate the drivers. Installing the Power Management Utility Dell provides a power management utility that helps you conserve battery on your hard-disk drive. 5. Follow the instructions and restart your computer to activate the utility. Installing the PC Card Utility Dell provides a PC - Dell Latitude CPi | User Guide - Page 106
7. Follow the instructions on your screen, and when prompted, restart your computer to activate the utility. Installing Audio Drivers Dell provides audio drivers so you can customize the sound features of your computer. To install the audio drivers, perform the following steps: 1. Save your work in - Dell Latitude CPi | User Guide - Page 107
drive. 2. Copy each of the utilities on the System Utilities diskette to the c:\dell directory on your hard-disk drive. hard-disk drive. 5. Follow the instructions on your screen. 6. After the installation is complete, remove the final diskette from the diskette drive and restart your computer - Dell Latitude CPi | User Guide - Page 108
to-Disk Utility: Dell™ Latitude™ CPi A-Series System User's Guide Suspend-to-Disk Utility | Removing the S2D Partition | Creating the S2D Partition Suspend-to-Disk Utility The Suspend-to-Disk (S2D) utility allows you to manage the S2D partition in your file system as your computing needs change. For - Dell Latitude CPi | User Guide - Page 109
with MS-DOS, read the readme.s2d file before using the following procedure. 1. At an MS-DOS prompt, type cd c:\dell\util and press to change to the directory on your hard-disk drive that contains the Suspend-to-Disk utility files. 2. Type mks2d and press . As the utility builds the - Dell Latitude CPi | User Guide - Page 110
| Main Menu Options | Tests in the Dell Diagnostics | Error Messages | RAM Test Group | System Set Test Group | Video Test Group | Keyboard Test Group | Mouse Test | Diskette Drives Test Group | Hard-Disk Drives (Non-SCSI) Test Group | IDE CD-ROM Drives Test Group | Serial/Infrared Ports Test Group - Dell Latitude CPi | User Guide - Page 111
can get one from Dell. See Getting Help for information on contacting Dell. 1. Install a CD-ROM drive in the modular bay. For instructions, see CD-ROM Drive. 2. Attach the diskette drive to the parallel port connector on the back of the computer. For instructions, see Diskette Drive. 3. Turn off the - Dell Latitude CPi | User Guide - Page 112
in the diskette drive and boot the computer. NOTE: Before you read the rest of this chapter, you may want to start the Dell Diagnostics so you can see the menus on your display. When you start the diagnostics, the Dell logo screen appears, and a program tests the random-access memory (RAM) that will - Dell Latitude CPi | User Guide - Page 113
correctly, because the program writes data to the computer's memory that can cause problems unless properly cleared. Figure 2. Main Screen of the Dell Diagnostics Confirming the System Configuration Information When you boot the computer from your diagnostics diskette, the diagnostics checks your - Dell Latitude CPi | User Guide - Page 114
, the keyboard controller, and other key components Basic input/output system (BIOS) configuration information temporarily saved in RAM Do not be concerned if the System Configuration area does not list the names of all the components or devices you know are part of the computer. For example - Dell Latitude CPi | User Guide - Page 115
highlight the test group and press the Spacebar. To clear all selected test groups, select Clear All. The Key-Help option displays a list of key controls available for the selected option. The Quit Menu option returns you to the Main menu. Subtest Most of the test groups consist of several subtests - Dell Latitude CPi | User Guide - Page 116
The Key-Help option in the Subtest menu displays a list of available key controls. Quit Menu (Under Subtest) The Quit Menu option in the Subtest menu user input. Display, Printer, File If you have a printer attached to the computer, you can use it to print the status messages, if any, that are - Dell Latitude CPi | User Guide - Page 117
result file through Windows® Notepad by performing the following steps: 1. Select Quit Menu to exit the diagnostics and return to the MS-DOS prompt. 2. Remove the Dell Diagnostics Diskette from the diskette drive. 3. Reboot the computer. 4. If necessary, start your operating system. 5. Insert the - Dell Latitude CPi | User Guide - Page 118
You can access and review the result file in RAM test group, the Video test group, the Serial/Infrared Ports test group, the Diskette Drives test group, the Parallel Ports test group, the SCSI Devices test group, and the Hard-Disk Drives example, memory address limits specified for the RAM test group - Dell Latitude CPi | User Guide - Page 119
environment, remove your diagnostics diskette from drive A and reboot the computer. CAUTION: It is important that you quit the diagnostics program correctly, because the program writes data to the computer's memory that can cause problems unless properly cleared. Tests in the Dell Diagnostics The - Dell Latitude CPi | User Guide - Page 120
microprocessor. Video Keyboard Mouse Diskette Drives Hard-Disk Drives (Non-SCSI) IDE CD-ROM Drives Serial/Infrared Ports USB Register Test USB Memory Structure Test Tests the PC Card controller on the system board. Tests the computer's USB connector. Video Memory Test Video Hardware Test Text - Dell Latitude CPi | User Guide - Page 121
the network controller registers in the Dell Latitude C/Port APR or C/Dock Expansion Station. This test runs only if the computer is docked. Tests the operation of the audio chip set. Tests the record and playback ability of the internal microphone and speakers. Tests the function of the fan. Error - Dell Latitude CPi | User Guide - Page 122
when an error occurs or a subtest finishes. Pause (p) is the default value. Why Run a RAM Test? Faulty memory can cause a variety of problems that may not, at first glance, appear to be happening in RAM. If the computer displays one or more of the following symptoms, run both the subtests in the - Dell Latitude CPi | User Guide - Page 123
problems that are internal to the memory chips A parity check that verifies the ability of the memory subsystem to detect errors A refresh check, to verify that the dynamic RAM (DRAM) is being recharged properly System Set Test Group The subtests in the System Set test group check the computer - Dell Latitude CPi | User Guide - Page 124
the following computer functions: CMOS Confidence Test Checks the nonvolatile RAM (NVRAM) for accessibility and reliability of data storage by performing a data pattern check and verifying the uniqueness of memory addresses. DMA Controller Test Tests the direct memory access (DMA) controller and - Dell Latitude CPi | User Guide - Page 125
controller and the video control circuitry installed in the computer. These subtests check for the correct operation of the readable registers in the video circuitry and the controller the computer. Before you run the Video test group or any of its subtests, you should make sure that the problem is - Dell Latitude CPi | User Guide - Page 126
in the Keyboard test group verify the correct operation of your keyboard and the keyboard controller chip. Why Run a Keyboard Test? Keyboard problems are not always caused by the keyboard. For example, a complete lockup of the computer, rendering the keyboard inoperable, is probably not caused by - Dell Latitude CPi | User Guide - Page 127
in RAM as they are to be caused by a faulty touch pad or mouse. Three sources of problems include the configuration of a program (which changes the function of the touch pad or mouse), memory-resident programs like Sidekick or ProKey, and failure of a device driver (the software that controls the - Dell Latitude CPi | User Guide - Page 128
the hard-disk drive controller (which affects the ability to read from and write to the drive). Why Run a Hard-Disk Drives Test? If you check your hard-disk drive to determine the amount of available space, your operating system will probably report problem areas. Problem areas on hard-disk drives - Dell Latitude CPi | User Guide - Page 129
in this test group require a CD with data tracks. If the CD-ROM drive contains a CD that does not have the required data or audio tracks, the subtest fails. Why Run an IDE CD-ROM Drives Test? If you encounter a problem while using an application program on a CD, the problem could result from the - Dell Latitude CPi | User Guide - Page 130
An error message appears on the screen stating that the computer cannot read from an IDE CD-ROM drive. Subtests The five subtests in the IDE CD-ROM Drives test group confirm the following drive functions: Drive Controller Test Causes the drive to execute its internal self-test. Seek Test Checks the - Dell Latitude CPi | User Guide - Page 131
problem: If a peripheral works intermittently or produces intermittent errors, the port may be faulty. If the computer displays an error message that is related to the external device connected If a loopback device is attached, checks the line control bits of the serial port and sends a test pattern - Dell Latitude CPi | User Guide - Page 132
problem: If a peripheral works intermittently or produces intermittent errors, the port may be faulty. If the computer displays an error message that is related to the external device connected Loopback Test Tests the functionality of the control lines through an external loopback connector, if - Dell Latitude CPi | User Guide - Page 133
controller in the C/Port APR or C/Dock Expansion Station, and the SCSI devices attached to either. These tests run only if the computer is docked. NOTES: Before conducting these subtests on an external SCSI CD-ROM drive, insert into the drive a CD with audio and data tracks (such as a multimedia CD - Dell Latitude CPi | User Guide - Page 134
test group; you must select this subtest individually. Eject Removable Media Test Causes a CD-ROM drive to eject its CD, or a SCSI tape drive to eject its tape cartridge. Display Information Test Displays information about the SCSI controller in an expansion device, the resources allocated to the - Dell Latitude CPi | User Guide - Page 135
Shared RAM Test Performs a memory test on controllers with memory-mapped shared RAM. On controllers with first-in first-out (FIFO) shared RAM, writes a data pattern to all locations and reads the pattern back to verify the operation. Some controllers do not support shared RAM tests. Display - Dell Latitude CPi | User Guide - Page 136
Playback Test and the Analog Sound Playback test, a series of musical tones is played through the computer's built-in speaker(s). A message on the display Group The Fan Control Test in the Other test group checks the function of the fan. The fan works with the air intake on the computer as part - Dell Latitude CPi | User Guide - Page 137
Back to Contents Page Diagnostic Video Tests: Dell™ Latitude™ CPi A-Series System User's Guide Overview | Video Memory Test | Video Hardware Test | Text Mode Character Test | Text Mode Color Test | Text Mode Pages Test | Graphics Mode Test | Color Palettes Test | Solid Colors Test - Dell Latitude CPi | User Guide - Page 138
Text Mode Character Test The Text Mode Character Test consists of a group of subtests that display printable characters and character attributes. The subtests check character quality and the ability of the display or monitor to show the characters correctly. A prompt at the bottom of each screen - Dell Latitude CPi | User Guide - Page 139
Text Mode Color Test The Text Mode Color Test contains three subtests that check the video subsystem's ability to present color in text modes. The following subsections describe these subtests. Color Attributes Subtest (80 x 25) The 80-column x 25-line color attributes subtest displays a pattern - Dell Latitude CPi | User Guide - Page 140
the pyramids are the correct colors; otherwise, type n. 320 x 200 16-Color Graphics Mode Screen The 320- x 200-pixel 16-color graphics mode screen displays a series of Xs in 16 different colors with the name of the color beneath each X. Type y if all the Xs are the correct colors; otherwise, type - Dell Latitude CPi | User Guide - Page 141
squares are the correct colors; otherwise, type n. 640 x 480 256-Color Graphics Mode Screen The 640- x 480-pixel 256-color graphics mode screen displays a series of squares with two colors in each square. Type y if all the squares appear to be correct; otherwise, type n. 800 x 600 16-Color Graphics - Dell Latitude CPi | User Guide - Page 142
be correct; otherwise, type n. 1024 x 768 16-Color Graphics Mode Screen (External Monitor) The 1024- x 768-pixel 16-color graphics mode screen displays a series of hourglasses in 16 different colors with the name of the color beneath each hourglass. Type y if all the hourglasses appear to be correct - Dell Latitude CPi | User Guide - Page 143
Flash Codes: Dell™ Latitude™ CPi A-Series System User's Guide Error Messages | System Flash Codes | Avoiding Interrupt Assignment Conflicts | Memory Allocations | I/O Memory Map Error Messages Your application programs, operating system, and the computer itself can identify problems and alert you - Dell Latitude CPi | User Guide - Page 144
(For instructions, see Running the Dell Diagnostics.) Hard-disk drive controller failure 1 The CD-ROM drive does not respond to commands from the computer. Hard-disk The hard-disk drive does not drive failure respond to commands from the computer. Turn off the computer, remove the drive, and - Dell Latitude CPi | User Guide - Page 145
faulty. A key on the built-in keyboard or external keyboard may have been pressed while the computer was booting. Run the Stuck Key Test in the Dell Diagnostics. (For instructions, see Running the Dell Diagnostics.) Memory address line failure at address, read value expecting value An installed - Dell Latitude CPi | User Guide - Page 146
installed memory module may be loose. Run the RAM test group and the Keyboard Controller Test in the Dell Diagnostics. (For instructions, see Running the Dell Diagnostics.) Warning: Battery is critically low. The battery is running out of charge. Replace the battery, or connect the computer to - Dell Latitude CPi | User Guide - Page 147
read failure. Run the System Set test group in the Dell Diagnostics. (See Running the Dell Diagnostics, for instructions.) If the program does not load, call Dell for technical assistance. (For instructions, see Getting Help.) 1-1-4 ROM BIOS checksum failure. Run the System Set test group in the - Dell Latitude CPi | User Guide - Page 148
Dell Diagnostics. (For instructions, see Running the Dell Diagnostics.) No usable memory. Run the RAM test group in the Dell Diagnostics. (For instructions, see Running the Dell Diagnostics.) Avoiding Interrupt Assignment Conflicts Problems default address of your computer's serial port is COM1 - Dell Latitude CPi | User Guide - Page 149
keyboard controller to indicate that the output buffer of the touch pad or external PS/2 mouse is full Reserved; generated by the math coprocessor Reserved; generated by the hard-disk drive to indicate that the drive requires the attention of the microprocessor Reserved; generated by CD-ROM drive in - Dell Latitude CPi | User Guide - Page 150
DMA controller #1 Interrupt controller #1 System timers Keyboard controller RTC and NMI enable DMA page registers Interrupt controller #2 DMA controller #2 Math coprocessor CD-ROM controller Hard-disk drive controller Audio controller Audio controller Fast IR IDE controller LPT1 Audio controller VGA - Dell Latitude CPi | User Guide - Page 151
03F0-03F7 03F8-03FF 0530-0537 0078-077B ECE0-ECFF FFA0-FFAF Back to Contents Page Diskette controller COM1 Audio controller ECP registers USB controller PCI-IDE bus registers - Dell Latitude CPi | User Guide - Page 152
Back to Contents Page Getting Help: Dell™ Latitude™ CPi A-Series System User's Guide Overview | Technical Assistance | Help Tools | Problems With Your Order | Product Information | Returning Items for Warranty Repair or Credit | Before You Call | Dell Contact Numbers Overview This file describes the - Dell Latitude CPi | User Guide - Page 153
Support Service [email protected] [email protected] (for Asian/Pacific countries only) support.euro.dell.com (for Europe only) Electronic Quote Service [email protected] [email protected] (for Asian/Pacific countries only) Electronic Information Service [email protected] AutoTech Service Dell - Dell Latitude CPi | User Guide - Page 154
question. Our technical support staff use computer-based diagnostics to provide fast, accurate answers to questions. To contact Dell's technical support service, first refer to Before You Call and then call the number for your country as listed in Dell Contact Numbers. Problems With Your Order If - Dell Latitude CPi | User Guide - Page 155
various codes required to make long-distance and international calls. Table 2, Dell Contact Numbers, provides local telephone numbers, area codes, toll-free numbers, and E-mail addresses, if applicable, for each department or service available in various countries around the world. If you are making - Dell Latitude CPi | User Guide - Page 156
required 22 Not required 11 1 8 22 - - 1344 Not required Table 2. Dell Contact Numbers Country (City) Australia (Sydney) Austria* (Vienna) Area Local Number or Department Name or Service Code Toll-Free Number Customer Technical Support toll free: 1-800-633-559 Customer Care toll free: 1-800-819 - Dell Latitude CPi | User Guide - Page 157
Switchboard 02 481 91 00 Web site: support.euro.dell.com/be E-mail: [email protected] Brunei NOTE: Customers in Brunei call Malaysia for sales, customer, and technical assistance. Customer Technical Support (Penang, Malaysia) 810 4966 Customer Service (Penang, Malaysia) 810 4949 Transaction Sales - Dell Latitude CPi | User Guide - Page 158
Care 06103 971-500 TechConnect BBS 06103 971-666 Switchboard 06103 971-0 Web site: support.euro.dell.com/de E-mail: [email protected] Hong Kong Technical Support toll free: 800 96 4107 Customer Service (Penang, Malaysia) 810 4949 NOTE: Customers in Hong Kong call Malaysia for customer - Dell Latitude CPi | User Guide - Page 159
6061 99 Sales 22 60 61 99 Fax 22 60 61 998 Switchboard 22 60 61 999 Web site: support.euro.dell.com/pl E-mail: [email protected] Technical Support toll free: 800 6011 051 Customer Service (Penang, Malaysia) 04 810 4949 Transaction Sales toll free: 800 6011 054 Corporate Sales toll free: 800 6011 - Dell Latitude CPi | User Guide - Page 160
01 90 Switchboard 022 799 01 01 Web site: support.euro.dell.com/ch E-mail: [email protected] Taiwan NOTE: Customers in Taiwan call Malaysia for customer assistance. Technical Support toll free: 0080 651 226/0800 33 557 Customer Service (Penang, Malaysia) 810 4949 Transaction Sales toll free: 0080 - Dell Latitude CPi | User Guide - Page 161
International (systems purchased by governmental agencies [local, state, or federal] or educational institutions): Customer Service and Technical Support (Return Material Authorization Numbers) toll free: 1-800234-1490 Dell Sales toll free: 1-800-289-3355 1-800-879-3355 Spare Parts Sales toll free - Dell Latitude CPi | User Guide - Page 162
Back to Contents Page Using the System Setup Program: Dell™ Latitude™ CPi A-Series System User's Guide Overview | Entering the System Setup Program | Using the System Setup Program | System Setup Options Overview Each time you turn on your computer, it compares the installed hardware with the system - Dell Latitude CPi | User Guide - Page 163
to load into memory, let the system complete the load operation; then shut down the computer and try BIOS). Options The box on the left half of screens 1, 2, and 4 lists options that define the installed hardware in your computer and the power conservation and security features for your computer - Dell Latitude CPi | User Guide - Page 164
currently assigned. The administrator password is designed for use by system administrators and service technicians in corporate environments. If an administrator password is assigned, you can use it to access the computer even if you do not know the primary password. CAUTION: The password features - Dell Latitude CPi | User Guide - Page 165
your computer. A service technician may ask you for this version number if you call Dell for technical assistance. NOTE: Dell may periodically offer revisions of the BIOS that add features or solve specific problems. Because the BIOS for your computer is stored on a reprogrammable flash-memory chip - Dell Latitude CPi | User Guide - Page 166
are: Internal HDD (the default) - Causes your computer to attempt to boot from the hard-disk drive. Diskette Drive - Causes your computer to attempt to boot from the diskette drive. CD-ROM Drive - Causes your computer to attempt to boot from a bootable CD-ROM disk. Modular Bay HDD - Attempts to boot - Dell Latitude CPi | User Guide - Page 167
not required). Date Date resets the date on the computer's internal calendar. Your computer automatically displays the day of the week corresponding to Out lets you determine how long your hard-disk drive remains idle before the drive motor turns off to conserve battery power. The AC category is set - Dell Latitude CPi | User Guide - Page 168
, using a higher time-out setting may save battery power and time by minimizing the number of times the hard-disk drive must power up. NOTE: Set Disk Time-Out to Disabled if using it causes compatibility problems with your software. A change to the Disk Time-Out option takes effect immediately - Dell Latitude CPi | User Guide - Page 169
battery operating time, set Display Time-Out to a lower number of minutes. NOTE: Set the Display Time-Out option to Disabled if using it causes compatibility problems the computer is attached to a Dell Latitude C/Port to take advantage of the computer's Fast IR support. Settings for this option - Dell Latitude CPi | User Guide - Page 170
controlled by the setting in the Click Volume option. Settings for this option are Disabled (the default) and Enabled. A change to the Keyboard Click option takes effect immediately (rebooting is not required). Modular Bay Modular Bay identifies the kind of device-Diskette Drive, Battery, or CD-ROM - Dell Latitude CPi | User Guide - Page 171
ECP mode may come with special drivers that need to be installed in upgrade the configuration. Pointing Device Pointing Device enables and disables the computer computer is being powered by a battery or AC power. If you want to use any of the time-out options while using battery power, the Battery - Dell Latitude CPi | User Guide - Page 172
, other than a modem, is connected to your computer. In order for the Ring/Event Resume option to work properly, this feature must be enabled in the device driver for your modem PC Card. All drivers supplied by Dell with your computer are configured to allow the computer to resume normal operation - Dell Latitude CPi | User Guide - Page 173
. Service Tag Service Tag displays the computer's five-character service code, which was programmed into NVRAM by Dell during the manufacturing process. Be prepared to supply this identification during technical assistance or service calls. The service tag is also accessed by certain Dell support - Dell Latitude CPi | User Guide - Page 174
settings for this option. The amount of memory displayed changes if you install or remove a memory module. Time Time resets the time on the computer's internal clock. Time is kept in a 24-hour format (hours:minutes:seconds). NOTE: If a network server controls the time reflected by the Time option - Dell Latitude CPi | User Guide - Page 175
Connect The Universal Connect option functions with the Dell Latitude C/Port APR if the computer uses Windows 95. Set this category to Enabled (the default) if you often use more than one C/Port APR and want to minimize the initialization time when you connect the replicator to the computer - Dell Latitude CPi | User Guide - Page 176
Back to Contents Page Diagnostic Video Tests: Dell™ Latitude™ CPi A-Series System User's Guide Overview | Video Memory Test | Video Hardware Test | Text Mode Character Test | Text Mode Color Test | Text Mode Pages Test | Graphics Mode Test | Color Palettes Test | Solid Colors Test - Dell Latitude CPi | User Guide - Page 177
Text Mode Character Test The Text Mode Character Test consists of a group of subtests that display printable characters and character attributes. The subtests check character quality and the ability of the display or monitor to show the characters correctly. A prompt at the bottom of each screen - Dell Latitude CPi | User Guide - Page 178
Text Mode Color Test The Text Mode Color Test contains three subtests that check the video subsystem's ability to present color in text modes. The following subsections describe these subtests. Color Attributes Subtest (80 x 25) The 80-column by 25-line color attributes subtest displays a pattern - Dell Latitude CPi | User Guide - Page 179
the pyramids are the correct colors; otherwise, type n. 320 x 200 16-Color Graphics Mode Screen The 320- x 200-pixel 16-color graphics mode screen displays a series of Xs in 16 different colors with the name of the color beneath each X. Type y if all the Xs are the correct colors; otherwise, type - Dell Latitude CPi | User Guide - Page 180
squares are the correct colors; otherwise, type n. 640 x 480 256-Color Graphics Mode Screen The 640- x 480-pixel 256-color graphics mode screen displays a series of squares with two colors in each square. Type y if all the squares appear to be correct; otherwise, type n. 800 x 600 16-Color Graphics - Dell Latitude CPi | User Guide - Page 181
be correct; otherwise, type n. 1024 x 768 16-Color Graphics Mode Screen (External Monitor) The 1024- x 768-pixel 16-color graphics mode screen displays a series of hourglasses in 16 different colors with the name of the color beneath each hourglass. Type y if all the hourglasses appear to be correct - Dell Latitude CPi | User Guide - Page 182
| Main Menu Options | Tests in the Dell Diagnostics | Error Messages | RAM Test Group | System Set Test Group | Video Test Group | Keyboard Test Group | Mouse Test | Diskette Drives Test Group | Hard-Disk Drives (Non-SCSI) Test Group | IDE CD-ROM Drives Test Group | Serial/Infrared Ports Test Group - Dell Latitude CPi | User Guide - Page 183
can get one from Dell. See Getting Help for information on contacting Dell. 1. Install a CD-ROM drive in the modular bay. For instructions, see CD-ROM Drive. 2. Attach the diskette drive to the parallel port connector on the back of the computer. For instructions, see Diskette Drive. 3. Turn off the - Dell Latitude CPi | User Guide - Page 184
in the diskette drive and boot the computer. NOTE: Before you read the rest of this chapter, you may want to start the Dell Diagnostics so you can see the menus on your display. When you start the diagnostics, the Dell logo screen appears, and a program tests the random-access memory (RAM) that will - Dell Latitude CPi | User Guide - Page 185
correctly, because the program writes data to the computer's memory that can cause problems unless properly cleared. Figure 2. Main Screen of the Dell Diagnostics Confirming the System Configuration Information When you boot the computer from your diagnostics diskette, the diagnostics checks your - Dell Latitude CPi | User Guide - Page 186
, the keyboard controller, and other key components Basic input/output system (BIOS) configuration information temporarily saved in RAM Do not be concerned if the System Configuration area does not list the names of all the components or devices you know are part of the computer. For example - Dell Latitude CPi | User Guide - Page 187
highlight the test group and press the Spacebar. To clear all selected test groups, select Clear All. The Key-Help option displays a list of key controls available for the selected option. The Quit Menu option returns you to the Main menu. Subtest Most of the test groups consist of several subtests - Dell Latitude CPi | User Guide - Page 188
The Key-Help option in the Subtest menu displays a list of available key controls. Quit Menu (Under Subtest) The Quit Menu option in the Subtest menu user input. Display, Printer, File If you have a printer attached to the computer, you can use it to print the status messages, if any, that are - Dell Latitude CPi | User Guide - Page 189
result file through Windows® Notepad by performing the following steps: 1. Select Quit Menu to exit the diagnostics and return to the MS-DOS prompt. 2. Remove the Dell Diagnostics Diskette from the diskette drive. 3. Reboot the computer. 4. If necessary, start your operating system. 5. Insert the - Dell Latitude CPi | User Guide - Page 190
You can access and review the result file in RAM test group, the Video test group, the Serial/Infrared Ports test group, the Diskette Drives test group, the Parallel Ports test group, the SCSI Devices test group, and the Hard-Disk Drives example, memory address limits specified for the RAM test group - Dell Latitude CPi | User Guide - Page 191
environment, remove your diagnostics diskette from drive A and reboot the computer. CAUTION: It is important that you quit the diagnostics program correctly, because the program writes data to the computer's memory that can cause problems unless properly cleared. Tests in the Dell Diagnostics The - Dell Latitude CPi | User Guide - Page 192
microprocessor. Video Keyboard Mouse Diskette Drives Hard-Disk Drives (Non-SCSI) IDE CD-ROM Drives Serial/Infrared Ports USB Register Test USB Memory Structure Test Tests the PC Card controller on the system board. Tests the computer's USB connector. Video Memory Test Video Hardware Test Text - Dell Latitude CPi | User Guide - Page 193
the network controller registers in the Dell Latitude C/Port APR or C/Dock Expansion Station. This test runs only if the computer is docked. Tests the operation of the audio chip set. Tests the record and playback ability of the internal microphone and speakers. Tests the function of the fan. Error - Dell Latitude CPi | User Guide - Page 194
when an error occurs or a subtest finishes. Pause (p) is the default value. Why Run a RAM Test? Faulty memory can cause a variety of problems that may not, at first glance, appear to be happening in RAM. If the computer displays one or more of the following symptoms, run both the subtests in the - Dell Latitude CPi | User Guide - Page 195
problems that are internal to the memory chips A parity check that verifies the ability of the memory subsystem to detect errors A refresh check, to verify that the dynamic RAM (DRAM) is being recharged properly System Set Test Group The subtests in the System Set test group check the computer - Dell Latitude CPi | User Guide - Page 196
the following computer functions: CMOS Confidence Test Checks the nonvolatile RAM (NVRAM) for accessibility and reliability of data storage by performing a data pattern check and verifying the uniqueness of memory addresses. DMA Controller Test Tests the direct memory access (DMA) controller and - Dell Latitude CPi | User Guide - Page 197
controller and the video control circuitry installed in the computer. These subtests check for the correct operation of the readable registers in the video circuitry and the controller the computer. Before you run the Video test group or any of its subtests, you should make sure that the problem is - Dell Latitude CPi | User Guide - Page 198
in the Keyboard test group verify the correct operation of your keyboard and the keyboard controller chip. Why Run a Keyboard Test? Keyboard problems are not always caused by the keyboard. For example, a complete lockup of the computer, rendering the keyboard inoperable, is probably not caused by - Dell Latitude CPi | User Guide - Page 199
in RAM as they are to be caused by a faulty touch pad or mouse. Three sources of problems include the configuration of a program (which changes the function of the touch pad or mouse), memory-resident programs like Sidekick or ProKey, and failure of a device driver (the software that controls the - Dell Latitude CPi | User Guide - Page 200
the hard-disk drive controller (which affects the ability to read from and write to the drive). Why Run a Hard-Disk Drives Test? If you check your hard-disk drive to determine the amount of available space, your operating system will probably report problem areas. Problem areas on hard-disk drives - Dell Latitude CPi | User Guide - Page 201
in this test group require a CD with data tracks. If the CD-ROM drive contains a CD that does not have the required data or audio tracks, the subtest fails. Why Run an IDE CD-ROM Drives Test? If you encounter a problem while using an application program on a CD, the problem could result from the - Dell Latitude CPi | User Guide - Page 202
An error message appears on the screen stating that the computer cannot read from an IDE CD-ROM drive. Subtests The five subtests in the IDE CD-ROM Drives test group confirm the following drive functions: Drive Controller Test Causes the drive to execute its internal self-test. Seek Test Checks the - Dell Latitude CPi | User Guide - Page 203
problem: If a peripheral works intermittently or produces intermittent errors, the port may be faulty. If the computer displays an error message that is related to the external device connected If a loopback device is attached, checks the line control bits of the serial port and sends a test pattern - Dell Latitude CPi | User Guide - Page 204
problem: If a peripheral works intermittently or produces intermittent errors, the port may be faulty. If the computer displays an error message that is related to the external device connected Loopback Test Tests the functionality of the control lines through an external loopback connector, if - Dell Latitude CPi | User Guide - Page 205
controller in the C/Port APR or C/Dock Expansion Station, and the SCSI devices attached to either. These tests run only if the computer is docked. NOTES: Before conducting these subtests on an external SCSI CD-ROM drive, insert into the drive a CD with audio and data tracks (such as a multimedia CD - Dell Latitude CPi | User Guide - Page 206
test group; you must select this subtest individually. Eject Removable Media Test Causes a CD-ROM drive to eject its CD, or a SCSI tape drive to eject its tape cartridge. Display Information Test Displays information about the SCSI controller in an expansion device, the resources allocated to the - Dell Latitude CPi | User Guide - Page 207
Shared RAM Test Performs a memory test on controllers with memory-mapped shared RAM. On controllers with first-in first-out (FIFO) shared RAM, writes a data pattern to all locations and reads the pattern back to verify the operation. Some controllers do not support shared RAM tests. Display - Dell Latitude CPi | User Guide - Page 208
Playback Test and the Analog Sound Playback test, a series of musical tones is played through the computer's built-in speaker(s). A message on the display Group The Fan Control Test in the Other test group checks the function of the fan. The fan works with the air intake on the computer as part
-
 1
1 -
 2
2 -
 3
3 -
 4
4 -
 5
5 -
 6
6 -
 7
7 -
8
-
9
-
10
-
11
-
12
-
13
-
14
-
15
-
16
-
17
-
18
-
19
-
20
-
21
-
22
-
23
-
24
-
25
-
26
-
27
-
28
-
29
-
30
-
31
-
32
-
33
-
34
-
35
-
36
-
37
-
38
-
39
-
40
-
41
-
42
-
43
-
44
-
45
-
46
-
47
-
48
-
49
-
50
-
51
-
52
-
53
-
54
-
55
-
56
-
57
-
58
-
59
-
60
-
61
-
62
-
63
-
64
-
65
-
66
-
67
-
68
-
69
-
70
-
71
-
72
-
73
-
74
-
75
-
76
-
77
-
78
-
79
-
80
-
81
-
82
-
83
-
84
-
85
-
86
-
87
-
88
-
89
-
90
-
91
-
92
-
93
-
94
-
95
-
96
-
97
-
98
-
99
-
100
-
101
-
102
-
103
-
104
-
105
-
106
-
107
-
108
-
109
-
110
-
111
-
112
-
113
-
114
-
115
-
116
-
117
-
118
-
119
-
120
-
121
-
122
-
123
-
124
-
125
-
126
-
127
-
128
-
129
-
130
-
131
-
132
-
133
-
134
-
135
-
136
-
137
-
138
-
139
-
140
-
141
-
142
-
143
-
144
-
145
-
146
-
147
-
148
-
149
-
150
-
151
-
152
-
153
-
154
-
155
-
156
-
157
-
158
-
159
-
160
-
161
-
162
-
163
-
164
-
165
-
166
-
167
-
168
-
169
-
170
-
171
-
172
-
173
-
174
-
175
-
176
-
177
-
178
-
179
-
180
-
181
-
182
-
183
-
184
-
185
-
186
-
187
-
188
-
189
-
190
-
191
-
192
-
193
-
194
-
195
-
196
-
197
-
198
-
199
-
200
-
201
-
202
-
203
-
204
-
205
-
206
-
207
-
208
 |
 |

Dell
™
Latitude
™
CPi A-Series System User's Guide
Introduction
Setup and Operation
Powering Your Computer
Traveling With Your Computer
Drivers
Customizing Your Computer
Removing and Replacing Parts
Troubleshooting
Technical Specifications
Getting Help
Information in this document is subject to change without notice.
© 1998 Dell Computer Corporation. All rights reserved.
Reproduction in any manner whatsoever without the written permission of Dell Computer Corporation is strictly forbidden.
Trademarks used in this text:
Dell, Latitude,
and the
DELL
logo are trademarks, and
DellWare
is a service mark of Dell Computer
Corporation;
Microsoft
,
Windows
,
Windows NT
, and
MS-DOS
are registered trademarks of Microsoft Corporation;
Intel
is a
registered trademark of Intel Corporation.
Other trademarks and trade names may be used in this document to refer to either the entities claiming the marks and names or
their products. Dell Computer Corporation disclaims any proprietary interest in trademarks and trade names other than its own.
1314D
Initial release: 4 Dec 1998