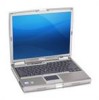
Dell Latitude D610 User Guide
Dell Latitude D610 Manual
 |
View all Dell Latitude D610 manuals
Add to My Manuals
Save this manual to your list of manuals |
Dell Latitude D610 manual content summary:
- Dell Latitude D610 | User Guide - Page 1
Dell™ Latitude™ D610 User's Guide Finding Information About Your Computer Using Microsoft® Windows® XP Dell™ QuickSet Using the Keyboard and Touch Pad Using the Display Using CDs, DVDs, and Other Multimedia Using a Battery Wireless Local Area Network Using PC Cards Using Smart Cards Travelling With - Dell Latitude D610 | User Guide - Page 2
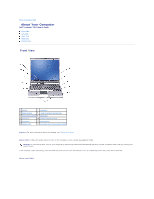
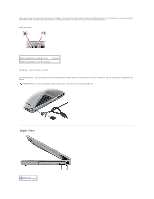
Contents Page About Your Computer Dell™ Latitude™ D610 User's Guide Front View Left View Right View Back View Bottom View Front View 1 display 7 speakers 2 power button 8 track stick/touch pad buttons 3 device status lights 9 track stick 4 keyboard 10 volume control buttons 5 touch pad 11 - Dell Latitude D610 | User Guide - Page 3
is turned off). ¡ Flashing orange: The battery charge is low. ¡ Solid orange: The battery charge is critically low. keyboard - The keyboard includes a numeric keypad as well as the Windows logo key. For information on supported keyboard shortcuts, see "Using the Keyboard and Touch Pad." touch pad - Dell Latitude D610 | User Guide - Page 4
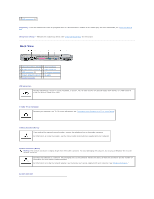
The green lights located above the keyboard indicate the following: Turns on when the numeric security cable slot 4 PC Card slot 2 audio connectors (2) 5 smart card slot 3 infrared sensor 6 hard drive PC Card slot - Supports one PC Card, such as a modem or network adapter. The computer ships - Dell Latitude D610 | User Guide - Page 5
For information on transferring data, see Windows Help, the Help and Support Center, or the documentation that came with your infrared-compatible device. audio connectors Attach headphones or speakers to the connector. Attach a microphone to the connector. hard drive - Stores software and data - Dell Latitude D610 | User Guide - Page 6
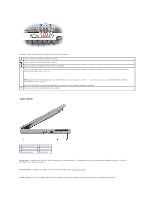
can install devices such as an optical drive or a Dell TravelLite™ module in the module bay. For more information, see "Using the Module Bay." device latch release - Releases the module bay device. See "Using the Module Bay" for instructions. Back View 1 network connector (RJ-45) 6 serial connector - Dell Latitude D610 | User Guide - Page 7
Display." serial connector Connects serial devices, such as a mouse or handheld device. AC adapter connector - Attach an AC adapter to the computer. The AC adapter converts AC power to the DC power hot. Fan noise is normal and does not indicate a problem with the fan or the computer. Bottom View - Dell Latitude D610 | User Guide - Page 8
3 battery charge gauge 7 modem/coin-cell battery cover 4 battery 8 hard drive memory module cover - Covers the compartment that contains the memory module(s). See "Adding and Replacing Parts." battery-bay latch release - Releases the battery. See Using a Battery for instructions. battery charge - Dell Latitude D610 | User Guide - Page 9
Appendix Dell™ Latitude™ D610 User's Guide Macrovision , side, or back panel of your computer, on card-mounting brackets, and on the cards themselves. If any one of the labels carries a used in accordance with the manufacturer's instruction manual, may cause interference with radio communications. - Dell Latitude D610 | User Guide - Page 10
- Dell Latitude D610 | User Guide - Page 11
Standard Format (ASF) Dell™ Latitude™ D610 User's Guide Alert Standard Format (ASF supports the following ASF alerts and remote capabilities: Alert Chassis Intrusion - Physical Security Violation/Chassis Intrusion - Physical Security Violation Event Cleared Failure to Boot to BIOS System Password - Dell Latitude D610 | User Guide - Page 12
Back to Contents Page Using a Battery Dell™ Latitude™ D610 User's Guide Battery Performance Checking the Battery Charge Conserving Battery Power Power Management Modes Configuring Power Management Settings Charging the Battery Replacing the Battery Storing a Battery Battery Performance NOTE: For - Dell Latitude D610 | User Guide - Page 13
when you press the power button, close the display, or press . NOTE: See Power Management Modes for more information on conserving battery power. Power Management Modes Standby Mode Standby mode conserves power by turning off the display and the hard drive after a predetermined period of - Dell Latitude D610 | User Guide - Page 14
hibernate mode if the battery charge level becomes critically low. To manually enter hibernate mode: l Click Start® Turn off computer, press and hold , and then click Hibernate. or l Depending on how you set the power management options in the Power Options Properties window or the QuickSet - Dell Latitude D610 | User Guide - Page 15
your docking device for instructions. 2. Ensure that the computer is turned off or suspended in a power management mode. 3. Slide and hold the battery-bay (or module-bay) latch release, and then remove the battery from the bay. To replace the battery, follow the removal procedure in reverse order - Dell Latitude D610 | User Guide - Page 16
any of the procedures in this section, follow the safety instructions in the Product Information Guide. You can install devices such as a floppy drive, CD drive, CD-RW drive, DVD drive, CD-RW/DVD drive, DVD+RW, second battery, or second hard drive in the module bay. About the Device Security Screw - Dell Latitude D610 | User Guide - Page 17
the Computer Is Running NOTICE: If the device security screw is installed, you must turn off the computer before removing the screw. 1. Before ejecting the device, double-click the Safely Remove Hardware icon on the taskbar, click the device you want to eject, and click Stop. NOTICE: To prevent - Dell Latitude D610 | User Guide - Page 18
4. Push the new device into the bay until it clicks. The operating system automatically recognizes the device. 5. If necessary, enter your password to unlock your computer. Back to Contents Page - Dell Latitude D610 | User Guide - Page 19
Dell™ Latitude™ D610 User's Guide Playing a CD or DVD Adjusting the Volume Adjusting the Picture Connecting Your Computer to a TV or Audio Device Playing a CD or DVD NOTICE: Do not press down on the CD or DVD tray when you open or close it. Keep the tray closed when you are not using the drive - Dell Latitude D610 | User Guide - Page 20
using too much memory and preventing DVD playback, adjust the display properties. 1. Click the Start button and click Control Panel. 2. Under Pick a category, click Appearance and Themes. 3. Under Pick a task..., click Change the screen resolution. 4. In the Display Properties window, click and drag - Dell Latitude D610 | User Guide - Page 21
Display Settings for a TV in Microsoft® Windows® XP" to ensure that the computer recognizes and works properly with the TV. S-Video and Standard Audio 1 standard S-video cable 2 standard audio TV/digital audio adapter cable) if your TV or audio device supports S-video but not S/PDIF digital audio. 2. - Dell Latitude D610 | User Guide - Page 22
turn on the computer. 8. See Enabling the Display Settings for a TV in Microsoft® Windows® XP to ensure that the computer recognizes and works properly with the TV. Enabling S/PDIF Digital Audio If your computer has a DVD drive, you can enable digital audio for DVD playback. 1. Click Start®Programs - Dell Latitude D610 | User Guide - Page 23
to the main menu screen. Enabling S/PDIF in the Windows Audio Driver NOTE: Enabling S/PDIF in Windows disables the sound from the headphone connector. 1. Double-click the speaker icon in the Windows notification area. 2. Click the Options menu and then click Advanced Controls. 3. Click Advanced - Dell Latitude D610 | User Guide - Page 24
Audio screen. Enabling the Display Settings for a TV in Microsoft® Windows® XP Your computer has either an integrated video controller (Intel® Extreme Graphics) or a discrete video controller (ATI Mobility Radeon X300). To enable the display settings for a TV on your computer, follow the instructions - Dell Latitude D610 | User Guide - Page 25
. c. In the new window, ensure that the display resolution settings are correct. 9. Click Apply to view the new settings. 10. Click OK to confirm the settings change. 11. Click Yes to keep the new settings. 12. Click OK. Discrete Video Controller Use the keyboard shortcut to enable your - Dell Latitude D610 | User Guide - Page 26
Cleaning Your Computer Dell™ Latitude™ D610 User's Guide Computer, Keyboard, and Display Floppy Drive CDs and DVDs CAUTION: Before you begin any of the procedures in this section, follow the safety instructions in the Product Information Guide. Computer, Keyboard, and Display CAUTION: Before you - Dell Latitude D610 | User Guide - Page 27
- Dell Latitude D610 | User Guide - Page 28
hard drive or from the optional Drivers and Utilities CD (also known as the ResourceCD). Starting the Dell Diagnostics From Your Hard Drive The Dell Diagnostics is located on a hidden diagnostic utility partition on your hard drive. NOTE: If your computer cannot display a screen image, contact Dell - Dell Latitude D610 | User Guide - Page 29
error code and problem description and follow the instructions on the screen. If you cannot resolve the error condition, contact Dell. NOTE: The Service Tag for your computer is located at the top of each test screen. If you contact Dell, technical support will ask for your Service Tag. 3. If you - Dell Latitude D610 | User Guide - Page 30
- Dell Latitude D610 | User Guide - Page 31
Display Dell™ Latitude™ D610 User's Guide Adjusting Brightness Switching the Video Image Setting Display Resolution and Refresh Rate Dual Independent Display Mode Swapping Primary and Secondary Displays Adjusting Brightness When a Dell™ computer is running on battery power, you can conserve power - Dell Latitude D610 | User Guide - Page 32
task..., click the area you want to change, or under or pick a Control Panel icon, click Display. 4. In the Display Properties window, click the Settings tab. NOTE: If you choose a resolution or color palette that is higher than the display supports, the settings adjust automatically to the closest - Dell Latitude D610 | User Guide - Page 33
to Contents Page Reinstalling Software Dell™ Latitude™ D610 User's Guide Drivers Resolving Software and Hardware Incompatibilities Using Microsoft® Windows® XP System Restore Reinstalling Microsoft® Windows® XP NOTE: The Drivers and Utilities CD and the Operating System CD are optional and may not - Dell Latitude D610 | User Guide - Page 34
close any open files, and exit any open programs. 2. Insert the Drivers and Utilities CD. In most cases, the CD starts running automatically. If it does not, start Windows Explorer, click your CD drive directory to display the CD contents, and then double-click the autorcd.exe file. The first time - Dell Latitude D610 | User Guide - Page 35
view, so they may not work if you set your Dell™ computer to the Windows Classic view. Creating a Restore Point 1. Click the Start button and click Help and Support. 2. Click System Restore. 3. Follow the instructions on the screen. Restoring the Computer to an Earlier Operating State NOTICE: Before - Dell Latitude D610 | User Guide - Page 36
hard drive. For conventional hard drive configurations, the primary hard drive is the first drive detected by the computer. To reinstall Windows XP, you need the following items: l Dell™ Operating System CD l Dell Drivers and Utilities CD NOTE: The optional Drivers and Utilities CD contains drivers - Dell Latitude D610 | User Guide - Page 37
and follow the instructions on the screen. The Windows XP Setup screen appears, and the operating system begins to copy files and install the devices. The computer automatically restarts multiple times. NOTE: The time required to complete the setup depends on the size of the hard drive and the speed - Dell Latitude D610 | User Guide - Page 38
19. Reinstall the appropriate drivers with the Drivers and Utilities CD. 20. Reinstall your virus protection software. 21. Reinstall your programs. NOTE: To reinstall and activate your Microsoft Office or Microsoft Works Suite programs, you need - Dell Latitude D610 | User Guide - Page 39
instructions l Regulatory information l Ergonomics information l End User License Agreement l Service Tag and Express Service Code l Microsoft Windows License Label NOTE: This document is available as a PDF at support.dell.com. Dell™ Product Information Guide Service Tag and Microsoft® Windows - Dell Latitude D610 | User Guide - Page 40
download Notebook System Software: 1. Go to support.dell.com, select your region or business segment, and enter your Service Tag. 2. Select Drivers & Downloads and click Go. 3. Click your operating system and search for the keyword Notebook System Software. l Software upgrades and troubleshooting - Dell Latitude D610 | User Guide - Page 41
After you reinstall your operating system, use the Drivers and Utilities CD (ResourceCD) to reinstall drivers for the devices that came with your computer. Your operating system product key label is located on your computer. NOTE: The color of your CD varies based on the operating system you ordered - Dell Latitude D610 | User Guide - Page 42
™ Latitude™ D610 User's Guide Technical Assistance Problems With Your Order Product Information Returning Items for Warranty Repair or Credit Before You Call Contacting Dell Technical Assistance If you need help with a technical problem, Dell is ready to assist you. CAUTION: If you need to remove - Dell Latitude D610 | User Guide - Page 43
support service, see Getting Help and then call the number for your country as listed in "Contacting Dell." Problems With Your Order If you have a problem with your order, such as missing parts, wrong parts, or incorrect billing, contact Dell for customer assistance. Have your invoice or packing - Dell Latitude D610 | User Guide - Page 44
on the back of the computer): Express Service Code: Return Material Authorization Number (if provided by Dell support technician): Operating system and version: Devices: Expansion cards: Are you connected to a network? Yes No Network, version, and network adapter: Programs and versions: See your - Dell Latitude D610 | User Guide - Page 45
Support Services Sales Aruba General Support Australia (Sydney) Website: support.ap.dell.com International Access Code: 0011 E-mail: support.ap.dell.com/contactus Country Code: 61 City Code: 2 General Support Website: support.euro.dell.com E-mail: tech_support_central_europe@dell - Dell Latitude D610 | User Guide - Page 46
and Warranty Support E-mail: [email protected] Customer Care E-mail: [email protected] Hardware and Warranty Support Fax Hardware and Warranty Support (Dell™ Dimension™ and Inspiron) Hardware and Warranty Support (OptiPlex™, Latitude™, and Dell Precision™) Hardware and Warranty Support (servers - Dell Latitude D610 | User Guide - Page 47
Switchboard Country Code: 30 Gold Service Switchboard Sales Fax Grenada General Support Guatemala General Support Guyana General Support Website: support.ap.dell.com Hardware and Warranty Support E-mail: [email protected] Hardware and Warranty Support (Dimension and Inspiron) Hong Kong - Dell Latitude D610 | User Guide - Page 48
Hardware and Warranty Support Customer Service (Xiamen, China) Transaction Sales (Xiamen, China) Website: support.ap.dell.com Malaysia (Penang) International Access Code: 00 Hardware And Warranty Support (Dell Precision, OptiPlex, and Latitude) Hardware And Warranty Support (Dimension, Inspiron - Dell Latitude D610 | User Guide - Page 49
Code: 52 Customer Service Main Montserrat General Support Netherlands Antilles General Support Website: support.euro.dell.com Hardware and Warranty Support for XPS portable computers only Hardware and Warranty Support for all other Dell computers Netherlands (Amsterdam) International - Dell Latitude D610 | User Guide - Page 50
Code: 65 Hardware and Warranty Support (OptiPlex, Latitude, and Dell Precision) Hardware and Warranty Support (PowerApp, PowerEdge, PowerConnect, Support, Customer Service, and Sales (Penang, Malaysia) Website: support.euro.dell.com Home and Small Business Hardware and Warranty Support - Dell Latitude D610 | User Guide - Page 51
Employee Purchase Program (EPP) Customers Printers and Projectors Support Public (government, education, and healthcare) Customer Service and Support Employee Purchase Program (EPP) Customers Dell Sales Dell Outlet Store (Dell refurbished computers) Software and Peripherals Sales Spare Parts - Dell Latitude D610 | User Guide - Page 52
U.S. Virgin Islands Venezuela Back to Contents Page Dell Services for the Deaf, Hard-of-Hearing, or Speech-Impaired General Support General Support toll-free: 1-877-DELLTTY (1-877-335-5889) 1-877-673-3355 8001-3605 - Dell Latitude D610 | User Guide - Page 53
- and operating system-independent. B backup - A copy of a program or data file on a floppy, CD, or hard drive. As a precaution, back up the data files from your hard drive regularly. battery - An internal power source used to operate portable computers when not connected to an AC adapter and an - Dell Latitude D610 | User Guide - Page 54
used for audio and software programs. CD drive - A drive that uses optical technology to read data from CDs. CD player - The software used to play music CDs. The CD player displays a window with buttons that you use to play a CD. CD-R - CD recordable - A recordable version of a CD. Data can - Dell Latitude D610 | User Guide - Page 55
of .hlp or .chm. hibernate mode - A power management mode that saves everything in memory to a reserved space on the hard drive and then turns off the computer. When you restart the computer, the memory information that was saved to the hard drive is automatically restored. HTML - hypertext markup - Dell Latitude D610 | User Guide - Page 56
audio, and video equipment. IDE - integrated device electronics - An interface for mass storage devices in which the controller is integrated into the hard drive or CD drive wide area network (WAN). LCD - liquid crystal display - The technology used by portable computer and flat-panel displays. LED - Dell Latitude D610 | User Guide - Page 57
that supports devices such as optical drives, a second battery, or a Dell TravelLite™ module. monitor - The high-resolution TV-like device that displays computer output. mouse - A pointing device that controls the movement of the cursor on your screen. Typically you roll the mouse over a hard, flat - Dell Latitude D610 | User Guide - Page 58
real time clock - Battery-powered clock on the system board that keeps the date and time after you shut down the computer. RTCRST - real-time clock reset - A jumper on the system board of some computers that can often be used for troubleshooting problems. S ScanDisk - A Microsoft utility that checks - Dell Latitude D610 | User Guide - Page 59
number of colors and resolution that a program displays depends on the capabilities of the monitor, the video controller and its drivers, and the amount of video memory installed in the computer. S-video TV-out - A connector used to attach a TV or digital audio device to the computer. SXGA - super - Dell Latitude D610 | User Guide - Page 60
Windows desktop. Change your wallpaper through the Windows Control Panel array - A video standard for video adapters and controllers that supports resolutions up to 1024 x 768. Z ZIF Zip drive - A high-capacity floppy drive developed by Iomega Corporation that uses 3.5-inch removable disks called - Dell Latitude D610 | User Guide - Page 61
Ctrl> Opens the Task Manager window Enables and disables the scroll lock Battery Displays the Dell™ QuickSet Battery Meter CD or DVD Tray Ejects the tray out of the drive (if Dell QuickSet is installed). Display Functions Switches the video - Dell Latitude D610 | User Guide - Page 62
box (if the computer is connected to a network) Windows logo key and Opens the System Properties dialog box To adjust keyboard operation, such as the character repeat rate, open the Control Panel, click Printers and Other Hardware, and click Keyboard. Touch Pad The touch pad detects the - Dell Latitude D610 | User Guide - Page 63
and close the window. Changing the Track Stick Cap You can replace your track stick cap Dell in certain countries. 1. Pull the cap off the track stick. 2. Align the new cap over the square track-stick post and gently press the cap down onto the post. NOTICE: The track stick can damage the display - Dell Latitude D610 | User Guide - Page 64
Back to Contents Page Passwords Dell™ Latitude™ D610 User's Guide About Passwords Using a Primary Password Using an Administrator Password Using a Hard Drive Password About Asset Tags Enabling Trusted Platform Module (TPM) About Passwords NOTE: Passwords are disabled when you receive your computer. - Dell Latitude D610 | User Guide - Page 65
administrator password provides access to the computer, but it does not provide access to a hard drive that is protected by a hard drive password. About Asset Tags NOTE: Some of these features may not be available for your computer or in certain countries. Using the Dell™ Portables Asset Tag Utility - Dell Latitude D610 | User Guide - Page 66
computer displays the new owner tag. Deleting an Owner Tag NOTE: For security, you cannot set, change, or delete the owner tag if the primary or administrator passwords are set. 1. Boot the computer using the bootable floppy disk you created in "Using the Dell™ Portables Asset Tag Utility." 2. Type - Dell Latitude D610 | User Guide - Page 67
computer. 2. If necessary, install the TPM software. The TPM software is factory-installed in the C:\Dell\TPM directory. You can also download it from support.dell.com. 3. Run the setup.exe file: a. Follow the instructions to install the Broadcom Secure Foundation software. b. If you are using TPM - Dell Latitude D610 | User Guide - Page 68
7. Initialize the TPM owner and user passwords: a. Boot your computer to the Microsoft® Windows® operating system. b. Click Start® Programs® Broadcom Security Platforms Tools. Then, click the icon for the Security Platform Initialization Wizard. c. Follow the instructions for creating the TPM owner, - Dell Latitude D610 | User Guide - Page 69
Contents Page Using PC Cards Dell™ Latitude™ D610 User's Guide PC Card Types PC Card Blanks Extended PC Cards Installing a PC Card Removing a PC Card or Blank PC Card Types See "Specifications" for information on supported PC Cards. NOTE: A PC Card is not a bootable device. The PC Card slot has one - Dell Latitude D610 | User Guide - Page 70
tells you to load the manufacturer's drivers, use the floppy or CD that came with the PC Card. Removing a PC Card or Blank NOTICE: Use the PC Card configuration utility (click the icon in the taskbar) to select a card and stop it from functioning before you remove it from the computer. If you - Dell Latitude D610 | User Guide - Page 71
to Contents Page Dell™ QuickSet Dell™ Latitude™ D610 User's Guide NOTE: This feature may not be available on your computer. Dell™ QuickSet provides you with easy access to configure or view the following types of settings: l Network connectivity l Power management l Display l System information - Dell Latitude D610 | User Guide - Page 72
Page Adding and Replacing Parts Dell™ Latitude™ D610 User's Guide Before You Begin Memory Modem Mini PCI Card Hard Drive Keyboard Internal Card With Bluetooth® Wireless Technology Coin-Cell Battery Before You Begin This chapter provides procedures for removing and installing the components - Dell Latitude D610 | User Guide - Page 73
the bottom of the computer and remove the battery from the bay, and then press the power button to ground the system board. 8. Remove any installed PC Cards from the PC Card slot. 9. Remove the hard drive. Memory You can increase your computer memory by installing memory modules on the system board - Dell Latitude D610 | User Guide - Page 74
a 45-degree angle, and rotate the module down until it clicks into place. If you do not feel the click, remove the module and reinstall it. To add or replace a memory module in the DIMM B connector: 1. Follow the procedures in "Before You Begin." 2. Turn the computer over, loosen the captive screw - Dell Latitude D610 | User Guide - Page 75
connector, do not use tools to spread the memory-module securing clips. 3. If you are replacing a memory module, ground yourself and remove the existing module: a. Use your fingertips to carefully spread apart the securing clips on each end of the memory module connector until the module pops up - Dell Latitude D610 | User Guide - Page 76
coin-cell battery 4. If a modem is not already installed, go to step 5. If you are replacing a modem, remove the existing modem: a. Remove the screw that correct insertion. If you feel resistance, check the connectors and realign the card. 6. Align the modem with the screw hole and press the modem - Dell Latitude D610 | User Guide - Page 77
, follow the safety instructions in the Product Information Guide. 1. Follow the procedures in "Before You Begin." 2. Remove the keyboard. 1 Mini PCI card 2 antenna wires (2) 3. If a Mini PCI card is not already installed, go to step 4. If you are replacing a Mini PCI card, remove the existing - Dell Latitude D610 | User Guide - Page 78
PCI card. 6. Replace the cover and screws. Hard Drive CAUTION: If you remove the hard drive from the computer when the drive is hot, do not touch the metal housing of the hard drive. CAUTION: Before working inside your computer, follow the safety instructions in the Product Information Guide. NOTICE - Dell Latitude D610 | User Guide - Page 79
. 5. Slide the hard drive into the bay until it is fully seated. 6. Replace and tighten the screws. 7. Use the Operating System CD to install the operating system for your computer. 8. Use the Drivers and Utilities CD to install the drivers and utilities for your computer. Keyboard CAUTION: Before - Dell Latitude D610 | User Guide - Page 80
center control cover 4. Remove the keyboard: a. Remove the two M2.5 x 6-mm screws across the top of the keyboard. NOTICE: The keycaps on the keyboard are fragile, easily dislodged, and time-consuming to replace. Be careful when removing and handling the keyboard. NOTE: Lift the keyboard carefully - Dell Latitude D610 | User Guide - Page 81
1. Remove the battery. 2. Open the card door. 3. Using a plastic scribe or screwdriver, gently pry the module from the plastic guide bracket and the compartment so that you can disconnect the card from its cable and remove it from the computer. 1 card connector 2 card 3 door Coin-Cell Battery - Dell Latitude D610 | User Guide - Page 82
sure you do not remove the plastic film between the battery and the system board as you remove the double-sided tape from the coin-cell battery. NOTICE: To avoid damaging the system board or modem card, retain the double-sided tape and secure the replacement coin-cell battery to the plastic film - Dell Latitude D610 | User Guide - Page 83
Back to Contents Page - Dell Latitude D610 | User Guide - Page 84
l System security and hard-drive password settings NOTICE: Unless you are an expert computer user or are directed to do so by Dell technical support, do not change the system setup settings. Certain changes might make your computer work incorrectly. Viewing the System Setup Screens 1. Turn on (or - Dell Latitude D610 | User Guide - Page 85
to boot the Dell Diagnostics on the diagnostics utility partition on your hard drive.) 1. Shut down the computer through the Start menu. 2. If the computer is connected to a docking device (docked), undock it. See the documentation that came with your docking device for instructions. 3. Connect the - Dell Latitude D610 | User Guide - Page 86
- Dell Latitude D610 | User Guide - Page 87
Back to Contents Page Using Smart Cards Dell™ Latitude™ D610 User's Guide About Smart Cards Installing a Smart Card NOTE: This feature may not be available on your computer. About Smart Cards Smart cards are portable credit-card shaped devices with internal integrated circuits. The top surface of - Dell Latitude D610 | User Guide - Page 88
Problems Dell™ Latitude™ D610 User's Guide Dell Technical Update Service Dell Support Utility Drive Problems E-Mail, Modem, and Internet Problems Error Messages IEEE 1394 Device Problems Keyboard Problems Lockups and Software Problems Memory Problems Network Problems PC Card Problems Power Problems - Dell Latitude D610 | User Guide - Page 89
For more information about the Dell Support Utility, click the question mark (?) at the top of the Dell Support screen. Drive Problems CAUTION: Before you begin any of the procedures in this section, follow the safety instructions in the Product Information Guide. Fill out the Diagnostics Checklist - Dell Latitude D610 | User Guide - Page 90
, where x is the hard drive letter, and then press . Click the Start button and click My Computer. E-Mail, Modem, and Internet Problems CAUTION: Before you begin any of the procedures in this section, follow the safety instructions in the Product Information Guide. NOTE: Connect the modem - Dell Latitude D610 | User Guide - Page 91
microprocessor has failed. Contact Dell. CD drive controller failure - The CD drive does not respond to commands from the computer. See "Drive Problems." Data error - The hard drive cannot read the data. See "Drive Problems." Decreasing available memory - One or more memory modules may be faulty or - Dell Latitude D610 | User Guide - Page 92
Dell Diagnostics." Hard-disk drive read failure - The hard drive may be defective. Shut down the computer, remove the hard drive, and boot the computer from a CD. Then shut down the computer, reinstall the hard drive, and restart the computer. If the problem persists, try another drive. Run the Hard - Dell Latitude D610 | User Guide - Page 93
/Remove and follow the prompts on the screen. 5. See the program documentation for installation instructions. Sector not found - The operating system cannot locate a sector on the hard drive. You may have a defective sector or corrupted FAT on the hard drive. Run the Windows error-checking utility - Dell Latitude D610 | User Guide - Page 94
displayed instead of letters. Verify that the numbers lock light is not lit. Lockups and Software Problems CAUTION: Before you begin any of the procedures in this section, follow the safety instructions in the Product Information Guide your keyboard or moving your mouse, press and hold the power - Dell Latitude D610 | User Guide - Page 95
or you are having problems connecting to the Internet, your computer might be infected with spyware. Use an anti-virus program that includes anti-spyware protection (your program may require an upgrade) to scan the computer and remove spyware. For more information, go to support.dell.com and search - Dell Latitude D610 | User Guide - Page 96
your network administrator or the person who set up your network to verify that your network settings are correct and that the network is functioning. PC Card Problems CAUTION: Before you begin any of the procedures in this section, follow the safety instructions in the Product Information Guide - Dell Latitude D610 | User Guide - Page 97
adapter, will cause you to receive a WARNING message. Docking Power Considerations NOTE: Ensure that your battery is charged before attempting to undock your computer. NOTE: When you undock your computer from the docking device, a solid black screen may appear, depending on the type of video adapter - Dell Latitude D610 | User Guide - Page 98
printer is recognized by Windows - 1. Click the Start button, click Control Panel, and then click driver - See the printer documentation for instructions. Scanner Problems CAUTION: Before you begin any of the procedures in this section, follow the safety instructions in the Product Information Guide - Dell Latitude D610 | User Guide - Page 99
volume using keyboard shortcuts - Press to disable (mute) or reenable the integrated speakers. Reinstall the sound (audio) driver - See "Reinstalling Drivers and Utilities." No sound from external speakers NOTE: The volume control in some MP3 players overrides the Windows volume setting - Dell Latitude D610 | User Guide - Page 100
Information Guide. If the display is blank NOTE: If you are using a program that requires a higher resolution than your computer supports, it is recommended that you attach an external monitor to your computer. Check the battery - If you are using a battery to power your computer, the battery charge - Dell Latitude D610 | User Guide - Page 101
different settings for Color quality and Screen resolution. Run the Video diagnostics tests - If no error message appears and you still have a display problem, but the display is not completely blank, run the Video device group in the Dell Diagnostics. Then contact Dell. See "Error Messages" - If an - Dell Latitude D610 | User Guide - Page 102
Dell™ Latitude™ D610 User's Guide Processor Processor type L1 cache L2 cache External bus frequency System Information System chipset Processor Side Data bus width DRAM bus width Processor address bus width Flash EPROM Graphics bus PCI bus PC Card CardBus controller PC Card connector Cards supported - Dell Latitude D610 | User Guide - Page 103
Controller Interface Network adapter Wireless v.92 56K MDC (optional) softmodem internal AC'97 bus 10/100/1000 Ethernet LAN on system board internal Mini PCI Wi-Fi (802.11b, 802.11b/g, or 802.11a/b/g) and Bluetooth® wireless technology (optional) Video NOTE: Your Dell™ Latitude™ D610 computer - Dell Latitude D610 | User Guide - Page 104
hours 1 hour varies depending on operating conditions and can be significantly reduced under certain power-intensive conditions See Using a Battery for more information on battery life and operating time. 300 discharge/charge cycles 0° to 35°C (32° to 95°F) -20° to 65°C (-4° to 149°F) AC Adapter - Dell Latitude D610 | User Guide - Page 105
(maximum at 4-second pulse); 3.34 A (continuous) Output power 90 W or 65 W Rated output voltage 19.5 VDC ( (-40° to 149°F) (both) Physical Height Width Depth Weight: With travel module With CD drive 34.3 mm (1.4 inches) 312.0 mm (12.5 inches) 262.2 mm (10.5 inches measured with hard drive in - Dell Latitude D610 | User Guide - Page 106
Dell™ Latitude™ D610 User's Guide or loss of data and tells you how to avoid the problem. CAUTION: A CAUTION indicates a potential for property damage, personal Glossary. If you purchased a Dell™ n Series computer, any references in this document to Microsoft® Windows® operating systems are not - Dell Latitude D610 | User Guide - Page 107
Back to Contents Page Travelling With Your Computer Dell™ Latitude™ D610 User's Guide Identifying Your Computer Packing the Computer Travel Tips Identifying Your Computer l Attach a name tag or business card to the computer. l Write down your Service Tag and store it in a safe place away from the - Dell Latitude D610 | User Guide - Page 108
where you live. l If the computer belongs to a company, notify the security office of the company. l Contact Dell customer service to report the missing computer. Provide the computer Service Tag, the case number, and the name, address, and telephone number of the law enforcement agency to which you - Dell Latitude D610 | User Guide - Page 109
Network Dell™ Latitude™ D610 User's Guide Overview Connecting to a Wireless Local Area Network Overview A WLAN is a series of interconnected computers that communicate with each other over the air waves rather than through a network a wireless network card and to determine the type of card, use one - Dell Latitude D610 | User Guide - Page 110
. NOTE: If the software is removed or corrupted, follow the instructions in the user documentation for your wireless network card. Verify the type of wireless network card installed in your computer and then search for that name on the Dell Support website at support.dell.com. For information on the - Dell Latitude D610 | User Guide - Page 111
utility installed on your computer, see your wireless network documentation in the Windows Help and Support Center. To access the Help and Support Center: 1. Click the Start button and click Help and Support. 2. Under Pick a Help topic, click Dell User and System Guides.s 3. Under Device Guides - Dell Latitude D610 | User Guide - Page 112
Page Using Microsoft® Windows® XP Dell™ Latitude™ D610 User's Guide Help and Support Center Microsoft® Windows® Classic View Desktop Cleanup Wizard Transferring Information to a New Computer User Accounts and Fast User Switching Setting Up a Home and Office Network Network Setup Wizard Internet - Dell Latitude D610 | User Guide - Page 113
Window sizes l Internet bookmarks You can transfer the data to the new computer over a network or serial connection, or you can store it on a removable medium, such as a writable CD , insert the Windows XP Operating System CD. 2. On the Welcome to Microsoft Windows XP screen, click Perform additional - Dell Latitude D610 | User Guide - Page 114
Adding User Accounts After the Microsoft® Windows® XP operating system is installed, the administrator or a user with administrator rights can create additional user accounts. 1. Click the Start button and click Control Panel. 2. In the Control Panel window, click User Accounts. 3. Under Pick a task - Dell Latitude D610 | User Guide - Page 115
to the Internet" enables the integrated firewall provided with Windows XP Service Pack 1 (SP1). 4. Complete the checklist and required preparations. 5. Return to the Network Setup Wizard and follow the instructions on the screen. Internet Connection Firewall The Internet Connection Firewall provides
-
 1
1 -
 2
2 -
 3
3 -
 4
4 -
 5
5 -
 6
6 -
 7
7 -
8
-
9
-
10
-
11
-
12
-
13
-
14
-
15
-
16
-
17
-
18
-
19
-
20
-
21
-
22
-
23
-
24
-
25
-
26
-
27
-
28
-
29
-
30
-
31
-
32
-
33
-
34
-
35
-
36
-
37
-
38
-
39
-
40
-
41
-
42
-
43
-
44
-
45
-
46
-
47
-
48
-
49
-
50
-
51
-
52
-
53
-
54
-
55
-
56
-
57
-
58
-
59
-
60
-
61
-
62
-
63
-
64
-
65
-
66
-
67
-
68
-
69
-
70
-
71
-
72
-
73
-
74
-
75
-
76
-
77
-
78
-
79
-
80
-
81
-
82
-
83
-
84
-
85
-
86
-
87
-
88
-
89
-
90
-
91
-
92
-
93
-
94
-
95
-
96
-
97
-
98
-
99
-
100
-
101
-
102
-
103
-
104
-
105
-
106
-
107
-
108
-
109
-
110
-
111
-
112
-
113
-
114
-
115
 |
 |
Dell™ Latitude™ D610 User's Guide
Click the links to the left for information on the features and operation of your computer. For information on other documentation included with your computer,
see "
Finding Information
."
Notes, Notices, and Cautions
Abbreviations and Acronyms
For a complete list of abbreviations and acronyms, see the
Glossary
.
If you purchased a Dell™ n Series computer, any references in this document to Microsoft®
Windows
®
operating systems are not applicable.
Information in this document is subject to change without notice.
©
2004
–2005 Dell Inc. All rights reserved.
Reproduction in any manner whatsoever without the written permission of Dell Inc.
is strictly forbidden.
Trademarks used in this text:
Dell
, the
DELL
logo,
Inspiron
,
XPS
,
Dell Precision
,
Dimension
,
OptiPlex
,
Latitude, Dell TravelLite, PowerEdge, PowerVault, PowerApp, ExpressCharge, Strike
Zone,
and
Dell OpenManage
are trademarks of Dell Inc.;
Intel
,
Intel SpeedStep
, and
Pentium
are registered trademarks of Intel Corporation;
Microsoft
,
MS-DOS
,
Outlook
,
and
Windows
are registered trademarks of Microsoft Corporation;
Bluetooth
is a registered trademark owned by Bluetooth SIG, Inc. and is used by Dell Inc. under license;
EMC
is a registered
trademark of EMC Corporation;
ENERGY STAR
is a registered trademark of the U.S. Environmental Protection Agency. As an ENERGY STAR partner, Dell Inc. has determined that this
product meets the ENERGY STAR guidelines for energy efficiency.
Other trademarks and trade names may be used in this document to refer to either the entities claiming the marks and names or their products. Dell Inc. disclaims any
proprietary interest in trademarks and trade names other than its own.
Model PP11L
December 2005
P/N P4946
Rev. A03
Finding Information
Using the Module Bay
About Your Computer
Solving Problems
Using Microsoft
®
Windows
®
XP
Using the Dell Diagnostics
Dell™ QuickSet
Cleaning Your Computer
Using the Keyboard and Touch Pad
Reinstalling Software
Using the Display
Adding and Replacing Parts
Using CDs, DVDs, and Other Multimedia
Using the System Setup Program
Using a Battery
Alert Standard Format (ASF)
Wireless Local Area Network
Getting Help
Using PC Cards
Specifications
Using Smart Cards
Appendix
Travelling With Your Computer
Glossary
Passwords
NOTE:
A NOTE indicates important information that helps you make better use of your computer.
NOTICE:
A NOTICE indicates either potential damage to hardware or loss of data and tells you how to avoid the problem.
CAUTION:
A CAUTION indicates a potential for property damage, personal injury, or death.
NOTE:
Some features may not be available for your computer or in certain countries.