Dell Latitude E6400 XFR Setup and Features Information Tech Sheet
Dell Latitude E6400 XFR Manual
 |
View all Dell Latitude E6400 XFR manuals
Add to My Manuals
Save this manual to your list of manuals |
Dell Latitude E6400 XFR manual content summary:
- Dell Latitude E6400 XFR | Setup and Features Information Tech Sheet - Page 1
Dell™ Latitude™ E6400 XFR Setup and Features Information WARNING: A WARNING indicates a potential for property damage, personal injury, or death. CAUTION: A CAUTION indicates either potential damage to hardware or loss of data and tells you how to avoid the problem. NOTE: A NOTE indicates - Dell Latitude E6400 XFR | Setup and Features Information Tech Sheet - Page 2
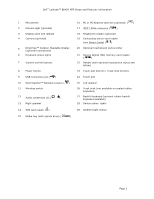
Dell™ Latitude™ E6400 XFR Setup and Features Information 1 Microphone 2 Camera light (optional) 3 Display latch and release 4 Camera (optional) 5 DirectVue™ Outdoor-Readable Display (optional touchscreen) 6 Keyboard status lights 7 Volume control buttons 8 Power button 9 USB - Dell Latitude E6400 XFR | Setup and Features Information Tech Sheet - Page 3
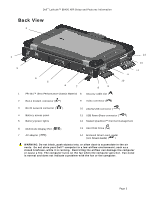
( ) 3 RJ-45 network connector ( ) 4 Battery access panel 5 Battery/power lights 10 eSATA/USB connector ( ) 11 USB PowerShare connector ( ) 12 Sealed QuadCool™ thermal management 6 Multimode Display Port ( ) 13 Hard Disk Drive ( ) 7 AC adapter ( ) 14 Enclosed Smart-card reader (see - Dell Latitude E6400 XFR | Setup and Features Information Tech Sheet - Page 4
Dell™ Latitude™ E6400 XFR Setup and Features Information Bottom View 3 1 2 1 Sealed QuadCool™ thermal management 3 Battery release latches 2 Sliding cover to docking device connector ( ) Battery Removal WARNING: Before working inside your computer, read the safety information that shipped - Dell Latitude E6400 XFR | Setup and Features Information Tech Sheet - Page 5
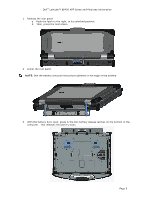
Dell™ Latitude™ E6400 XFR Setup and Features Information 1. Release the rear panel. a. Push the latch to the right, to its unlocked position. b. Then, press the latch down. b a 2. Lower the rear panel. NOTE: See the battery removal instructions adhered to the edge of the battery. 3. With the battery - Dell Latitude E6400 XFR | Setup and Features Information Tech Sheet - Page 6
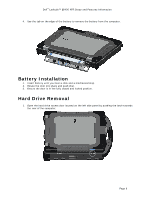
Dell™ Latitude™ E6400 XFR Setup and Features Information 4. Use the tab on the edge of the battery to remove the battery from the computer. Battery Installation 1. Insert battery is in the fully closed and locked position. Hard Drive Removal 1. Open the hard drive access door located on the left - Dell Latitude E6400 XFR | Setup and Features Information Tech Sheet - Page 7
Dell™ Latitude™ E6400 XFR Setup and Features Information NOTE: See hard drive removal instructions adhered to the edge of the hard drive. 2. Press in the blue locking button on the right side of the compartment. 3. While pressing in the blue locking button, use the tab on the edge of the hard drive - Dell Latitude E6400 XFR | Setup and Features Information Tech Sheet - Page 8
Dell™ Latitude™ E6400 XFR Setup and Features Information Back Press-Fit Doors A press-fit door is opened by inserting a finger into the door slot and pulling the door away from - Dell Latitude E6400 XFR | Setup and Features Information Tech Sheet - Page 9
Dell™ Latitude™ E6400 XFR Setup and Features Information Front Secure Digital Door The secure digital door is located at the front of the computer behind the handle. 1 1 Secure digital door - Dell Latitude E6400 XFR | Setup and Features Information Tech Sheet - Page 10
Dell™ Latitude™ E6400 XFR Setup the power strip or electrical outlet may cause fire or equipment damage. CAUTION: When you disconnect the AC adapter cable computer to a docking device or other external device, such as a printer. 1. Connect the AC adapter to the AC adapter connector on the computer - Dell Latitude E6400 XFR | Setup and Features Information Tech Sheet - Page 11
Dell™ Latitude™ E6400 XFR Setup and Features Information 3. Connect USB devices, such as a mouse or keyboard. 4. Connect IEEE 1394 devices, such as a DVD player. 5. Open the computer display and press the power button to turn on the computer. Smart Cards There are two main types of Smart or Common - Dell Latitude E6400 XFR | Setup and Features Information Tech Sheet - Page 12
Dell™ Latitude™ E6400 XFR Setup keyboard touch pad. DirectVue™ Touch Display Information The computer provides an optional touch screen the care instructions regarding the onto the screen. With warranty. The touch screen is pre-configured Drivers and Documentation Your DirectVue Touch Display's drivers - Dell Latitude E6400 XFR | Setup and Features Information Tech Sheet - Page 13
Dell™ Latitude™ E6400 XFR Setup and Features Information You can launch the pre- driver as well as providing a link for downloading the latest driver. General The general property page shows all the Touchkit touch screen controllers installed including RS232, USB and PS2 interfaces. The touch screen - Dell Latitude E6400 XFR | Setup and Features Information Tech Sheet - Page 14
Dell™ Latitude™ E6400 XFR Setup and Features Information linearization is completed, the linearity of the touch screen will be shown in the Linearization Curve window. • Draw Test: Used for accuracy and performance checking. 1. 4 Points Calibration The touch screen must be calibrated before it can - Dell Latitude E6400 XFR | Setup and Features Information Tech Sheet - Page 15
Dell™ Latitude™ E6400 XFR Setup and Features Information clicks within the specified area in the specified double click time will be recognized as a double click event. 5. Mouse Emulation mode There are 5 mouse emulation modes for the Touchkit touch screen Touchkit driver supports multiple monitor - Dell Latitude E6400 XFR | Setup and Features Information Tech Sheet - Page 16
Dell™ Latitude™ E6400 XFR Setup and Features Information 1 3 1 2 1 Tether anchor points 2 Tether 3 Stylus NOTE: The stylus and tether are provided when the computer is configured with the optional touchscreen. NOTE: - Dell Latitude E6400 XFR | Setup and Features Information Tech Sheet - Page 17
Dell™ Latitude™ E6400 XFR Setup and Features Information 1. Remove the 4 screws from the front of the computer. 2. Install the shoulder strap anchors to the front of the computer using the screws removed in step 1. 3. Install the shoulder strap to the holes in the shoulder strap anchors. Page 17 - Dell Latitude E6400 XFR | Setup and Features Information Tech Sheet - Page 18
Dell™ Latitude™ E6400 XFR Setup and Features Information Specifications NOTE: Offerings may vary by region. For more information regarding the configuration of your computer, click Start -> Help and Support and select the option to view information about your computer. Video NOTE: Your Dell™ - Dell Latitude E6400 XFR | Setup and Features Information Tech Sheet - Page 19
Dell™ Latitude™ E6400 XFR Setup and Features Information Type Dimensions: 12-cell "smart" lithium ion prismatic rugged slice (84 Whr) 6-cell "smart" lithium ion (56 Whr) 6-cell lithium-ion batteries: Depth 206 mm (8.11 inches) Height 19.8 mm (0.78 inches) 12-cell lithium-ion rugged slice - Dell Latitude E6400 XFR | Setup and Features Information Tech Sheet - Page 20
Dell™ Latitude™ E6400 XFR Setup and Features Information Output voltage 19.5 V DC Output current 4.62 A Height 32 mm (1.3 inches) Width 60 mm (2.4 inches) Depth 140 mm (5.5 inches) Weight 0.425 kg (0.9 lb) PA-3E 90 E-Series AC adapter: Output voltage 19.5 V DC Output current 4.62 A Height 15 mm (0.6 - Dell Latitude E6400 XFR | Setup and Features Information Tech Sheet - Page 21
Dell™ Latitude™ E6400 XFR Setup and Features Information Information in this document is subject to change without notice. © 2009 Dell Inc. All rights reserved. Printed in the U.S.A. Reproduction in any manner whatsoever without the written permission of Dell Inc. is strictly forbidden.
-
 1
1 -
 2
2 -
 3
3 -
 4
4 -
 5
5 -
 6
6 -
 7
7 -
8
-
9
-
10
-
11
-
12
-
13
-
14
-
15
-
16
-
17
-
18
-
19
-
20
-
21
 |
 |

Dell™ Latitude™ E6400 XFR
Setup and Features Information
WARNING
:
A WARNING indicates a potential for property damage, personal injury,
or death.
CAUTION: A CAUTION indicates either potential damage to hardware or loss of data
and tells you how to avoid the problem.
NOTE:
A NOTE indicates important information that helps you make better use of your
computer.
Front View
1
2
3
4
5
6
7
8
9
10
11
12
13
14
15
17
18
19
22
21
24
23
25
26
27
28
29
16
20
Model U315K