Dell OptiPlex 960 Setup and Quick Reference Guide
Dell OptiPlex 960 Manual
 |
View all Dell OptiPlex 960 manuals
Add to My Manuals
Save this manual to your list of manuals |
Dell OptiPlex 960 manual content summary:
- Dell OptiPlex 960 | Setup and Quick Reference Guide - Page 1
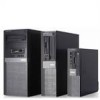
™ Optiplex™ 960 Setup and Quick Reference Guide This guide provides a features overview, specifications, and quick setup, software, and troubleshooting information for your computer. For more information about your operating system, devices, and technologies, see the Dell Technology Guide at support - Dell OptiPlex 960 | Setup and Quick Reference Guide - Page 2
avoid the problem. CAUTION: A CAUTION indicates a potential for property damage, personal injury, or death. If you purchased a Dell™ n Series computer, any of Dell Inc. is strictly forbidden. Trademarks used in this text: Dell, the DELL logo, OptiPlex, and DellConnect are trademarks of Dell Inc - Dell OptiPlex 960 | Setup and Quick Reference Guide - Page 3
1 About Your Computer 7 Mini Tower - Front View 7 Mini Tower - Back View 8 Mini Tower - Back Panel Connectors 9 Desktop - Front View 10 Desktop - Back View 11 Desktop - Back Panel Connectors 12 Small Form Factor- Front View 13 Small Form Factor- Back View 14 Small Form Factor- Back Panel - Dell OptiPlex 960 | Setup and Quick Reference Guide - Page 4
® XP 25 3 Specifications 29 4 Troubleshooting Tips 39 Using the Hardware Troubleshooter 39 Tips 39 Power Problems 39 Memory Problems 47 Lockups and Software Problems 48 Dell Technical Update Service 49 Dell Diagnostics 49 5 Reinstalling Software 51 Drivers 51 Identifying Drivers 51 - Dell OptiPlex 960 | Setup and Quick Reference Guide - Page 5
Assistance 59 Fast Call for Help 60 Loading iAMT drivers on installation 60 Technical Support and Customer Service . . . . . 61 DellConnect 61 Online Services 61 AutoTech Service 62 Automated Order-Status Service 62 Problems With Your Order 62 Product Information 63 Returning Items - Dell OptiPlex 960 | Setup and Quick Reference Guide - Page 6
6 Contents - Dell OptiPlex 960 | Setup and Quick Reference Guide - Page 7
About Your Computer Mini Tower - Front View 1 2 34 5 6 7 8 9 12 10 11 1 hard drive activity light 3 WiFi (optional) light 5 power button, power light 2 link integrity light 4 diagnostic lights 6 optical drive About Your Computer 7 - Dell OptiPlex 960 | Setup and Quick Reference Guide - Page 8
(4) or memory card reader) 11 headphone connector 12 microphone connector Mini Tower - Back View 3 4 2 5 1 6 7 1 power supply check button 2 power supply check light 3 cover-release latch and padlock ring 4 security cable slot (security screw also an option) 8 About Your Computer - Dell OptiPlex 960 | Setup and Quick Reference Guide - Page 9
card slots (4) 6 back-panel connectors Mini Tower - Back Panel Connectors 1 2 3 4 5 6 7 8 14 13 12 11 9 10 1 PS2 mouse connector 3 serial connector 5 network adapter connector 7 space for optional wireless connector 9 line-in/microphone connector 11 VGA video connector 13 DisplayPort - Dell OptiPlex 960 | Setup and Quick Reference Guide - Page 10
(2) 7 headphone connector 9 hard drive activity light 11 WiFi (optional) light 2 optical drive 4 Dell™ badge 6 microphone connector 8 flex bay (for optional floppy drive, memory card reader, or second 3.5-inch hard disk drive) 10 link integrity light 12 diagnostic lights 10 About Your Computer - Dell OptiPlex 960 | Setup and Quick Reference Guide - Page 11
Desktop - Back View 1 23 4 7 6 5 1 expansion card slots (4) 3 power supply check light 5 security cable slot 7 back-panel connectors 2 power supply check button 4 cover-release latch and padlock ring (security screw also an option) 6 power connector About Your Computer 11 - Dell OptiPlex 960 | Setup and Quick Reference Guide - Page 12
connector 9 line-in/microphone connector 11 VGA video connector 13 DisplayPort connector 9 11 10 2 parallel (printer) connector 4 network-activity light 6 link-integrity light 8 line-out connector 10 USB 2.0 connectors (6) 12 eSATA connector 14 PS2 keyboard connector 12 About Your Computer - Dell OptiPlex 960 | Setup and Quick Reference Guide - Page 13
Small Form Factor- Front View 1 2 3 4 12 11 10 9 8 76 5 1 power button, power light 3 optical-drive eject button 5 Dell badge 7 microphone connector 9 hard drive activity light 11 WiFi (optional) light 2 optical-drive (slim-line) 4 slim-line flex bay (for optional floppy drive or memory - Dell OptiPlex 960 | Setup and Quick Reference Guide - Page 14
Small Form Factor- Back View 1 2 3 4 1 expansion-card slots (2) 3 power supply check light 5 security cable slot 7 back-panel connectors 5 7 6 2 power supply check button 4 cover-release latch and padlock ring (security screw also an option) 6 power connector 14 About Your Computer - Dell OptiPlex 960 | Setup and Quick Reference Guide - Page 15
Small Form Factor- Back Panel Connectors 1 2 3 4 5 6 7 8 14 13 12 1 PS2 mouse connector 3 serial connector 5 network adapter connector 7 space for optional wireless connector 9 line-in/microphone connector 11 VGA video connector 13 DisplayPort connector 9 11 10 2 parallel (printer) - Dell OptiPlex 960 | Setup and Quick Reference Guide - Page 16
16 About Your Computer - Dell OptiPlex 960 | Setup and Quick Reference Guide - Page 17
computer comes with VGA and DisplayPort connectors for video (Desktop back panel shown here). 1 2 1 DisplayPort connector 2 VGA video connector 2 Using the DisplayPort for video may require an optional adapter to connect to older monitors which only support VGA and/or DVI (available at www.dell - Dell OptiPlex 960 | Setup and Quick Reference Guide - Page 18
of a DisplayPort monitor or adapter will result in the x16 PCI-Express slot being disabled. This is not a valid configuration. Remove the PCI-Express card. Alternatively you may use the VGA port to connect a display device if the PCI-Express card is not a graphics card. 3 Connect the monitor using - Dell OptiPlex 960 | Setup and Quick Reference Guide - Page 19
5 Connect the network cable. 6 Connect the modem (if your computer has this option). Setting Up Your Computer 19 - Dell OptiPlex 960 | Setup and Quick Reference Guide - Page 20
7 Connect the power cable(s). 8 Press the power buttons on the monitor and the computer. 20 Setting Up Your Computer - Dell OptiPlex 960 | Setup and Quick Reference Guide - Page 21
your network. 4 5 3 2 6 1 1 Internet service 2 cable or DSL modem 3 wireless router (not necessary if your 4 desktop computer with network computer has the optional WiFi adapter capability) 5 desktop computer with USB wireless 6 USB wireless adapter adapter The Dell™ Wireless Antenna, if - Dell OptiPlex 960 | Setup and Quick Reference Guide - Page 22
. Follow the guidelines below when installing your computer in an enclosure. CAUTION: Before installing your computer in an enclosure, read the safety instructions that shipped with your computer. NOTICE: The operating temperature specifications indicated in this document reflect the maximum ambient - Dell OptiPlex 960 | Setup and Quick Reference Guide - Page 23
enclosure) to allow hot air to escape. NOTICE: Do not install your computer in an enclosure that does not allow airflow. Restricting the airflow impacts your computer's performance, possibly causing it to overheat. • If your computer is installed in a corner on a desk or under a desk, leave at least - Dell OptiPlex 960 | Setup and Quick Reference Guide - Page 24
computer and to the telephone wall connector before you set up your Internet connection. If you are using a DSL or cable/satellite modem connection, contact your ISP or cellular phone service for setup instructions. Setting Up Your Internet Connection To set up an Internet connection with a desktop - Dell OptiPlex 960 | Setup and Quick Reference Guide - Page 25
the Dell Technology Guide. If you have successfully connected in the past, the ISP might have a service outage. Contact your ISP to check the service status instructions on the screen and use the setup information provided by your ISP to complete the setup. Transferring Information to a New Computer - Dell OptiPlex 960 | Setup and Quick Reference Guide - Page 26
media, such as a writable CD, for transfer to the new computer. NOTE: You can transfer information from an old computer to a new computer by directly connecting a serial cable to the input/output (I/O) ports of the two computers. For instructions on setting up a direct cable connection between two - Dell OptiPlex 960 | Setup and Quick Reference Guide - Page 27
must create a wizard disk that will allow you to create a backup image file to removable media. To create a wizard disk, use your new computer with Windows XP and perform the following steps: 1 Open the Files and Settings Transfer Wizard: click Start→ All Programs→ Accessories→ System Tools→ Files - Dell OptiPlex 960 | Setup and Quick Reference Guide - Page 28
appears. 3 Click Finished and restart the new computer. NOTE: For more information about this procedure, search support.dell.com for document #154781 (What Are The Different Methods To Transfer Files From My Old Computer To My New Dell™ Computer Using the Microsoft® Windows® XP Operating System - Dell OptiPlex 960 | Setup and Quick Reference Guide - Page 29
about your computer. Processor Processor type System Information Chipset RAID Support DMA channels Interrupt levels BIOS chip (NVRAM) NIC Memory Type Memory connectors Intel® Core™2 Quad Processor FSB up to 1333 MHz Intel® Core™2 Duo Desktop Processor Intel® Pentium® Dual-Core Desktop Processor - Dell OptiPlex 960 | Setup and Quick Reference Guide - Page 30
on Mini Tower and Desktop via PCIe x16 graphics card slot. Support for half-height video cards is available on Desktop and Small Form Factor via PCIe x16 graphics card slot. Analog Devices ADI 1984A Integrated HD Audio PCI 2.3 PCI Express 1.0A and 2.0 SATA 1.0 and 2.0 USB 2.0 30 Specifications - Dell OptiPlex 960 | Setup and Quick Reference Guide - Page 31
-height slots with riser Small Form Factor: two half-height slots Mini Tower: two connectors Desktop: two low-profile connectors, with support for two full-height 6.9-in PCI cards (or one 6.9-in PCI and one 6.9-in PCIe x16 card) if a PCI riser board is used Small Form Factor: one connector 124 pins - Dell OptiPlex 960 | Setup and Quick Reference Guide - Page 32
number of hard disk drives supported is determined by the number of internal 3.5-inch bays. NOTE: The optical drives (CD, DVD) is determined by the number of external 5.25-inch bays. Mini Tower and Desktop: one 34-pin connector Small Form Factor: one 38-pin low-profile connector 32 Specifications - Dell OptiPlex 960 | Setup and Quick Reference Guide - Page 33
Audio eSATA Serial PS/2 Parallel System board connectors: SATA Internal USB device Floppy drive Processor fan VGA and DisplayPort connectors RJ-45 connector Mini Tower: four front-panel, and six back-panel USB connectors Desktop: two front-panel, and six back-panel USB connectors Small Form Factor - Dell OptiPlex 960 | Setup and Quick Reference Guide - Page 34
Power 12 V Power LAN on motherboard (LOM) Controls and Lights Front of computer: Power button Power light Drive activity light Diagnostic light Mini Tower: four full-height slots Desktop: four half-height slots without riser, two full-height slots, two half-height slots with riser Small Form Factor - Dell OptiPlex 960 | Setup and Quick Reference Guide - Page 35
Orange, 1000 - Amber/Yellow off (no light) - The computer is not detecting a physical connection to the network. Network activity light (on yellow blinking light integrated network adapter) Power AC - DC power supply Wattage Mini Tower: 305 W Desktop: 255 W Small Form Factor: 235 W Maximum - Dell OptiPlex 960 | Setup and Quick Reference Guide - Page 36
Power Input voltage (see the safety 115/230 VAC information that shipped with your computer for important voltage setting information) Input frequency 50/60 Hz Input amperage Mini Tower: 3.6 A/1.8 A Desktop: 4.0 A/2.0 A Small Form Factor (12.74 in) at least 5.9 kg (13.0 lbs) 36 Specifications - Dell OptiPlex 960 | Setup and Quick Reference Guide - Page 37
3048 m (-50 to 10,000 ft) -15.2 to 10,668 m (-50 to 35,000 ft) G2 or lower as defined by ISA-S71.04-1985 Specifications 37 - Dell OptiPlex 960 | Setup and Quick Reference Guide - Page 38
38 Specifications - Dell OptiPlex 960 | Setup and Quick Reference Guide - Page 39
safety best practices information, see www.dell.com/regulatory_compliance. The diagnostic lights on the front of the computer along with the status of the power button indicate the potential problem with the system. Consult the following table in case of a power problem. Troubleshooting Tips 39 - Dell OptiPlex 960 | Setup and Quick Reference Guide - Page 40
NOTE: The diagnostic lights will blink when the power button is amber or off, and will not when it is blue. This has no other significance. Light Pattern Off Off Problem Description The computer is either turned off or not receiving power. A possible motherboard failure has occurred. Suggested - Dell OptiPlex 960 | Setup and Quick Reference Guide - Page 41
Light Pattern Blinking Amber Steady Amber Problem Description A possible motherboard, power supply, or peripheral failure has occurred. No CPU present. Suggested Resolution 1 Power off computer, leaving the computer plugged in. Press and hold the power supply test button on the rear of the power - Dell OptiPlex 960 | Setup and Quick Reference Guide - Page 42
occurred. • Remove all peripheral cards from the PCI and PCI-E slots and restart the computer. If the computer boots, add the peripheral cards back one by one until you find the bad one. • If the problem persists, the motherboard is probably bad. Contact Dell (see "Contacting Dell" on page 66). 42 - Dell OptiPlex 960 | Setup and Quick Reference Guide - Page 43
Reseat the 2x2 power connector from the power supply unit. • If the system still fails to boot, contact Dell (see "Contacting Dell" on page 66). Possible peripheral card or motherboard failure has occurred. • Remove all peripheral cards from the PCI and PCI-E slots and restart the computer. If the - Dell OptiPlex 960 | Setup and Quick Reference Guide - Page 44
module or reinstalled all modules without error. • If available, install working memory of the same type into your computer (see your service manual). • If the problem persists, contact Dell (see "Contacting Dell" on page 66). A possible graphics card failure has occurred. • Reseat any installed - Dell OptiPlex 960 | Setup and Quick Reference Guide - Page 45
. • If available, install working memory of the same type into your computer (see your service manual). • If the problem persists, contact Dell (see "Contacting Dell" on page 66). Memory modules are detected, but a memory configuration or compatibility error has occurred. • Ensure that no special - Dell OptiPlex 960 | Setup and Quick Reference Guide - Page 46
, then remove a different card and restart the computer. 3 Repeat this process for each expansion card installed. If the computer starts normally, troubleshoot the last card removed from the computer for resource conflicts. 4 If the problem persists, contact Dell (see "Contacting Dell" on page 66 - Dell OptiPlex 960 | Setup and Quick Reference Guide - Page 47
the memory installation guidelines. • Ensure that the memory you are using is supported by your computer. For more information about the type of memory supported by your computer, see "Specifications" on page 29. • Run the Dell Diagnostics (see "Dell Diagnostics" on page 49). Troubleshooting Tips - Dell OptiPlex 960 | Setup and Quick Reference Guide - Page 48
Lockups and Software Problems NOTE: The procedures in this document were written for the Windows default view, so they may not apply if you set your Dell computer to the Windows Classic view. The computer does not start up Ensure that the power cable is firmly connected to the computer and to the - Dell OptiPlex 960 | Setup and Quick Reference Guide - Page 49
for your computer. To enroll for the Dell Technical Update service, go to support.dell.com/technicalupdate. Dell Diagnostics CAUTION: Before you begin any of the procedures in this section, follow the safety instructions that shipped with your computer. Starting the Dell Diagnostics From Your - Dell OptiPlex 960 | Setup and Quick Reference Guide - Page 50
Run the 32 Bit Dell Diagnostics from the numbered list. If multiple versions are listed, select the version that is appropriate for your computer. 7 When the Dell Diagnostics Main Menu appears, select the test that you want to run, and follow the instructions on the screen. 50 Troubleshooting Tips - Dell OptiPlex 960 | Setup and Quick Reference Guide - Page 51
Utilities" on page 51). Reinstalling Drivers and Utilities NOTICE: The Dell Support website at support.dell.com and your Drivers and Utilities media provide approved drivers for your computer. If you install drivers obtained from other sources, your computer might not work correctly. Reinstalling - Dell OptiPlex 960 | Setup and Quick Reference Guide - Page 52
the device for which the new driver was installed and click Properties. 4 Click the Drivers tab→ Roll Back Driver. If Device Driver Rollback does not resolve the problem, use System Restore (see "Restoring Your Operating System" on page 53) to return your computer to the operating state that existed - Dell OptiPlex 960 | Setup and Quick Reference Guide - Page 53
follow the instructions on the screen. If a particular driver is not listed, that driver is not required by your operating system, or you must find the drivers that came with the specific device. Manually Reinstalling Drivers 1 Click the Windows Vista Start button , and right-click Computer. 2 Click - Dell OptiPlex 960 | Setup and Quick Reference Guide - Page 54
for the Windows default view, so they may not apply if you set your Dell™ computer to the Windows Classic view. Starting System Restore 1 Click Start . 2 Dell Factory Image Restore NOTICE: Use Dell Factory Image Restore only if System Restore did not resolve your operating system problem. Using Dell - Dell OptiPlex 960 | Setup and Quick Reference Guide - Page 55
any programs or drivers installed after you received your computer. If possible, back up the data before using Dell Factory Image Restore. NOTE: Dell Factory Image Restore may not be available in certain countries or on certain computers. 1 Turn on the computer. 2 When the Dell logo appears, press - Dell OptiPlex 960 | Setup and Quick Reference Guide - Page 56
drive configurations, the primary hard drive is the first drive detected by the computer. To reinstall Windows, you need the Dell™ Operating System media and the Dell Drivers and Utilities media. The Dell Drivers and Utilities media contains drivers that were installed at the time you ordered your - Dell OptiPlex 960 | Setup and Quick Reference Guide - Page 57
when you use support.dell.com or contact support. • Enter the Express Service Code to direct your call when contacting support NOTE: Your Service Tag/Express Service Code is located on your computer. Drivers and Utilities Media • A diagnostic program for your computer The Drivers and Utilities - Dell OptiPlex 960 | Setup and Quick Reference Guide - Page 58
parts The Service Manual for your computer can be found at support.dell.com. • How to configure system settings • How to troubleshoot and solve problems Dell Technology Guide • About your operating system The Dell Technology Guide is available at support.dell.com. Dell™ Systems Management - Dell OptiPlex 960 | Setup and Quick Reference Guide - Page 59
computer is experiencing. 2 See "Dell Diagnostics" on page 49 for procedures on how to run Dell Diagnostics. 3 Fill out the "Diagnostics Checklist" on page 65. 4 Use Dell's extensive suite of online services available at Dell Support (support.dell.com) for help with installation and troubleshooting - Dell OptiPlex 960 | Setup and Quick Reference Guide - Page 60
After downloading the drivers, you are ready to configure your computer to take advantage of the Intel iAMT management capabilities. For information on setting up and configuring your computer for Intel iAMT management: 1 Navigate to support.dell.com. 2 Select Manuals. 3 Locate the instructions for - Dell OptiPlex 960 | Setup and Quick Reference Guide - Page 61
Guide for Intel iAMT setup and configuration information. Technical Support and Customer Service Dell's support service is available to answer your questions about Dell™ hardware. Our support staff uses computer-based diagnostics to provide fast, accurate answers. To contact Dell's support service - Dell OptiPlex 960 | Setup and Quick Reference Guide - Page 62
anonymous, and use your e-mail address as your password AutoTech Service Dell's automated support service-AutoTech-provides recorded answers to the questions most frequently asked by Dell customers about their laptop and desktop computers. When you call AutoTech, use your touch-tone telephone to - Dell OptiPlex 960 | Setup and Quick Reference Guide - Page 63
65), indicating the tests that you have run and any error messages reported by the Dell Diagnostics (see "Contacting Dell" on page 66). 3 Include any accessories that belong with the item(s) being returned (power cables, software floppy disks, guides, and so on) if the return is for credit. 4 Pack - Dell OptiPlex 960 | Setup and Quick Reference Guide - Page 64
ready when you call. The code helps Dell's automated-support telephone system direct your call more efficiently. You may also be asked for your Service Tag (located on the back or bottom of your computer). Remember to fill out the Diagnostics Checklist (see "Diagnostics Checklist" on page 65). If - Dell OptiPlex 960 | Setup and Quick Reference Guide - Page 65
contents of the system's start-up files. If the computer is connected to a printer, print each file. Otherwise, record the contents of each file before calling Dell. Error message, beep code, or diagnostic code: Description of problem and troubleshooting procedures you performed: Getting Help 65 - Dell OptiPlex 960 | Setup and Quick Reference Guide - Page 66
provides several online and telephone-based support and service options. Availability varies by country and product, and some services may not be available in your area. To contact Dell for sales, technical support, or customer service issues: 1 Visit support.dell.com, and verify your country or - Dell OptiPlex 960 | Setup and Quick Reference Guide - Page 67
drive, 49 Dell Systems Management Administrator's Guide, 58 Dell Technology Guide, 58 DellConnect, 61 Desktop System Software, 57 diagnostics Dell, 49 documentation, 57 Dell Systems Management Administrator's Guide, 58 Dell Technology Guide, 58 Service Manual, 58 drivers, 51 Drivers and Utilities - Dell OptiPlex 960 | Setup and Quick Reference Guide - Page 68
, 57 memory troubleshooting, 47 N networks, 21 connecting, 21 O operating system Dell Factory Image Restore, 54 media, 55 reinstalling, 57 System Restore, 53 Operating System media, 57 operating system product key, 58 P phone numbers, 66 power power light conditions, 39 troubleshooting, 39 problems - Dell OptiPlex 960 | Setup and Quick Reference Guide - Page 69
problems, 48 reinstalling, 51 troubleshooting, 48-49 updates, 49 specifications all, 29 audio, 30 connectors, 33 controls and lights, 34 drives, 32 environmental, 37 expansion bus, 30 memory, 29 physical, 36 power, 35 processor, 29 system information, 29 video, 30 support, 59 contacting Dell - Dell OptiPlex 960 | Setup and Quick Reference Guide - Page 70
, 7-9 front, 7 W warranty information, 58 Windows License label, 58 Windows Vista Dell Factory Image Restore, 54 Device Driver Rollback, 52 Program Compatibility wizard, 48 reinstalling, 57 returning to a previous device driver version, 52 System Restore, 53-54 Windows XP Files and Settings Transfer
-
 1
1 -
 2
2 -
 3
3 -
 4
4 -
 5
5 -
 6
6 -
 7
7 -
8
-
9
-
10
-
11
-
12
-
13
-
14
-
15
-
16
-
17
-
18
-
19
-
20
-
21
-
22
-
23
-
24
-
25
-
26
-
27
-
28
-
29
-
30
-
31
-
32
-
33
-
34
-
35
-
36
-
37
-
38
-
39
-
40
-
41
-
42
-
43
-
44
-
45
-
46
-
47
-
48
-
49
-
50
-
51
-
52
-
53
-
54
-
55
-
56
-
57
-
58
-
59
-
60
-
61
-
62
-
63
-
64
-
65
-
66
-
67
-
68
-
69
-
70
 |
 |

www.dell.com | support.dell.com
Dell
™
Optiplex
™
960
Setup and Quick Reference Guide
This guide provides a features overview, specifications, and quick setup,
software, and troubleshooting information for your computer. For more
information about your operating system, devices, and technologies, see
the
Dell Technology Guide
at
support.dell.com
.
Models DCSM, DCNE, DCCY