Dell OptiPlex SX260 Setup and Quick Reference Guide
Dell OptiPlex SX260 Manual
 |
View all Dell OptiPlex SX260 manuals
Add to My Manuals
Save this manual to your list of manuals |
Dell OptiPlex SX260 manual content summary:
- Dell OptiPlex SX260 | Setup and Quick Reference Guide - Page 1
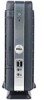
Dell™ OptiPlex™ SX Systems Setup and Quick Reference Guide Guide de configuration et de référence rapide Guía de instalación y de referencia rápida Model DCT www.dell.com | support.dell.com - Dell OptiPlex SX260 | Setup and Quick Reference Guide - Page 2
- Dell OptiPlex SX260 | Setup and Quick Reference Guide - Page 3
Dell™ OptiPlex™ SX Systems Setup and Quick Reference Guide Model DCT www.dell.com | support.dell.com - Dell OptiPlex SX260 | Setup and Quick Reference Guide - Page 4
in any manner whatsoever without the written permission of Dell Computer Corporation is strictly forbidden. Trademarks used in this text: Dell, OptiPlex, and the DELL logo are trademarks of Dell Computer Corporation; Microsoft and Windows are registered trademarks of Microsoft Corporation; Intel - Dell OptiPlex SX260 | Setup and Quick Reference Guide - Page 5
16 Attaching the Cable Cover 17 Attaching the Stand to the Mounting Plate 19 Finding Information and Assistance 21 Solving Problems 22 Troubleshooting Tools 23 Using the Dell Drivers and Utilities CD 23 Running the Dell Diagnostics 24 Running the Dell IDE Hard-Drive Diagnostics 25 Contents 3 - Dell OptiPlex SX260 | Setup and Quick Reference Guide - Page 6
(U.S. Only 27 "Total Satisfaction" Return Policy (U.S. Only 30 Limited Warranty Terms for Dell-Branded Hardware Products (Canada Only 31 "Total Satisfaction" Return Policy (Canada Only 33 Dell Software and Peripherals (Canada Only 34 1-Year End-User Manufacturer Guarantee (Latin America and - Dell OptiPlex SX260 | Setup and Quick Reference Guide - Page 7
About This Guide This document contains getting started/setup; solving problems; and safety, regulatory, and warranty information about your Dell™ OptiPlex™ computer. To obtain the latest versions of the documents on your hard drive, go to the Dell Support website at support.dell.com. Regulatory - Dell OptiPlex SX260 | Setup and Quick Reference Guide - Page 8
www.dell.com | support.dell.com cable cover hard-drive cover (open cover to access module device locking switch) module bay computer cover power adapter chassis-stand mounting plate computer stand 6 Setup and Quick Reference Guide - Dell OptiPlex SX260 | Setup and Quick Reference Guide - Page 9
a trained service technician. Always follow installation instructions closely. • To help prevent electric shock, plug the computer and device power cables into properly grounded electrical outlets. These cables are equipped with 3-prong plugs to help ensure proper grounding. Do not use adapter plugs - Dell OptiPlex SX260 | Setup and Quick Reference Guide - Page 10
www.dell.com | support.dell.com CAUTION: Safety Instructions (continued) • To help protect your computer from sudden, transient increases and decreases in electrical power, use a surge suppressor, line conditioner, or uninterruptible power supply (UPS). • Ensure that nothing rests on your computer - Dell OptiPlex SX260 | Setup and Quick Reference Guide - Page 11
computer is equipped with one of the following: - A fixed-voltage power supply - Computers with a fixed-voltage power supply used in your location. NOTICE: To help avoid damaging a computer with a manual voltage selection switch, set the switch for the voltage that most closely matches the AC power - Dell OptiPlex SX260 | Setup and Quick Reference Guide - Page 12
www.dell.com | support.dell.com When Using Your Computer (continued) When Working Inside Your Computer Before you open the computer cover, perform the following steps in the sequence indicated. CAUTION: Do not attempt to service the computer yourself, except as explained in your online Dell™ - Dell OptiPlex SX260 | Setup and Quick Reference Guide - Page 13
pads and workbench pads. Battery Disposal Your computer uses a lithium coin-cell battery. The lithium coin-cell battery is a long-life battery, and it is very possible that you will never need to replace it. However, should you need to replace it, see your User's Guide. Do not dispose of the battery - Dell OptiPlex SX260 | Setup and Quick Reference Guide - Page 14
optional wall-mount bracket instead of the chassis stand. To order this bracket, contact Dell. NOTICE: To ensure proper ventilation, do not place your computer vertically on a desktop without using the computer stand (see "Attaching the Stand"). NOTICE: To ensure proper ventilation, do not block the - Dell OptiPlex SX260 | Setup and Quick Reference Guide - Page 15
the hard-drive cover. Your Dell computer ships with either a floppy drive or an airbay installed in the module bay. To install a CD, DVD, or second hard drive in the module bay, first remove the airbay and then install the device. module device locking switch Setup and Quick Reference Guide 13 - Dell OptiPlex SX260 | Setup and Quick Reference Guide - Page 16
www.dell.com | support.dell.com 3 Attaching the Stand NOTE: If you are installing the computer under a desktop or tabletop, first attach all cables, and then attach the stand to the mounting plate (see "Attaching the Stand to the Mounting Plate" on page - Dell OptiPlex SX260 | Setup and Quick Reference Guide - Page 17
and into the computer. 1 Connect the power adapter to the connector on the back of the computer. 2 Connect the power cable to the power adapter. NOTICE contact between the green ground wire and power leads because electrical shock, fire, or damage to your computer can occur (see the following figure - Dell OptiPlex SX260 | Setup and Quick Reference Guide - Page 18
www.dell.com | support.dell.com 5 Connecting External Devices NOTE: Connect only one keyboard and one mouse. CAUTION: To help prevent electric shock, use only the power adapter and power cable provided, and ensure that they are plugged into a properly grounded power source. SX260 SX270 16 Setup - Dell OptiPlex SX260 | Setup and Quick Reference Guide - Page 19
on page 19). NOTICE: If you use the stand on your computer, attach the stand before attaching the cable cover. NOTICE: When attaching the cable cover, do not place the computer face-down so that the surface comes in contact with a hard surface. Doing so may press the power button and may scratch the - Dell OptiPlex SX260 | Setup and Quick Reference Guide - Page 20
www.dell.com | support.dell.com 4 Grasp the top piece of the cable cover and align the two tabs with the two slots in the computer's back panel. 5 Insert the tabs into the slots and slide the piece toward the diagnostic lights (see the illustration). 6 Install a security device in the security - Dell OptiPlex SX260 | Setup and Quick Reference Guide - Page 21
if used. Plate NOTICE: When installing the computer in the hanging orientation, avoid locations to a solid surface capable of supporting 40 lbs (18.1 kg) attach to the mounting plate. 1 Using the four #6 wood screws (0.625 see the illustration). 2 Orient the computer and stand under the mounting plate - Dell OptiPlex SX260 | Setup and Quick Reference Guide - Page 22
www.dell.com | support.dell.com 3 Lift the computer and stand, insert the stand into the mounting bracket, and slide the stand until the release-lever tab is inserted through the slot in the mounting plate. 4 Attach the cable cover (if used). screw holes (4) mounting-plate slot release-lever tab - Dell OptiPlex SX260 | Setup and Quick Reference Guide - Page 23
desktop or click the Start button and then click Help and Support to access the electronic documentation stored on your hard drive. Operating System CD If you reinstall your operating system, use the Drivers and Utilities CD to reinstall drivers for the devices that came with your computer. Setup - Dell OptiPlex SX260 | Setup and Quick Reference Guide - Page 24
• Details on my computer configuration • How to use Windows XP • Documentation for my computer • Documentation for devices (such as a modem) Find it Here Dell Support website The Dell Support website provides several online tools, including: • Solutions - Troubleshooting tips, Knowledge Base - Dell OptiPlex SX260 | Setup and Quick Reference Guide - Page 25
and allow it to boot to the Windows desktop. 2 Insert the Dell Drivers and Utilities CD into the CD drive. If you are using the Drivers and Utilities CD for the first time on this computer, the installation window opens to inform you that the CD is about to begin installation. 3 Click OK to continue - Dell OptiPlex SX260 | Setup and Quick Reference Guide - Page 26
a computer problem to help you identify the source of the problem. You can run the Dell Diagnostics from your hard drive or the Drivers and Utilities CD. From the Hard Drive: NOTICE: If your hard drive fails, run the Dell IDE Hard-Drive Diagnostics (see "Running the Dell IDE Hard-Drive Diagnostics - Dell OptiPlex SX260 | Setup and Quick Reference Guide - Page 27
From the Drivers and Utilities CD: 1 Insert the Drivers and Utilities CD into the CD drive. 2 Shut down and restart the computer. When the DELL logo appears, press immediately. If you wait too long and the Windows logo appears, continue to wait until you see the Windows desktop. Then shut down - Dell OptiPlex SX260 | Setup and Quick Reference Guide - Page 28
the computer and the receiver are on different branch circuits. If necessary, consult a Dell Technical Support representative or an experienced radio/television technician for additional suggestions. NOTE: Additional regulatory information regarding your system can be found in your User's Guide. 26 - Dell OptiPlex SX260 | Setup and Quick Reference Guide - Page 29
product instructions or failure to perform preventive maintenance - Problems caused by using accessories, parts, or components not supplied by Dell • Products with missing or altered Service Tags or serial numbers • Products for which Dell has not received payment THIS WARRANTY GIVES YOU SPECIFIC - Dell OptiPlex SX260 | Setup and Quick Reference Guide - Page 30
Large, or Global Commercial Customers, Healthcare Customers, and Value-Added Resellers (VARs): Technical Support and Customer Service Government and Education Customers: Technical Support and Customer Service Dell-Branded Memory U.S. Only 1-800-624-9896 1-800-624-9897 1-800-822-8965 1-800-456-3355 - Dell OptiPlex SX260 | Setup and Quick Reference Guide - Page 31
us. NOTE: Before you replace parts, make sure to back up the data on the hard drive(s) and any other storage device(s) in the product(s). We are not responsible for lost or corrupted data. What if I purchased a service contract? If your service contract is with Dell, service will be provided to you - Dell OptiPlex SX260 | Setup and Quick Reference Guide - Page 32
www.dell.com | support.dell.com May I transfer the limited warranty? Limited warranties on systems may be transferred if the current owner transfers ownership of the system and records the transfer with us. The limited warranty on Dell-branded memory may not be transferred. You may record your - Dell OptiPlex SX260 | Setup and Quick Reference Guide - Page 33
product instructions or failure to perform preventive maintenance - Problems caused by using accessories, parts, or components not supplied by Dell • Products with missing or altered Service Tags or serial numbers • Products for which Dell has not received payment THIS WARRANTY GIVES YOU SPECIFIC - Dell OptiPlex SX260 | Setup and Quick Reference Guide - Page 34
Technical Support Customer Service Dell-Branded Memory Canada problem is not covered under this warranty, we will notify you and inform you of service alternatives that are available to you on a fee basis. NOTE: Before you ship the product(s) to us, make sure to back up the data on the hard drive - Dell OptiPlex SX260 | Setup and Quick Reference Guide - Page 35
us. NOTE: Before you replace parts, make sure to back up the data on the hard drive(s) and any other storage device(s) in the product(s). We are not responsible for lost or corrupted data. What if I purchased a service contract? If your service contract is with Dell, service will be provided to you - Dell OptiPlex SX260 | Setup and Quick Reference Guide - Page 36
, and all of the manuals, floppy disk(s), CD(s), power cables, and other items included with a product must be returned with it. For customers who want to return, for refund or credit only, either application or operating system software that has been installed by Dell, the whole system must - Dell OptiPlex SX260 | Setup and Quick Reference Guide - Page 37
Dell's option, be repaired or replaced at Dell's expense. Dell owns all parts removed from repaired products. Dell uses new and reconditioned parts or the Caribbean by contacting the Dell point of sale within the guarantee period. The end user must always supply proof of purchase, indicating name and - Dell OptiPlex SX260 | Setup and Quick Reference Guide - Page 38
's motherboard. This limited warranty does not cover damages due to external causes, including accident, problems with electrical power, usage not in accordance with product instructions, misuse, neglect, alteration, repair, improper installation, or improper testing. How to Obtain Warranty Service - Dell OptiPlex SX260 | Setup and Quick Reference Guide - Page 39
card part of our ongoing quality assurance process. As a result, today's microprocessors from Intel are among the most reliable components in computers. What are "Errata"? Exhaustive product testing can highlight differences between the actual behavior of the microprocessor and its specifications - Dell OptiPlex SX260 | Setup and Quick Reference Guide - Page 40
www.dell.com | support.dell.com 38 Setup and Quick Re ference Guide - Dell OptiPlex SX260 | Setup and Quick Reference Guide - Page 41
Systèmes Dell™ OptiPlex™ SX Guide de configuration et de référence rapide Modèle DCT www.dell.com | support.dell.com - Dell OptiPlex SX260 | Setup and Quick Reference Guide - Page 42
» du Guide d'utilisation. Si vous avez acheté un ordinateur Dell™ série n, aucune des références faites dans ce document aux systèmes d'exploitation Microsoft® Windows® n'est applicable. Les informations de ce document sont sujettes à modifications sans préavis. © 2002 - 2003 Dell Computer - Dell OptiPlex SX260 | Setup and Quick Reference Guide - Page 43
sentation de ce guide 43 Caractéristiques un périphérique dans la baie modulaire 51 Installation du support 52 Connexion de l'adaptateur CA/CC 53 Connexion de pé du capot de l'emplacement pour câble 55 Installation du support sur la plaque de montage 57 Recherche d'informations et d' - Dell OptiPlex SX260 | Setup and Quick Reference Guide - Page 44
et règle de retour 67 Conditions de garantie limitée pour les produits matériels Dell (Canada seulement 67 Règle de retour « Satisfait ou remboursé » (Canada seulement 70 Logiciels et périphériques Dell (Canada seulement 71 Déclaration de garantie Intel® pour les processeurs Pentium® et Celeron - Dell OptiPlex SX260 | Setup and Quick Reference Guide - Page 45
des problèmes ainsi que sur les instructions de sécurité, les réglementations et la garantie concernant votre ordinateur Dell™ OptiPlex™. Pour obtenir les dernières versions des documents sur votre disque dur, visitez le site Web de support de Dell à l'adresse support.dell.com. Numéro de modèle de - Dell OptiPlex SX260 | Setup and Quick Reference Guide - Page 46
.dell.com capot de l'emplacement pour câble capot de l'unité de disque dur (ouvrez le capot pour accéder au loquet de verrouillage du périphérique modulaire) baie modulaire capot de l'ordinateur adaptateur de courant plaque de montage du support de châssis support de l'ordinateur 44 Guide - Dell OptiPlex SX260 | Setup and Quick Reference Guide - Page 47
moins que vous ne soyez un technicien de maintenance qualifié. Suivez toujours scrupuleusement les instructions d'installation. • Pour éviter toute décharge électrique, branchez les câbles d' ble sur la prise du réseau, puis sur la carte réseau. Guide de configuration et de r éférence rapide 45 - Dell OptiPlex SX260 | Setup and Quick Reference Guide - Page 48
www.dell.com | support.dell.com PRÉCAUTION : Consignes de sécurité (suite) • Pour aider à protéger votre ordinateur contre ordinateur. Faites donc très attention lorsque vous manipulez l'adaptateur pendant ou après son fonctionnement. 46 Guide de configuration et d e r é f é r e n c e r a p i d e - Dell OptiPlex SX260 | Setup and Quick Reference Guide - Page 49
éviter d'endommager la carte système. Certains composants de la carte système sont alimentés en permanence lorsque l'ordinateur est branché à une source de CA. Guide de configuration et de r éférence rapide 47 - Dell OptiPlex SX260 | Setup and Quick Reference Guide - Page 50
dell.com | support.dell Dell™ documentation Dell™ en ligne ou dans les in instructions fournies par Dell. Suivez toujours de près les instructions une carte par ses bords ou par son support de montage métallique. Prenez un composant ménagères. Contactez le service municipal de traitement des déchets - Dell OptiPlex SX260 | Setup and Quick Reference Guide - Page 51
n'ayez jamais besoin de la remplacer. Si vous êtes toutefois amené à la remplacer, reportez-vous à votre Guide d'utilisation. Ne jetez pas la batterie avec les ordures ménagères. Contactez le service municipal de traitement des déchets pour connaître l'adresse du site de dépôt de batteries le plus - Dell OptiPlex SX260 | Setup and Quick Reference Guide - Page 52
support de montage mural en option à la place du support de châssis. Pour commander ce support, contactez Dell support d'ordinateur (reportez-vous à la section « Installation du support »). AVIS : Afin d'assurer une ventilation appropriée, ne bloquez pas les ventilateurs de refroidissement. 50 Guide - Dell OptiPlex SX260 | Setup and Quick Reference Guide - Page 53
du périphérique modulaire, retirez le capot de l'unité de disque dur. Votre ordinateur Dell est livré avec un lecteur de disquette ou un emplacement prédécoupé dans la baie modulaire. Pour installer un CD, un DVD ou une deuxième unité de disque dur dans la baie modulaire, retirez d'abord - Dell OptiPlex SX260 | Setup and Quick Reference Guide - Page 54
www.dell.com | support.dell.com 3 Installation du support REMARQUE : Si vous installez l'ordinateur sous un bureau ou une table, connectez d'abord tous les câbles, puis installez le support sur la plaque de montage (reportez-vous à la section « Installation du support sur la plaque de montage » à - Dell OptiPlex SX260 | Setup and Quick Reference Guide - Page 55
ère la source de masse, puis vissez la source de masse. source de masse connecteur métallique de masse 4 Connectez le câble d'alimentation CA à la prise. Guide de configuration et de r éférence rapide 53 - Dell OptiPlex SX260 | Setup and Quick Reference Guide - Page 56
www.dell.com | support.dell.com 5 Connexion de périphériques externes REMARQUE : Connectez seulement un clavier et une souris qu'ils sont branchés sur une source d'alimentation électrique correctement reliée à la terre. SX260 SX270 54 Guide de configuration et d e r é f é r e n c e r a p i d e - Dell OptiPlex SX260 | Setup and Quick Reference Guide - Page 57
de montage (reportez-vous à l'étape 7, « Installation du support sur la plaque de montage » à la page 57). AVIS : Si vous utilisez le support sur votre ordinateur, fixez-le avant de refermer le capot de ) jusqu'à ce qu'elle se positionne correctement. Guide de configuration et de r éférence rapide 55 - Dell OptiPlex SX260 | Setup and Quick Reference Guide - Page 58
www.dell.com | support.dell.com 4 Saisissez la partie supérieure du capot et alignez les deux onglets avec les deux fentes sur le é (en option). emplacement pour câble de sécurité Ne placez pas l'ordinateur face en bas sur le cadre 56 Guide de configuration et d e r é f é r e n c e r a p i d e - Dell OptiPlex SX260 | Setup and Quick Reference Guide - Page 59
0,625 pouces) fournies, fixez la plaque de montage sur une surface fixe d'une épaisseur minimum de 2,5 cm (1 pouce) (voir illustration). 2 Orientez l'ordinateur et le support sous la plaque de montage à environ 2,5 cm (1 pouce) du bord de la plaque. Guide de configuration et de r éférence rapide 57 - Dell OptiPlex SX260 | Setup and Quick Reference Guide - Page 60
www.dell.com | support.dell.com 3 Soulevez l'ordinateur et le support, insérez le support dans le support de montage et faites- ordinateur, lisez l'accord de licence du logiciel et suivez les instructions d'installation du système d'exploitation à l'écran. 9 Félicitations ! Vous avez terminé - Dell OptiPlex SX260 | Setup and Quick Reference Guide - Page 61
, double-cliquez sur l'icône User's Guides (Guides d'utilisation) située sur le bureau, ou cliquez sur le bouton Start (Démarrer), puis sur Help and Support (Aide et support) pour accéder à la documentation électronique stockée sur l'unité de disque dur. CD-ROM du système d'exploitation Si vous - Dell OptiPlex SX260 | Setup and Quick Reference Guide - Page 62
Windows XP 1 Cliquez sur le bouton Démarrer, puis sur Aide et support. 2 Entrez un mot ou une expression qui décrive votre problème, puis cliquez sur l'icône en forme de flèche. 3 Cliquez sur la rubrique qui décrit votre problème. 4 Suivez les instructions qui s'affichent à l'écran. 60 Guide - Dell OptiPlex SX260 | Setup and Quick Reference Guide - Page 63
disponibles pour votre système, consultez le site Web du support technique de Dell à l'adresse support.dell.com. Vous pouvez aussi trouver une description des outils de dépannage Dell dans la section « Obtention de l'aide » du Guide d'utilisationen ligne. Si des problèmes nécessitant l'aide de - Dell OptiPlex SX260 | Setup and Quick Reference Guide - Page 64
www.dell.com | support.dell.com Utilisation du CD Pilotes et utilitaires Dell Pour utiliser le CD Pilotes et utilitaires Dell pendant l'exécution du système d'exploitation Microsoft® Windows®, procédez comme suit : REMARQUE : Pour accéder aux pilotes de périphériques et à la documentation - Dell OptiPlex SX260 | Setup and Quick Reference Guide - Page 65
cuter les Diagnostics Dell à partir de l'unité de disque dur ou du CD Pilotes et utilitaires. instructions pour exécuter les Diagnostics Dell à partir de votre CD Pilotes et utilitaires. Si vous attendez trop longtemps et que le logo Windows menu principal des Diagnostics Dell s'affiche, sélectionnez - Dell OptiPlex SX260 | Setup and Quick Reference Guide - Page 66
www.dell.com | support.dell.com À partir du CD Pilotes et utilitaires : 1 Insérez le CD Pilotes et utilitaires dans le lecteur de CD. 2 Arrêtez, puis redémarrez l'ordinateur. Lorsque le logo DELL apparaît, appuyez immédiatement sur . Si vous attendez trop longtemps et que le logo Windows - Dell OptiPlex SX260 | Setup and Quick Reference Guide - Page 67
service de sécurité ou encore sérieusement dégrader, obstruer ou interrompre de manière répétée un service de communications radio autorisé. Les services mes GSM. Ces services autorisés, ainsi des interférences avec des services de communications radio, ce ésentant du support technique de Dell ou un - Dell OptiPlex SX260 | Setup and Quick Reference Guide - Page 68
www.dell.com | support.dell.com 66 Guide de configuration et d e r é f é r e n c e r a p i d e - Dell OptiPlex SX260 | Setup and Quick Reference Guide - Page 69
instructions du produit. - Non-respect des instructions du produit ou non-exécution de l'entretien préventif exigé. - Problèmes dus à l'utilisation d'accessoires, de pièces et de composants non fournis par Dell. • Produits dont les numéros de service Guide de configuration et de r éférence rapide 67 - Dell OptiPlex SX260 | Setup and Quick Reference Guide - Page 70
DE DELL. Dell qui est valable un an seulement et de la garantie limitée des lampes de projecteurs Dell composants sous garantie. Dell peut modifier en toute j'ai besoin d'un service de garantie ? Avant : Support technique Service client : Support technique Service clientèle Mémoire Dell Canada - Dell OptiPlex SX260 | Setup and Quick Reference Guide - Page 71
tous les supports amovibles, tels que les disquettes, CD-ROM ou cartes la façon de bénéficier du service. Comment allez-vous réparer mon produit ? Dell utilise des composants neufs ou remis en Dell est propriétaire de tous les composants retirés des produits réparés. Guide de configuration et de - Dell OptiPlex SX260 | Setup and Quick Reference Guide - Page 72
tous les guides, disquettes, CD-ROM, cordons d'alimentation et autres accessoires compris avec le produit doivent être renvoyés avec lui. Les clients désirant renvoyer, pour remboursement ou avoir uniquement, un logiciel d'application ou de système d'exploitation installé par Dell doivent retourner - Dell OptiPlex SX260 | Setup and Quick Reference Guide - Page 73
sont à votre charge. Pour retourner les produits, vous devez appeler le Service Clientèle de Dell au 1-800-387-5759 qui vous fournira un numéro d'autorisation de ne doivent pas être ouverts et tous les guides, disquettes, CD-ROM, câbles d'alimentation et autres accessoires compris avec le produit - Dell OptiPlex SX260 | Setup and Quick Reference Guide - Page 74
's motherboard. This limited warranty does not cover damages due to external causes, including accident, problems with electrical power, usage not in accordance with product instructions, misuse, neglect, alteration, repair, improper installation, or improper testing. How to Obtain Warranty Service - Dell OptiPlex SX260 | Setup and Quick Reference Guide - Page 75
card part of our ongoing quality assurance process. As a result, today's microprocessors from Intel are among the most reliable components in computers. What are "Errata"? Exhaustive product testing can highlight differences between the actual behavior of the microprocessor and its specifications - Dell OptiPlex SX260 | Setup and Quick Reference Guide - Page 76
www.dell.com | support.dell.com 74 Guide de configuration et d e r é f é r e n c e r a p i d e - Dell OptiPlex SX260 | Setup and Quick Reference Guide - Page 77
Sistemas Optiplex™ SX de Dell™ Guía de instalación y de referencia rápida DCT del modelo www.dell.com | support.dell.com - Dell OptiPlex SX260 | Setup and Quick Reference Guide - Page 78
de cualquier manera sin la autorización por escrito de Dell Computer Corporation. Marcas comerciales utilizadas en este texto: Dell, OptiPlex y el logotipo de DELL son marcas comerciales de Dell Computer Corporation; Microsoft y Windows son marcas registradas de Microsoft Corporation; Intel, Pentium - Dell OptiPlex SX260 | Setup and Quick Reference Guide - Page 79
de montaje 93 Localización de información y ayuda 95 Solución de problemas 97 Herramientas de solución de problemas 97 Utilización del CD Drivers and Utilities (Controladores y utilidades) de Dell 98 Cómo ejecutar los Diagnósticos Dell 99 Ejecución de los Diagnósticos de disco duro IDE de - Dell OptiPlex SX260 | Setup and Quick Reference Guide - Page 80
y política de devoluciones 103 Termo de Garantia Contratual - Brasil - Garantia Oferecida pela Dell ao Usuário Final - 1º ano . . . . . 103 Términos contractuales - Argentina Garantía ofrecida por DELL al usuario final - 1º. Año . . . . . 105 Garantía de un año del fabricante para el usuario final - Dell OptiPlex SX260 | Setup and Quick Reference Guide - Page 81
, seguridad, regulaciones y condiciones de la garantía de su ordenador OptiPlex™ de Dell™. Para obtener la versión más actualizada de los documentos en la unidad de disco duro, vaya al sitio Web de Dell | Support en support.dell.com. Número de modelo reglamentario y tipo de chasis DCT = ordenador - Dell OptiPlex SX260 | Setup and Quick Reference Guide - Page 82
www.dell.com | support.dell.com cubierta de los cables cubierta de la unidad de disco duro (abrir para acceder al interruptor de bloqueo del dispositivo modular) compartimiento modular cubierta - Dell OptiPlex SX260 | Setup and Quick Reference Guide - Page 83
tierra. • Para evitar el peligro potencial de descargas eléctricas, no use el equipo durante las tormentas eléctricas. • Para evitar el peligro potencial de red, desconecte primero el cable del adaptador de red de la parte posterior del ordenador y, a continuación, de la conexión de red. Cuando - Dell OptiPlex SX260 | Setup and Quick Reference Guide - Page 84
www.dell.com | support.dell.com PRECAUCIÓN: Instrucciones de seguridad (continuación) • Para proteger el equipo contra las subidas y bajadas de tensión transitorias, utilice un supresor de sobrevoltajes, un acondicionador de lí - Dell OptiPlex SX260 | Setup and Quick Reference Guide - Page 85
a un único voltaje (consulte la etiqueta de regulación de la parte exterior del equipo para conocer su voltaje de funcionamiento). - Un circuito evitar que se dañe un equipo con un interruptor de selección de voltaje manual, ajuste el interruptor al voltaje que más se aproxime al de la alimentación - Dell OptiPlex SX260 | Setup and Quick Reference Guide - Page 86
www.dell.com | support.dell.com Cuando utilice el equipo (continuación) Al trabajar en el Conéctese a tierra tocando una superficie metálica sin pintar del chasis, como por ejemplo la parte posterior del equipo, antes de tocar ningún componente de su interior. Mientras trabaja, toque periódicamente - Dell OptiPlex SX260 | Setup and Quick Reference Guide - Page 87
Cuando utilice el equipo (continuación) Protección contra descargas electrostáticas La electricidad estática puede dañar los delicados componentes que hay en el interior del ordenador. Para evitar el daño por descargas electrostáticas, antes de tocar cualquiera de los componentes electrónicos del - Dell OptiPlex SX260 | Setup and Quick Reference Guide - Page 88
www.dell.com | support.dell.com Introducción e instalación PRECAUCIÓN: antes de realizar cualquiera de los en ese entorno se producen fuertes vibraciones, use un soporte de pared en lugar del soporte del chasis. Para pedir este soporte, póngase en contacto Dell. AVISO: A fin de garantizar una - Dell OptiPlex SX260 | Setup and Quick Reference Guide - Page 89
dulo, quite la cubierta de la unidad de disco duro. El ordenador Dell se comercializa con una unidad de disquete o un compartimiento de unidad en el compartimiento modular. Para instalar una unidad de CD, DVD u otro tipo en este compartimento, quite primero el compartimento de unidad y, a continuaci - Dell OptiPlex SX260 | Setup and Quick Reference Guide - Page 90
www.dell.com | support.dell.com 3 chasis a una de las tres ranuras de montaje situadas en la parte posterior del ordenador. 2 En cuanto el soporte quede acoplado, apriete el en ese lugar se producen fuertes vibraciones, use el soporte de pared opcional en lugar del soporte del ordenador. - Dell OptiPlex SX260 | Setup and Quick Reference Guide - Page 91
el adaptador está correctamente conectado a la toma de corriente y al ordenador. 1 Conecte el adaptador de alimentación al conector de la parte posterior del ordenador. 2 Conecte el cable de alimentación al adaptador de alimentación. AVISO: Los siguientes pasos sólo se aplican a Japón. PRECAUCI - Dell OptiPlex SX260 | Setup and Quick Reference Guide - Page 92
www.dell.com | support.dell.com 5 Conexión de dispositivos externos NOTA: Conecte sólo un teclado y un ratón. PRECAUCIÓN: Para evitar en lo posible descargas eléctricas, use únicamente el adaptador de corriente y el cable de alimentación proporcionados y asegúrese de que están enchufados a una - Dell OptiPlex SX260 | Setup and Quick Reference Guide - Page 93
contacto con una superficie dura. De lo contrario podría presionar el botón de encendido y rayar el frontal del ordenador. 1 Conecte todos los cables a la parte posterior del ordenador. 2 Sostenga la pieza inferior de la cubierta del cable y alinee las cuatro lengüetas con las cuatro ranuras de la - Dell OptiPlex SX260 | Setup and Quick Reference Guide - Page 94
www.dell.com | support.dell.com 4 Agarre la pieza superior de la cubierta del cable y alinee las dos lengüetas con las dos ranuras del panel posterior del equipo. 5 Inserte - Dell OptiPlex SX260 | Setup and Quick Reference Guide - Page 95
Para retirar la cubierta del cable, retire el dispositivo instalado en la ranura para el cable de seguridad, si lo hay. 1 Sujete la pieza superior de la cubierta del cable, deslícela hacia la izquierda hasta que se detenga y, a continuación, levántela y retírela. 2 Para extraer la pieza inferior de - Dell OptiPlex SX260 | Setup and Quick Reference Guide - Page 96
www.dell.com | support.dell.com 3 Eleve el ordenador y el soporte, inserte este último en el soporte de montaje y deslice el soporte hasta que la lengüeta de la palanca - Dell OptiPlex SX260 | Setup and Quick Reference Guide - Page 97
Help and Support (Ayuda y soporte técnico) para acceder a la documentación almacenada en la unidad de disco duro. • Cómo volver a instalar el sistema operativo C D O p e r a t i n g S y s t e m ( S i s t e m a o p e r a t i v o ) Si vuelve a instalar el sistema operativo, utilice el CD Drivers and - Dell OptiPlex SX260 | Setup and Quick Reference Guide - Page 98
técnicos del equipo El sitio Web Dell Premier Support está personalizado para • Detalles sobre la configuración del equipo empresas e instituciones gubernamentales y educativas. Es posible que este sitio no esté disponible en todos los países o regiones. • Procedimientos para utilizar Windows XP - Dell OptiPlex SX260 | Setup and Quick Reference Guide - Page 99
de asistencia técnica de Dell en support.dell.com. También encontrará descripciones de las herramientas de solución de problemas de Dell en la sección • Luces del sistema: ubicadas en la parte frontal del equipo. • Luces de diagnóstico: ubicadas en la parte trasera del equipo. • Mensajes del sistema - Dell OptiPlex SX260 | Setup and Quick Reference Guide - Page 100
. 1 Encienda el ordenador y permita que se inicie en el escritorio de Windows. 2 Inserte el CD Drivers and Utilities (Controladores y utilidades) de Dell en la unidad de CD-ROM. Si utiliza el CD Drivers and Utilities (Controladores y utilidades) por primera vez en este ordenador, la ventana de - Dell OptiPlex SX260 | Setup and Quick Reference Guide - Page 101
(Controladores y utilidades): 1 Inserte el CD Drivers and Utilities (Controladores y utilidades) en la unidad de CD-ROM. 2 Apague y reinicie el equipo. Cuando aparezca el logotipo de DELL, presione inmediatamente. Si espera demasiado y aparece el logotipo de Windows, siga esperando hasta que - Dell OptiPlex SX260 | Setup and Quick Reference Guide - Page 102
www.dell.com | support.dell.com 3 Cuando aparezca la lista de dispositivos de inicio, seleccione IDE CD-ROM Device (Dispositivo CD-ROM IDE) y presione . 4 Seleccione la opción IDE CD-ROM Device (Dispositivo CD-ROM IDE) en el menú de inicio del CD. 5 Seleccione la opción Boot from CD-ROM ( - Dell OptiPlex SX260 | Setup and Quick Reference Guide - Page 103
descritos en este documento, en cumplimiento con los requisitos de la Norma Oficial Mexicana (NOM) Exportador: Importador: Enviar a: Dell Computer Corporation One Dell Way Round Rock, TX 78682 Dell Computer de México, S.A. de C.V. Paseo de la Reforma 2620 - 11° Piso Col. Lomas Altas 11950 México - Dell OptiPlex SX260 | Setup and Quick Reference Guide - Page 104
www.dell.com | support.dell.com 102 Guía de instalación y de referencia rápida - Dell OptiPlex SX260 | Setup and Quick Reference Guide - Page 105
as disposições abaixo, que os produtos de hardware com a sua marca, adquiridos pelo usuário final de uma empresa do grupo DELL ou de um distribuidor autorizado DELL situado na América Latina e Caribe, estão livres de defeitos em seus componentes eletrônicos, mecânicos e de montagem, pelo prazo de - Dell OptiPlex SX260 | Setup and Quick Reference Guide - Page 106
www.dell.com | support.dell.com Exclusões Os seguintes itens, entre outros compatíveis com o ora exposto, não estão cobertos pela garantia: • Partes consumíveis, tais como baterias não-recarregáveis, bolsas, maletas, etc; • Programas de computador, exceto no tocante a termos e prazos especificados - Dell OptiPlex SX260 | Setup and Quick Reference Guide - Page 107
Dell Computer de Chile Ltda Coyancura 2283, Piso 3 - Of. 302, Providencia, Santiago - Chile Dell Computer de Colombia Corporation Carrera 7 #115-33 Oficina 603 Bogota, Colombia Dell Computer pasarán a ser propiedad de DELL. DELL podrá utilizar partes nuevas o reacondicionadas, de prestaciones, - Dell OptiPlex SX260 | Setup and Quick Reference Guide - Page 108
dell.com | support.dell.com Responsabilidad del cliente Notificar de inmediato a DELL sobre el mal funcionamiento de sus equipos al Servicio Técnico de DELL. Proporcionar al personal técnico de DELL no están cubiertos por la garantía: • Partes consumibles, tales como baterías no recargables, bolsas - Dell OptiPlex SX260 | Setup and Quick Reference Guide - Page 109
imposibilitará a DELL poder registrar el pedido. Una vez diagnosticado el problema, DELL realizara el despacho de la parte y/o de uno final (sólo para Latinoamérica y el Caribe) Garantía Dell Computer Corporation ("Dell") garantiza al usuario final, de acuerdo con las provisiones siguientes - Dell OptiPlex SX260 | Setup and Quick Reference Guide - Page 110
Industrial Belgraf, 400 92990-000 - Eldorado do Sul - RS - Brasil Dell Computer de Chile Ltda Coyancura 2283, Piso 3 - Of. 302, Providencia, Santiago - Chile Dell Computer de Colombia Corporation Carrera 7 #115-33 Oficina 603 Bogotá, Colombia Dell Computer de Mexico SA de CV Paseo de la Reforma 2620 - Dell OptiPlex SX260 | Setup and Quick Reference Guide - Page 111
's motherboard. This limited warranty does not cover damages due to external causes, including accident, problems with electrical power, usage not in accordance with product instructions, misuse, neglect, alteration, repair, improper installation, or improper testing. How to Obtain Warranty Service - Dell OptiPlex SX260 | Setup and Quick Reference Guide - Page 112
as part of our ongoing quality assurance process. As a result, today's microprocessors from Intel are among the most reliable components in computers. What are 'Errata'? Exhaustive product testing can highlight differences between the actual behavior of the microprocessor and its specifications
-
 1
1 -
 2
2 -
 3
3 -
 4
4 -
 5
5 -
 6
6 -
 7
7 -
8
-
9
-
10
-
11
-
12
-
13
-
14
-
15
-
16
-
17
-
18
-
19
-
20
-
21
-
22
-
23
-
24
-
25
-
26
-
27
-
28
-
29
-
30
-
31
-
32
-
33
-
34
-
35
-
36
-
37
-
38
-
39
-
40
-
41
-
42
-
43
-
44
-
45
-
46
-
47
-
48
-
49
-
50
-
51
-
52
-
53
-
54
-
55
-
56
-
57
-
58
-
59
-
60
-
61
-
62
-
63
-
64
-
65
-
66
-
67
-
68
-
69
-
70
-
71
-
72
-
73
-
74
-
75
-
76
-
77
-
78
-
79
-
80
-
81
-
82
-
83
-
84
-
85
-
86
-
87
-
88
-
89
-
90
-
91
-
92
-
93
-
94
-
95
-
96
-
97
-
98
-
99
-
100
-
101
-
102
-
103
-
104
-
105
-
106
-
107
-
108
-
109
-
110
-
111
-
112
 |
 |

www.dell.com | support.dell.com
Dell™ OptiPlex™ SX Systems
Setup and Quick
Reference Guide
Guide de configuration et de référence rapide
Guía de instalación y de referencia rápida
Model DCT