Dell P1500 Dell™ Laser Printer P1500 User's Guide
Dell P1500 Manual
 |
UPC - 807027501110
View all Dell P1500 manuals
Add to My Manuals
Save this manual to your list of manuals |
Dell P1500 manual content summary:
- Dell P1500 | Dell™ Laser Printer P1500 User's Guide - Page 1
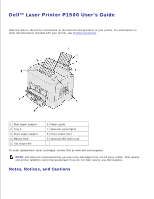
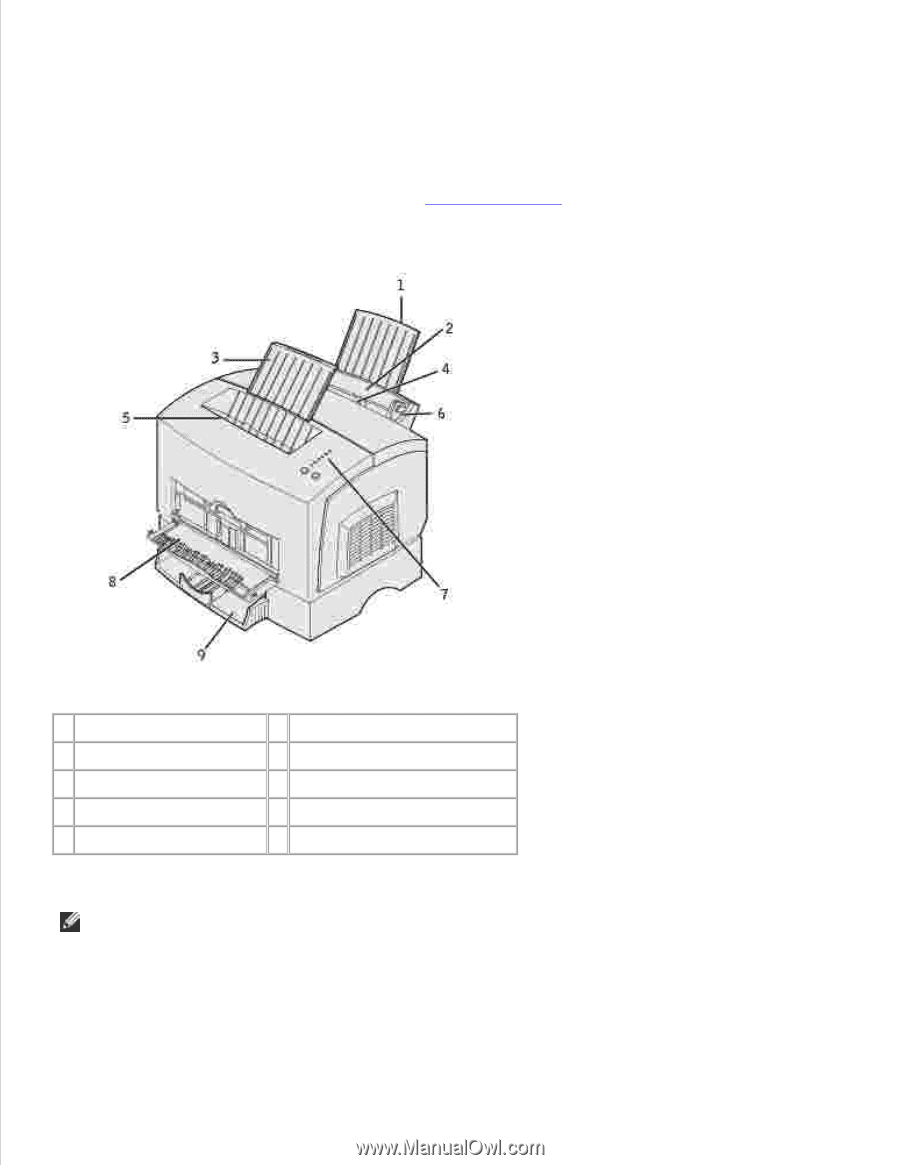
Dell™ Laser Printer P1500 User's Guide Click the links to the left for information on the features and operation of your printer. For information on other documentation included with your printer, see Finding information. 1 Rear paper support 2 Tray 1 3 Front paper support 4 Manual feed 5 Top - Dell P1500 | Dell™ Laser Printer P1500 User's Guide - Page 2
that helps you make better use of your printer. NOTICE: A NOTICE indicates either potential damage to hardware or loss of data and tells you how to avoid the problem. CAUTION: A CAUTION indicates a potential for property damage, personal injury, or death. Information in this document is - Dell P1500 | Dell™ Laser Printer P1500 User's Guide - Page 3
overview What are you looking for? Drivers for my printer My User's Guide Find it here Drivers and Utilities CD Documentation and drivers are already installed on your printer when shipped from Dell. You can use the CD to uninstall/reinstall drivers or access your documentation. Readme files - Dell P1500 | Dell™ Laser Printer P1500 User's Guide - Page 4
Code and Service Tag number Latest drivers for my printer Answers to technical service and support questions Documentation for my printer This label is located on your printer Dell Support Website The Dell Support Website provides several online tools, including: Solutions - Troubleshooting hints - Dell P1500 | Dell™ Laser Printer P1500 User's Guide - Page 5
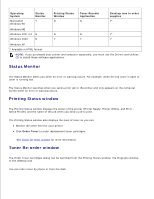
printer (Printer Ready, Printer Offline, and Error Check Printer) and the name of the job when you send a job to print. The Printing Status window also displays the level of toner so you can: Monitor the toner level for your printer. Click Order Toner to order replacement toner cartridges. See Toner - Dell P1500 | Dell™ Laser Printer P1500 User's Guide - Page 6
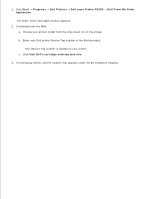
1. Click Start Programs Dell Printers Dell Laser Printer P1500 Dell Toner Re-Order Application. The Order Toner Cartridges window appears. 2. If ordering from the Web: a. Choose your printer model from the drop-down list on the screen. b. Enter your Dell printer Service Tag number in the field - Dell P1500 | Dell™ Laser Printer P1500 User's Guide - Page 7
Settings Configuration sheet Choosing the right cable Understanding printer features Your Dell™ Laser Printer P1500 offers the following features: 1 Rear paper support 2 Tray 1 3 Front paper support 4 Manual feed 5 Top output bin 6 Paper guide 7 Operator panel lights 8 Front output door 9 Optional - Dell P1500 | Dell™ Laser Printer P1500 User's Guide - Page 8
paper or 10 sheets of specialty media. Support media in tray 1. Support media in the top output bin. Load a single sheet of paper or other media, such as transparencies, labels, envelopes, and card stock. Adjust the width of the media in tray 1 and the manual feed. Check the status of your printer - Dell P1500 | Dell™ Laser Printer P1500 User's Guide - Page 9
the Home menu is displayed. 7. Press and release Continue until all the lights cycle. A Printer Settings Configuration sheet prints. Choosing the right cable Your Dell™ Laser Printer P1500 interconnection cable must meet the following requirements: Connection USB Parallel Cable certification USB - Dell P1500 | Dell™ Laser Printer P1500 User's Guide - Page 10
in your printer driver. The settings range from Very Light to Very Dark. Selecting the Very Light setting conserves toner. Reduce paper consumption by printing on both sides of the paper. Ordering replacement toner cartridges To order replacement toner cartridges, contact Dell at www.dell.com - Dell P1500 | Dell™ Laser Printer P1500 User's Guide - Page 11
, replace the toner cartridge. NOTE: Dell does not recommend that you use toner cartridges from a third-party refiller. Print quality and printer reliability cannot be guaranteed if you do. For best results, use Dell supplies. Replacing the toner cartridge Removing the old toner cartridge 1. Use the - Dell P1500 | Dell™ Laser Printer P1500 User's Guide - Page 12
Set the toner cartridge aside. NOTE: Dell cannot guarantee print quality or printer reliability if you use refilled cartridges from a third party. The printer warranty does not cover damage caused by using refilled cartridges. Installing the new toner cartridge 1. Take the new toner cartridge out of - Dell P1500 | Dell™ Laser Printer P1500 User's Guide - Page 13
shake the cartridge to distribute the toner evenly. 4. Insert the toner cartridge. a. Align the colored arrows on either side of the toner cartridge with the corresponding arrows in the printer. b. Holding the handle, tilt the cartridge down and guide it between the toner cartridge grooves. CAUTION - Dell P1500 | Dell™ Laser Printer P1500 User's Guide - Page 14
get the maximum benefit from your toner cartridge: Do not remove the toner cartridge from its packaging until you are ready to install it. Store toner cartridges in the same environment as the printer. Do not remove the toner cartridge from the printer except to replace it or to clear a paper jam. - Dell P1500 | Dell™ Laser Printer P1500 User's Guide - Page 15
Printing Using the operator panel lights Setting up a print job Canceling a print job Sharing printers Using the operator panel lights The operator panel has six lights and two operator panel buttons. - Dell P1500 | Dell™ Laser Printer P1500 User's Guide - Page 16
is on Alerts you that the toner is getting low. Load Paper light is on Prompts you to load media in tray 1, manual feed, or the optional 250-sheet tray (if installed). Paper Jam light is on Detects a jam. Error light is on Cover is open or the toner cartridge is not installed. Press Continue - Dell P1500 | Dell™ Laser Printer P1500 User's Guide - Page 17
the top left corner in the manual feed. 2. From the File menu, select Print (or Printer) Setup to open your printer driver. 3. In the Print Setup dialog box, click Properties, Options or Setup (depending on the program) and select the size of envelope you want from the Paper Type setting. 4. Change - Dell P1500 | Dell™ Laser Printer P1500 User's Guide - Page 18
up the printer for sharing (Windows 95, 98, NT 4.0, Windows Me, and Windows 2000) 1. Click Start Settings Printers. 2. Select the printer you just created. 3. Click File Sharing. 4. Check the Shared check box, and then enter a name in the Shared Name text box. 5. In the Alternate Drivers section - Dell P1500 | Dell™ Laser Printer P1500 User's Guide - Page 19
Setting up the printer for sharing (Windows XP) 1. Click Start Control Panel Printers and Other Hardware Printers and Faxes. 2. Select the printer you just printer on network clients Using the point and print method This method is usually the best use of system resources. The server handles driver - Dell P1500 | Dell™ Laser Printer P1500 User's Guide - Page 20
5. Click OK. NOTE: If this is a new printer, you may be prompted to install a printer driver. If no system driver is available, then you will need to provide a path to available drivers. 6. Select whether you want this printer to be the default printer for the client, and then click Finish. 7. Print - Dell P1500 | Dell™ Laser Printer P1500 User's Guide - Page 21
b. c. Click File Properties. d. On the General tab, click Print Test Page. When a test page prints successfully, printer installation is complete. - Dell P1500 | Dell™ Laser Printer P1500 User's Guide - Page 22
printer has two standard paper sources: an automatic paper feeder (tray 1), which holds up to 150 sheets of plain paper, and a single-sheet manual feed. Use tray 1 for most print jobs. Use the manual feed for a single piece of paper, transparency, envelope, label, or index card. 1 Paper support - Dell P1500 | Dell™ Laser Printer P1500 User's Guide - Page 23
a straight-through paper path for special media, such as transparencies, envelopes, labels, card stock or index cards, reducing curling and potential paper jams. To increase paper capacity, you can purchase the optional 250-sheet tray. Loading paper Tray 1 1. Extend the rear paper support until you - Dell P1500 | Dell™ Laser Printer P1500 User's Guide - Page 24
2. Flex the sheets back and forth to loosen them, fan the sheets on all four sides, and flex them again. 3. If loading letterhead paper, insert letterhead with the top of the page pointing down, facing you. - Dell P1500 | Dell™ Laser Printer P1500 User's Guide - Page 25
such as letterhead must be able to withstand temperatures up to 200°C (392°F) without melting or releasing hazardous emissions. 4. Slide the paper guides against the edges of the paper. 5. Extend the front paper support on the top output bin until you hear a click. If you are printing on legal size - Dell P1500 | Dell™ Laser Printer P1500 User's Guide - Page 26
your print job. Manual feed Use the manual feed to print one sheet of paper at a time. 1. If loading letterhead paper, insert one sheet of letterhead with the top of the page pointing down, facing you. 2. Slide the paper guides flush against the edges of the paper. 3. Select the paper size and type - Dell P1500 | Dell™ Laser Printer P1500 User's Guide - Page 27
3. 4. Start your print job. 5. Press and release Continue to resume printing. 6. When the Load Paper light blinks and the Press Continue light comes on, place another sheet in the manual feed. 7. Press Continue. Optional 250-sheet tray 1. Grasp the tabs on either side of the tray and pull it - Dell P1500 | Dell™ Laser Printer P1500 User's Guide - Page 28
2. Before loading paper, push down on the metal plate until it locks into place. 3. If loading A4 or legal size paper, extend the paper support. - Dell P1500 | Dell™ Laser Printer P1500 User's Guide - Page 29
the sheets back and forth to loosen them, fan the sheets on all four sides, and flex them again. 5. If loading letterhead paper, insert letterhead face down with the top of the page entering the printer first. 6. Do not exceed the stack height indicator; overfilling the tray may cause paper jams. - Dell P1500 | Dell™ Laser Printer P1500 User's Guide - Page 30
bucklers and lying flat in the tray. 8. Slide the paper guides flush against the edges of the media. 9. Reinstall the tray firmly into the printer. If the tray is not pushed all the way in, the paper may not feed properly. 10. Select the paper size from your software program. 11. Start your print - Dell P1500 | Dell™ Laser Printer P1500 User's Guide - Page 31
11. Loading transparencies When printing on transparencies, use transparencies designed for laser printers. Tray 1 1. Extend the rear paper support until you hear a click. 2. To reduce curling or potential jams, open the front output door for a straight paper path. 3. - Dell P1500 | Dell™ Laser Printer P1500 User's Guide - Page 32
temperatures of 200°C (392°F) without melting or releasing hazardous emissions. 5. Slide the paper guides against the edges of the transparencies. 6. Select the paper type from your software program. 7. Start your print job. Manual feed Use the manual feed to print one transparency at a time. 1. To - Dell P1500 | Dell™ Laser Printer P1500 User's Guide - Page 33
1. 2. Slide the paper guides flush against the edges of the transparency. 3. Select the paper size and type from your software program. 4. Start your print job. 5. Press and release Continue to resume printing. 6. When the Load Paper light blinks and the Press Continue light comes on, place another - Dell P1500 | Dell™ Laser Printer P1500 User's Guide - Page 34
7. Press Continue. Loading envelopes Load up to 10 envelopes in tray 1 or load envelopes one at a time in the manual feed. Tray 1 1. Extend the rear paper support until you hear a click. 2. - Dell P1500 | Dell™ Laser Printer P1500 User's Guide - Page 35
adjust the paper guides to fit the width of the envelopes. NOTE: Use envelopes that can withstand temperatures of 200°C (392°F) without sealing, excessive curling, wrinkling or releasing hazardous emissions. 4. Select the paper type from your software program. 5. Start your print job. Manual feed - Dell P1500 | Dell™ Laser Printer P1500 User's Guide - Page 36
envelope at a time. If you experience problems feeding envelopes in tray 1, try printing them one at a time from the manual feed. 1. Open the front output door for a straight paper path. 2. Load an envelope in the center of the manual feed and adjust the paper guides to fit the width of the envelope - Dell P1500 | Dell™ Laser Printer P1500 User's Guide - Page 37
envelope in the manual feed. 7. Press Continue. Loading labels For occasional label printing, use paper labels designed for laser printers. You can load labels one at a time from the manual feed, or you can load up to 10 sheets of labels in tray 1. Tray 1 1. Extend the rear paper support until you - Dell P1500 | Dell™ Laser Printer P1500 User's Guide - Page 38
2. To reduce curling or potential jams, open the front output door for a straight paper path. 3. Flex the sheets back and forth to loosen them, fan the sheets on all four sides, and flex them again. 4. Load up to 10 label sheets with the side you want to print on facing you. - Dell P1500 | Dell™ Laser Printer P1500 User's Guide - Page 39
releasing hazardous emissions. 5. Slide the paper guides against the edges of the label sheets. 6. Select the paper size and type from your software program. 7. Start your print job. Manual feed Use the manual feed to print one label sheet at a time. If you experience problems feeding labels in tray - Dell P1500 | Dell™ Laser Printer P1500 User's Guide - Page 40
1. Extend the front paper support on the top output bin until you hear a click. 2. Open the front output door for a straight paper path. 3. Load the label sheet with the side on which you want to print facing you. - Dell P1500 | Dell™ Laser Printer P1500 User's Guide - Page 41
guides against the edges of the label sheet. 5. Select the paper size and type from your software program. 6. Start your print job. 7. Press and release Continue to resume printing. 8. When the Load Paper light blinks and the Press Continue light comes on, place another label sheet in the manual - Dell P1500 | Dell™ Laser Printer P1500 User's Guide - Page 42
to 10 sheets of card stock or index cards in tray 1. Load one sheet of card stock or one index card at a time in the manual feeder. Tray 1 1. Extend the rear paper support until you hear a click. 2. - Dell P1500 | Dell™ Laser Printer P1500 User's Guide - Page 43
facing you. NOTE: Use card stock with a pressure of 25 psi that can withstand temperatures of 200°C (392°F) without releasing hazardous emissions. 4. Slide the paper guides against the edges of the card stock. 5. Select the paper size and type from your software program. 6. Start your print job. - Dell P1500 | Dell™ Laser Printer P1500 User's Guide - Page 44
card at a time. If you experience problems feeding index cards in tray 1, try printing them one at a time from the manual feed. 1. Open the front output door for a straight paper path. 2. Load an index card with the print side facing you. 3. Slide the paper guides against the edges of the index card - Dell P1500 | Dell™ Laser Printer P1500 User's Guide - Page 45
the Press Continue light comes on, place another index card in the manual feed. 8. Press Continue. Printing on both sides of the paper Printing on both sides of the paper reduces printing costs. Select Duplex from your printer driver to format your job to print every other page of the document first - Dell P1500 | Dell™ Laser Printer P1500 User's Guide - Page 46
NOTE: Manual duplex is only available on Windows NT 4.0, Windows 2000, and Windows XP. Although you can use tray 1 or the optional 250-sheet tray to print the first side of the duplex job, only use tray 1 to print the second side. You can also choose how you want your job duplexed: Long Edge or - Dell P1500 | Dell™ Laser Printer P1500 User's Guide - Page 47
1 Portrait 2 Landscape 3 Back of sheet 4 Front of sheet - Dell P1500 | Dell™ Laser Printer P1500 User's Guide - Page 48
Low Paper Jam Press Printer condition: Continue Ready Power Saver Click here for more information: The printer is ready to receive and process data. Ready and toner low Power saver and toner low The printer is ready to receive and process data. In addition, the toner in the toner cartridge - Dell P1500 | Dell™ Laser Printer P1500 User's Guide - Page 49
, or until it receives additional data. In addition, the toner in the toner cartridge is getting low. Flushing Resolution reduced The printer is flushing corrupted print data. Flushing and toner low Resolution reduced and toner low The printer is flushing corrupted print data. In addition, the - Dell P1500 | Dell™ Laser Printer P1500 User's Guide - Page 50
the manual feed. The printer is out of media, or the media did not feed properly. Print side two of your Print the other duplex print job side of your duplex print job. Top cover open The printer top cover is open. Toner cartridge error Toner cartridge is not installed The toner cartridge is - Dell P1500 | Dell™ Laser Printer P1500 User's Guide - Page 51
shows what these light sequences mean and what you can do. Secondary error code light sequences Ready/Data Toner Low Load Paper Paper Jam Error Press Printer Continue condition: Secondary error code Click here for more information: Secondary error code Insufficient collation area Memory - Dell P1500 | Dell™ Laser Printer P1500 User's Guide - Page 52
cannot errors establish communication with the network. Secondary error code light sequences for jams Ready/Data Toner Low Load Paper Paper Error Press Jam Continue Printer condition: Jam Click here for more information: Clearing jams Jam occurs just as it Clearing a tray 1 starts - Dell P1500 | Dell™ Laser Printer P1500 User's Guide - Page 53
Power Saver setting, it can only be set from the Local Printer Setup Utility (see Using the Local Printer Setup Utility). What this light sequence means: The printer is ready to receive and process data. In addition, the toner in the toner cartridge is getting low. What you can do: Send a print job - Dell P1500 | Dell™ Laser Printer P1500 User's Guide - Page 54
to cancel the print job. Press and hold Cancel to reset the printer. What this light sequence means: The printer is not ready to receive or process data, or the printer ports are offline. In addition, the toner in the toner cartridge is getting low. What you can do: Press and release Continue to - Dell P1500 | Dell™ Laser Printer P1500 User's Guide - Page 55
pages print. The Ready/Data light is on when printing stops. Press and release Cancel to cancel printing. Press and hold Cancel to reset the printer. Receiving/processing data from a host interface: Wait for the message to clear. Press and release Cancel to stop processing. Press and hold Cancel to - Dell P1500 | Dell™ Laser Printer P1500 User's Guide - Page 56
addition, the toner in the toner cartridge is getting low. What you can do: Remove the toner cartridge and gently shake it to extend the life of the cartridge. Replace the toner cartridge. Press and release Cancel to cancel the print job. Press and hold Cancel to reset the printer. What this light - Dell P1500 | Dell™ Laser Printer P1500 User's Guide - Page 57
The printer is waiting until a print timeout occurs, or until it receives additional data. In addition, the toner in the toner cartridge is getting low. What you can do: Remove the toner cartridge and gently shake it to extend the life of the cartridge. Replace the toner cartridge. Press and release - Dell P1500 | Dell™ Laser Printer P1500 User's Guide - Page 58
to Ready/Data to print other jobs. Remove the toner cartridge and gently shake it to extend the life of the cartridge. Replace the toner cartridge. What this light sequence means: The printer prompts you to load a single sheet of media in the manual feed. What you can do: Load media, with the - Dell P1500 | Dell™ Laser Printer P1500 User's Guide - Page 59
cancel the print job. What this light sequence means: Print the other side of your duplex print job. What you can do: Re-insert your print job in tray 1 using the instructions in the driver pop-up menu to orient the pages correctly. What this light sequence means: The printer top cover is open. - Dell P1500 | Dell™ Laser Printer P1500 User's Guide - Page 60
sequence means: The toner cartridge is not installed, or the printer detects a toner cartridge error. What you can do: If the toner cartridge is not installed, install it. If the toner cartridge is installed, remove it and install a new toner cartridge (see Replacing a toner cartridge). What this - Dell P1500 | Dell™ Laser Printer P1500 User's Guide - Page 61
can do: Install a toner cartridge made for your printer (see Ordering replacement toner cartridges). What this light sequence means: The printer is in the Ready mode and Hex Trace is active. What you can do: Advanced users can use Hex Trace to help troubleshoot printing problems. After resolving the - Dell P1500 | Dell™ Laser Printer P1500 User's Guide - Page 62
toner in the toner cartridge is getting low. What you can do: Advanced users can use Hex Trace to help troubleshoot printing problems. After resolving the problem, turn off the printer to exit Hex Trace. Remove the toner cartridge means: The printer has a service error and printing has stopped. - Dell P1500 | Dell™ Laser Printer P1500 User's Guide - Page 63
The printer has a service error and printing has stopped. What you can do: Turn the printer off and back on. If the lights are still blinking, contact Dell. Secondary error code What this light sequence means: The printer has one of the following errors: Memory is full. A page is too complex to - Dell P1500 | Dell™ Laser Printer P1500 User's Guide - Page 64
of text or graphics on the page and deleting unnecessary downloaded fonts or macros. Install additional printer memory (refer to the Owner's Manual for instructions). Secondary error code What this light sequence means: The printer is processing data, but the memory used to store pages is full. - Dell P1500 | Dell™ Laser Printer P1500 User's Guide - Page 65
the amount of text or graphics on the page and deleting unnecessary downloaded fonts or macros. Install additional printer memory (refer to the Owner's Manual for instructions). Secondary error code What this light sequence means: The page may not print correctly because the print information - Dell P1500 | Dell™ Laser Printer P1500 User's Guide - Page 66
not know the media size loaded in the tray, or there is a problem feeding the media. What you can do: Make sure the print media you loaded is large enough. Open the printer cover, clear the paper path and close the cover to resume printing (see Clearing jams). Press and release Continue to - Dell P1500 | Dell™ Laser Printer P1500 User's Guide - Page 67
What this light sequence means: The printer does not have enough memory to save the data in the buffer. What you can do: Install additional memory (refer to the Owner's Manual for instructions). Press and release Continue to continue printing the job. Press and release Cancel to cancel the print job - Dell P1500 | Dell™ Laser Printer P1500 User's Guide - Page 68
fonts and macros not previously stored in flash memory are deleted. Refer to the Owner's Manual for instructions to install flash memory. Secondary error code What this light sequence means: The printer detects unformatted flash memory. What you can do: Press and release Continue to clear the - Dell P1500 | Dell™ Laser Printer P1500 User's Guide - Page 69
has insufficient memory to free up unused space in flash memory. What you can do: Delete fonts, macros, and other data in RAM. Install additional printer memory. What this light sequence means: The code in an internal print server has not been programmed, or the programmed code is not valid. What - Dell P1500 | Dell™ Laser Printer P1500 User's Guide - Page 70
: Make sure the cable connecting the ENA and the printer is securely attached. Turn the printer off and then on to reset the printer. Press and hold Cancel to reset the printer. Secondary error code What this light sequence means: The printer cannot establish communication with the network. What you - Dell P1500 | Dell™ Laser Printer P1500 User's Guide - Page 71
Menus overview Using the Local Printer Setup Utility Printing the Printer Settings Configuration sheet To help resolve printing problems or to change printer configuration settings, advanced users can print the Printer Settings Configuration sheet for instructions on scrolling through the menus - Dell P1500 | Dell™ Laser Printer P1500 User's Guide - Page 72
menus. Utilities menu Use the Utilities menu to troubleshoot printer problems. Reset Factory Defaults Use this setting to: return your printer settings to the factory default values. Sometimes resetting the printer to the original settings solves formatting problems. All menu items are reset to the - Dell P1500 | Dell™ Laser Printer P1500 User's Guide - Page 73
print jobs to the printer and query printer status information simultaneously. Values: Off On Auto (factory default) Protocol Use this setting to: receive information at a much higher transmission rate if your printer is set to Fastbytes (if your computer supports Fastbytes) or receive information - Dell P1500 | Dell™ Laser Printer P1500 User's Guide - Page 74
binary PostScript print jobs from computers using the Macintosh operating system. This setting often causes Windows print jobs to fail. Auto (factory default) - The printer processes print jobs from computers using either Windows or Macintosh operating systems. USB menu Use the USB menu to change - Dell P1500 | Dell™ Laser Printer P1500 User's Guide - Page 75
print jobs to fail. Auto (factory default) - Printer processes print jobs from computers using either Windows or Macintosh operating systems. Set Network Port Speed Use this setting to: automatically detect the connection speed of your network. You can disable this setting to set the speed manually. - Dell P1500 | Dell™ Laser Printer P1500 User's Guide - Page 76
Programs Dell Printers Dell Laser Printer P1500 Local Printer Setup Utility. You can change the following settings using the Local Printer Setup Utility: Paper Settings Finishing Settings PCL Emulation Settings Paper Source Duplex Orientation Paper Size (per supported sources) Duplex Bind - Dell P1500 | Dell™ Laser Printer P1500 User's Guide - Page 77
Font Priority Setup Settings Printer Language Power Saver Resource Save Download Target Print Timeout Wait Timeout Auto Continue Jam Recovery Page Protect Print Area Display Language Alarm Control Toner Alarm Quality Settings Print Resolution Toner Darkness PQET PictureGrade Parallel Settings - Dell P1500 | Dell™ Laser Printer P1500 User's Guide - Page 78
support.dell.com. You may have a printer part that requires cleaning or replacement by a service technician. Problem What to do The media skews or buckles. Do not overfill tray 1 or the optional 250-sheet tray (see media capacities in the Media types and sizes table). Make sure the paper guides - Dell P1500 | Dell™ Laser Printer P1500 User's Guide - Page 79
sure the paper is under both corner bucklers (see Loading paper). Remove the paper from the optional 250-sheet tray and fan the paper. Make sure you cleared all jams. Press and release Continue, or open and close the printer cover to restart the printer. Make sure the toner cartridge is installed - Dell P1500 | Dell™ Laser Printer P1500 User's Guide - Page 80
. If you cannot fix the problem, contact Dell at support.dell.com. You may have a printer part that requires cleaning or replacement by a service technician. Problem The print is getting light, but the Toner Low light is not on. What to do Remove the toner cartridge and gently shake it from side - Dell P1500 | Dell™ Laser Printer P1500 User's Guide - Page 81
is on, but nothing prints. Contact Dell at support.dell.com. Wait to see if the lights come on. This may take a few seconds. Make sure the power cord is firmly plugged in at the back of the printer and at the electrical outlet. Make sure the toner cartridge is positioned correctly. Make sure the - Dell P1500 | Dell™ Laser Printer P1500 User's Guide - Page 82
from the Drivers and Utilities CD (see Using the Local Printer Setup Utility). Make sure the printer cover is closed. The printer is on, the Toner Low light is blinking, and the Error light is on. Make sure the toner cartridge is installed. Install a new toner cartridge. The Load Paper light is - Dell P1500 | Dell™ Laser Printer P1500 User's Guide - Page 83
the toner cartridge is installed. Make sure the printer top cover is closed. Make sure you are using the correct PostScript driver. The printer does not have enough memory to print the job. Install more memory. Your printer driver may not support manual duplex. Solving print quality problems Use - Dell P1500 | Dell™ Laser Printer P1500 User's Guide - Page 84
. Replace the toner cartridge. Toner smears or rubs off the page. Try a different kind of paper. Paper designed for copiers gives the best quality. If you are printing on specialty media (for example, card stock or labels), be sure you selected the correct paper type in the printer driver. Try - Dell P1500 | Dell™ Laser Printer P1500 User's Guide - Page 85
of paper. Paper designed for copiers gives the best quality. Replace the toner cartridge. Make sure you are using the correct printer driver. Press and hold Continue until all the lights come on to reset the printer to your user default settings. Select Hex Trace to help you troubleshoot the problem - Dell P1500 | Dell™ Laser Printer P1500 User's Guide - Page 86
Clearing a tray 1 jam If media has just started to feed from tray 1 when the jam occurs: 1. Pull the media straight up out of tray 1. 2. Press Continue or open and close the printer cover to resume printing. Clearing a fuser jam If the jam occurs in the fuser: 1. - Dell P1500 | Dell™ Laser Printer P1500 User's Guide - Page 87
(it may be warm). NOTE: The photoconductor drum on the bottom of the toner cartridge may be damaged if it is exposed to light. Cover the cartridge or store it in a clean, dark place if you take it out of the printer for an extended period of time. 1 Photoconductor drum 3. Gently pull out the - Dell P1500 | Dell™ Laser Printer P1500 User's Guide - Page 88
and print 10 or more menu settings pages. The paper removes any remaining adhesive in or on the fuser. NOTICE: Serious damage to your printer may occur if adhesive labels remain in the fuser. Contact Dell at support.dell.com. If the jam occurs as the paper exits the optional 250-sheet tray into the - Dell P1500 | Dell™ Laser Printer P1500 User's Guide - Page 89
the toner cartridge (the cartridge may be warm). 3. Gently pull the paper toward you. 4. Reinstall the toner cartridge. 5. Close the printer cover to resume printing. If you cannot reach the paper easily: 1. Turn off the printer. NOTE: You will lose the rest of the print job. 2. Lift the printer off - Dell P1500 | Dell™ Laser Printer P1500 User's Guide - Page 90
3. Clear the jam. 4. Align the printer with the front of the base and place it on top of the base. 5. Turn on the printer and resend your print job. If the jam occurs just after the paper feeds from the 250-sheet tray: 1. Pull the 250-sheet tray all the way out. 2. - Dell P1500 | Dell™ Laser Printer P1500 User's Guide - Page 91
2. Reach inside and gently pull the paper toward you. 3. Reinstall the tray and resume printing. Calling for service Before calling for service, check the following: Is the power cord plugged into the printer? Is the power cord plugged directly into a properly grounded electrical outlet? Is your - Dell P1500 | Dell™ Laser Printer P1500 User's Guide - Page 92
Has a power outage occurred in your area? Is a toner cartridge installed in your printer? Is the printer cover closed completely? If all else fails, try turning your printer off and back on again. If your printer is still not operating properly, call for service. If you are able to print, press and - Dell P1500 | Dell™ Laser Printer P1500 User's Guide - Page 93
drivers Windows Installer Driver Profiler Fonts Local Printer Setup Utility Uninstall software utility The Drivers and Utilities CD contains drivers and utilities, the Dell Diagnostics, and user's guides for your computer and optional devices. Dell ships your computer to you with required drivers - Dell P1500 | Dell™ Laser Printer P1500 User's Guide - Page 94
contains the profiles to use when creating a customized printer object. A DCF can contain profiles for any number of printer models and any number of different drivers (PostScript or PCL, Windows 98, Windows Me, Windows 2000, Windows NT 4.0, or Windows XP). Profiles can be added to an existing DCF - Dell P1500 | Dell™ Laser Printer P1500 User's Guide - Page 95
printers by using the Save As Command File option. Changes made using the Local Printer Setup Utility create settings that apply to all print jobs. Use the printer driver complete. 2. Click Start Programs Dell Printers Dell Laser Printer P1500 Dell Printer Software Uninstall. a. Select the - Dell P1500 | Dell™ Laser Printer P1500 User's Guide - Page 96
Emulation, compatibility, and connectivity Emulations PostScript 3, PCL 6 Compatibility Windows 98/Me, Windows 2000, Windows NT 4.0, Windows XP Connectivity Parallel and USB Cartridge and printer life Ships with toner cartridge yield at approximately 5% coverage Duty cycle (average) Duty cycle - Dell P1500 | Dell™ Laser Printer P1500 User's Guide - Page 97
Humidity Temperature 15.6° C (60° F) 15.6° C (60° F) 25.6° C (78° F) 32.2° C (90° F) 32.2° C (90° F) Storage Relative humidity (non-condensing) 8% 80% 80% 8% 45% Temperature range: -4°F to 104°F (-20°C to 40°C) Unpacked humidity range: 8% RH to 80% RH (non-condensing) Storage (packed) humidity - Dell P1500 | Dell™ Laser Printer P1500 User's Guide - Page 98
. You must understand the section in your operating instructions that discusses the guidelines for selecting appropriate print media to avoid the possibility of harmful emissions. Use 20 lb (75 g/m2) xerographic paper. Use transparencies designed for laser printers. Use envelopes made from 24 lb (90 - Dell P1500 | Dell™ Laser Printer P1500 User's Guide - Page 99
9, Com-10, 24 lb (90 g/m2) C5, B5, DL Labels (Paper) Minimum: 8.3 x 11 in. (210 mm x 279 mm) Index paper) Tray 1: 10 sheets Manual feed: 1 sheet Tray 1: 10 envelopes Manual feed:1 envelope Tray 1: 10 sheets Manual feed: 1 sheet Tray 1: 10 cards Manual feed: 1 card Cables Your Dell™ Laser Printer P1500 - Dell P1500 | Dell™ Laser Printer P1500 User's Guide - Page 100
follow all safety instructions in your Owner's Manual prior to setting up and operating your printer. Regulatory Information FCC different from that to which the receiver is connected. Consult your service representative for additional suggestions. The manufacturer is not responsible for any radio - Dell P1500 | Dell™ Laser Printer P1500 User's Guide - Page 101
is approved under the approval number NS/G/1234/J/100003 for the indirect connections to the public telecommunications systems in the United Kingdom. Noise Emissions Levels The following measurements were made in accordance with ISO 7779 and reported in conformance with ISO 9296. Printing Idling - Dell P1500 | Dell™ Laser Printer P1500 User's Guide - Page 102
laser system and printer are designed so there is never any human access to laser radiation above a Class I level during normal operation, user maintenance, or prescribed service to 50 percent. Dell is proud to be a participant in this program. As an ENERGY STAR Partner, Dell Computer Corporation has - Dell P1500 | Dell™ Laser Printer P1500 User's Guide - Page 103
Contacting Dell Warranty and Return Policy Dell technical support policy Technician-assisted technical support requires the cooperation and participation of the customer in the troubleshooting process and provides for restoration of the Operating System, application software and hardware drivers to - Dell P1500 | Dell™ Laser Printer P1500 User's Guide - Page 104
Information Service [email protected] Warranty and Return Policy Dell Computer Corporation ("Dell") manufactures its hardware products from parts and components that are new or equivalent to new in accordance with industry-standard practices. For information about the Dell warranty for your printer - Dell P1500 | Dell™ Laser Printer P1500 User's Guide - Page 105
of the Dell modified version is similarly provided without warranty. See the warranty disclaimers in the referenced licenses for additional details. To obtain source code files for the Dell modified GNU licensed software, launch the Drivers and Utilities CD that shipped with your printer and click
-
 1
1 -
 2
2 -
 3
3 -
 4
4 -
 5
5 -
 6
6 -
 7
7 -
8
-
9
-
10
-
11
-
12
-
13
-
14
-
15
-
16
-
17
-
18
-
19
-
20
-
21
-
22
-
23
-
24
-
25
-
26
-
27
-
28
-
29
-
30
-
31
-
32
-
33
-
34
-
35
-
36
-
37
-
38
-
39
-
40
-
41
-
42
-
43
-
44
-
45
-
46
-
47
-
48
-
49
-
50
-
51
-
52
-
53
-
54
-
55
-
56
-
57
-
58
-
59
-
60
-
61
-
62
-
63
-
64
-
65
-
66
-
67
-
68
-
69
-
70
-
71
-
72
-
73
-
74
-
75
-
76
-
77
-
78
-
79
-
80
-
81
-
82
-
83
-
84
-
85
-
86
-
87
-
88
-
89
-
90
-
91
-
92
-
93
-
94
-
95
-
96
-
97
-
98
-
99
-
100
-
101
-
102
-
103
-
104
-
105
 |
 |
Dell™ Laser Printer P1500 User's Guide
Click the links to the left for information on the features and operation of your printer. For information on
other documentation included with your printer, see
Finding information
.
1
Rear paper support
6
Paper guide
2
Tray 1
7
Operator panel lights
3
Front paper support
8
Front output door
4
Manual feed
9
Optional 250-sheet tray
5
Top output bin
To order replacement toner cartridges, contact Dell at www.dell.com/supplies.
NOTE:
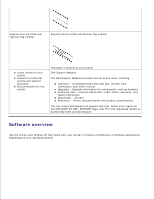
Dell does not recommend that you use toner cartridges from a third-party refiller. Print quality
and printer reliability cannot be guaranteed if you do. For best results, use Dell supplies.
Notes, Notices, and Cautions