Dell P703w All In One Photo Printer Dell Photo P703w All-In-One Printer User's
Dell P703w All In One Photo Printer Manual
 |
View all Dell P703w All In One Photo Printer manuals
Add to My Manuals
Save this manual to your list of manuals |
Dell P703w All In One Photo Printer manual content summary:
- Dell P703w All In One Photo Printer | Dell Photo P703w All-In-One Printer User's - Page 1
Dell™ Photo P703w All-In-One Printer User's Guide To order ink or supplies from Dell: 1. Double-click the following icon on your desktop. 2. Visit Dell's website, or order Dell printer supplies by phone. www.dell.com/supplies For the best service, ensure you have the Dell printer Service Tag - Dell P703w All In One Photo Printer | Dell Photo P703w All-In-One Printer User's - Page 2
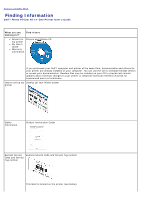
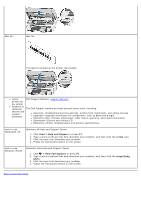
to Contents Page Finding Information Dell™ Photo P703w All-In-One Printer User's Guide What are you looking for? Find it here Drivers for my printer My User's Guide Warranty information Drivers and Utilities CD If you purchased your Dell™ computer and printer at the same time, documentation - Dell P703w All In One Photo Printer | Dell Photo P703w All-In-One Printer User's - Page 3
, and repair information Downloads-Drivers and Utilities CD Reference-Printer documentation and product specifications How to use Windows® XP Windows XP Help and Support Center 1. Click Start® Help and Support or press F1. 2. Type a word or phrase that best describes your problem, and then click - Dell P703w All In One Photo Printer | Dell Photo P703w All-In-One Printer User's - Page 4
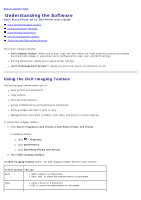
Understanding the Software Dell™ Photo P703w All-In-One Printer User's Guide Using the Dell Imaging Toolbox Configuring Printer Settings Using Printing Preferences Dell Ink Management System Removing and Reinstalling Software The printer software includes: Dell Imaging Toolbox- Allows - Dell P703w All In One Photo Printer | Dell Photo P703w All-In-One Printer User's - Page 5
access Configure Settings: 1. Click Start® Programs® Dell Printers® Dell Photo P703w AIO Printer. In Windows Vista®: a. Click ® Programs. b. Click Dell Printers. c. Click Dell Photo P703w AIO Printer. 2. Select Dell Imaging Toolbox. The Dell Imaging Toolbox opens. 3. Click Settings. NOTE: Changes - Dell P703w All In One Photo Printer | Dell Photo P703w All-In-One Printer User's - Page 6
digits of the printer's serial number. You can change this to a more personalized name by entering a new name. AIO PrinterPrint Print quality- Select Draft, Normal, or Best for non-photo paper print one of more photos on the size paper loaded (see Layouts). It is enabled when you select Photo - Dell P703w All In One Photo Printer | Dell Photo P703w All-In-One Printer User's - Page 7
have Dell Imaging Toolbox prompt you for the filename and location to save the file. Automatically save- Select to automatically save scans to the name and location you specify. The default filename base is Scan appended with a three digit integer that increments sequentially as photos are scanned - Dell P703w All In One Photo Printer | Dell Photo P703w All-In-One Printer User's - Page 8
that contains all supported paper sizes. Print mirror image- Select the check box to flip the image for iron-on printing. Two-sides printing- Select No to print on one side of the paper only. Select Manual (Instructions provided) to perform manual duplexing where you print on one side, rotate the - Dell P703w All In One Photo Printer | Dell Photo P703w All-In-One Printer User's - Page 9
in any one of the cartridges touches 5 percent or below, the printing status expands with an error (red bar) that the ink cartridge is almost empty. For more information, see Replacing Ink Cartridges. To order ink cartridges: 1. Click Start® Programs® Dell Printers® Dell Photo P703w AIO Printer. In - Dell P703w All In One Photo Printer | Dell Photo P703w All-In-One Printer User's - Page 10
Programs® Dell Printers® Dell Photo P703w AIO Printer. In Windows Vista®: a. Click ® Programs. b. Click Dell Printers. c. Click Dell Photo P703w AIO Printer. 2. Click Uninstall Dell Photo P703w AIO Printer. 3. Follow the instructions on the screen. 4. Restart your computer. 5. Insert the Drivers and - Dell P703w All In One Photo Printer | Dell Photo P703w All-In-One Printer User's - Page 11
Back to Contents Page About Your Printer Dell™ Photo P703w All-In-One Printer User's Guide Understanding the Printer Parts Understanding the Operator Panel You can use your printer to perform a variety of tasks. Your printer can perform tasks with or without a connection to a computer. If the - Dell P703w All In One Photo Printer | Dell Photo P703w All-In-One Printer User's - Page 12
your PictBridge-enabled digital camera or a USB key to your printer. 9 Photo tray light Lights up when the photo tray is engaged. 10 Photo tray Tray that holds the photo paper. 11 Paper-length Guide that helps the paper feed into the printer properly. guide 12 Output tray extender - Dell P703w All In One Photo Printer | Dell Photo P703w All-In-One Printer User's - Page 13
to navigate Up , Down , Left , and Right . Press to enter Photo mode. Lights up when in Photo mode. Rotate picture on the display, clockwise, 90 degrees. When the printer is in Photo Preview mode, pressing enters thumbnail view. When a photo has been magnified with the Zoom in button, pressing the - Dell P703w All In One Photo Printer | Dell Photo P703w All-In-One Printer User's - Page 14
Wi-Fi Protected Setup (WPS) - Advanced Users Only Minimum Requirements for Setup Dell™ Photo P703w AIO Printer An existing wireless network Drivers and Utilities CD that shipped with your printer A computer running one of the following operating systems: Windows Vista® Windows® XP NOTE: Install the - Dell P703w All In One Photo Printer | Dell Photo P703w All-In-One Printer User's - Page 15
CD, you can download the appropriate software from support.dell.com. The Windows firewall settings might have to be disabled before you download the software. 11. Connect the USB cable between the port on the back of the printer and the computer. 12. Follow the on-screen instructions until you reach - Dell P703w All In One Photo Printer | Dell Photo P703w All-In-One Printer User's - Page 16
13. Select the Wireless connection, and click Next. NOTE: Ensure that your computer is connected to the same network. Configure Wireless Printer window opens. - Dell P703w All In One Photo Printer | Dell Photo P703w All-In-One Printer User's - Page 17
® Dell Printers® Dell Photo P703w AIO Printer® WiFi Config Utility. In Windows Vista®: a. Click ® Programs. b. Click Dell Printers. c. Click Dell Photo P703w AIO Printer® WiFi Config Utility. Configuring Wireless using Wi-Fi Protected Setup (WPS) - Advanced Users Only Follow these instructions - Dell P703w All In One Photo Printer | Dell Photo P703w All-In-One Printer User's - Page 18
for the WPS logo. NOTE: Wireless configuration using WPS is only recommended for advanced users. Before configuring your printer using WPS, you must know the and password, contact your router manufacturer's helpline or your Internet service provider. 2. On your router's web page, navigate to the - Dell P703w All In One Photo Printer | Dell Photo P703w All-In-One Printer User's - Page 19
into the PIN textbox on your router's WPS page and initiate the WPS search on the router. Complete step 9 within 2 minutes. At your printer's Operator Panel: 9. Return to the printer within 2 minutes of initiating WPS search on the web page and press the Select button to initiate the process at the - Dell P703w All In One Photo Printer | Dell Photo P703w All-In-One Printer User's - Page 20
have already installed your printer on your computer, launch the installed Wi-Fi Config Utility program. Skip to step 16. NOTE: If you do not have your Drivers and Utilities CD, you can download the appropriate software from support.dell.com . 15. Follow the on-screen instructions until you reach - Dell P703w All In One Photo Printer | Dell Photo P703w All-In-One Printer User's - Page 21
16. Select the Wireless connection, and click Next. NOTE: Ensure that your computer is connected to the same network. 17. Configure Wireless Printer window opens. Select Keep wireless settings of my printer, and click Next. - Dell P703w All In One Photo Printer | Dell Photo P703w All-In-One Printer User's - Page 22
18. Select your printer, and click Next. 19. Click Finish to complete the installation. - Dell P703w All In One Photo Printer | Dell Photo P703w All-In-One Printer User's - Page 23
Back to Contents Page - Dell P703w All In One Photo Printer | Dell Photo P703w All-In-One Printer User's - Page 24
Dell™ Photo P703w All-In-One Printer User's Guide Copy Mode Photo Mode Scan Mode Copy Mode To view or change the Copy Mode menu: 1. Press the Copy button on the printer right Arrow button to change the copy quality (Draft/Normal/Best). 3. Press the Select button to set and continue setting - Dell P703w All In One Photo Printer | Dell Photo P703w All-In-One Printer User's - Page 25
change the photo quality (Draft/Normal/Best). 3. Press the Select button to set and continue setting options, or Start button . 1. From the Photo Menu, set save photo settings to Yes or No. Scan Mode To view or change the Scan Mode menu settings: 1. Press the Scan button on the printer's operator - Dell P703w All In One Photo Printer | Dell Photo P703w All-In-One Printer User's - Page 26
Back to Contents Page Maintenance Dell™ Photo P703w All-In-One Printer User's Guide Cleaning the Scanner Glass Cleaning the Scanner Lid Formatting a Memory Card Printing a Diagnostic Sheet Checking Ink Levels Replacing Ink Cartridges Running a Calibration Cleaning the Printhead - Dell P703w All In One Photo Printer | Dell Photo P703w All-In-One Printer User's - Page 27
contacting Dell support. 1. Press the Menu button . 2. Press the down Arrow button to scroll to Print Diagnostic Sheet. 3. Press the Select button . 4. Press the Start button . Printing of the diagnostic sheet begins. Checking Ink Levels Your printer uses separate black and color ink cartridges. You - Dell P703w All In One Photo Printer | Dell Photo P703w All-In-One Printer User's - Page 28
Dell ink cartridges to ensure the best results and avoid printhead damage. 1. Turn on your printer. 2. Lift the scanner base unit from the front. The printhead moves to a center position. The ink tanks are located in the printhead. Number Part 1 Printhead 2 Color ink cartridge 3 Black ink - Dell P703w All In One Photo Printer | Dell Photo P703w All-In-One Printer User's - Page 29
by grasping the top edge and pulling/rotating it off the ink cartridge. NOTE: Insert the ink cartridge into the printhead immediately to prevent any drying of the ink. 7. Slide the ink cartridge into the printhead. 8. Press down the tab until you hear a click and feel the latch snap into position - Dell P703w All In One Photo Printer | Dell Photo P703w All-In-One Printer User's - Page 30
have any photo paper, you can use plain paper, but photo paper is highly recommended for calibrations. 2. Click Start® Programs® Dell Printers® Dell Photo P703w AIO Printer. In Windows Vista®: a. Click ® Programs. b. Click Dell Printers. c. Click Dell Photo P703w AIO Printer. 3. Select Dell Imaging - Dell P703w All In One Photo Printer | Dell Photo P703w All-In-One Printer User's - Page 31
5. Follow the instructions on the LCD display to complete the calibration. Cleaning the Printhead If you notice a degradation in the quality of prints, the printhead may need cleaning. Cleaning the Printhead From the Computer 1. Click Start® Programs® Dell Printers® Dell Photo P703w AIO Printer. In - Dell P703w All In One Photo Printer | Dell Photo P703w All-In-One Printer User's - Page 32
not be changed normally, during the lifespan of the printer. 1. Turn on your printer. 2. Lift the scanner base unit from the front. The printhead moves to a center position. Wait until the printhead is idle and silent. 3. Remove the ink cartridges. For more information, see the steps 3 and 4 under - Dell P703w All In One Photo Printer | Dell Photo P703w All-In-One Printer User's - Page 33
6. Remove the new printhead from its bag. 7. Remove and discard the orange protective cap. 8. Place the new printhead into the carriage. 9. Push firmly against the target label on the printhead until it clicks into place. - Dell P703w All In One Photo Printer | Dell Photo P703w All-In-One Printer User's - Page 34
the section Replacing Ink Cartridges. 11. Close the scanner base unit. Disabling the Upgrade To enable or disable the Dell Imaging Toolbox from automatically checking for software updates each time it starts: 1. Click Start® Programs® Dell Printers® Dell Photo P703w AIO Printer. In Windows Vista - Dell P703w All In One Photo Printer | Dell Photo P703w All-In-One Printer User's - Page 35
This requires an internet connection. 1. Click Start®Programs® Dell Printers® Dell Photo P703w AIO Printer. In Windows Vista®: a. Click ® Programs. b. Click Dell Printers. c. Click Dell Photo P703w AIO Printer. 2. Select Dell Imaging Toolbox. The Dell Imaging Toolbox opens. 3. Click the Help button - Dell P703w All In One Photo Printer | Dell Photo P703w All-In-One Printer User's - Page 36
to Contents Page Loading Paper and Originals Dell™ Photo P703w All-In-One Printer User's Guide Loading Paper Loading Photo Paper Loading Envelopes Loading Labels Loading Original Documents Loading Paper You can load the main paper tray with various types of paper from 3 to 8.5 inches wide - Dell P703w All In One Photo Printer | Dell Photo P703w All-In-One Printer User's - Page 37
5. Slide the paper-width and paper-length guides inward until they stop at the edges of the paper. 6. Lower the output tray. 7. Pull the output tray extender out. Loading Photo Paper You can load up to 20 sheets of 10 mil thick 4x6 inch (101x150 mm) photo paper into the photo tray. NOTE: To avoid - Dell P703w All In One Photo Printer | Dell Photo P703w All-In-One Printer User's - Page 38
it stops. NOTE: When the photo tray is disengaged, the main paper tray is active. 3. Insert the stack of photo paper into the photo tray, print side down. 4. Slide the photo tray with the stack of photo paper in until it stops. NOTE: Engaging the photo tray turns the photo tray light on. 5. Close - Dell P703w All In One Photo Printer | Dell Photo P703w All-In-One Printer User's - Page 39
into the main input tray of your printer. NOTE: Do not use envelopes with cutouts or cellophane windows. 1. Lift the output tray, and slide the paper-width and paper-length guides to their outermost positions. 2. Remove any paper in the input tray. 3. Insert one or more envelopes face down with the - Dell P703w All In One Photo Printer | Dell Photo P703w All-In-One Printer User's - Page 40
the output tray. Loading Labels Use letter or A4 (designed for use with ink jet printers) label sheets. 1. Ensure that none of the pages are sticking together. 2. Place a stack of label sheets on top of standard paper in the input tray, label side down. Loading Original Documents 1. Open the top - Dell P703w All In One Photo Printer | Dell Photo P703w All-In-One Printer User's - Page 41
3. Close the top cover. Back to Contents Page - Dell P703w All In One Photo Printer | Dell Photo P703w All-In-One Printer User's - Page 42
Contents Page Troubleshooting Dell™ Photo P703w All-In-One Printer User's Guide Setup Problems General Problems Improving Print Quality General Guidelines for Selecting or Loading Print Media Avoiding Jams and Misfeeds Error Messages Setup Problems Computer Problems Correct communication - Dell P703w All In One Photo Printer | Dell Photo P703w All-In-One Printer User's - Page 43
Paper. Ensure that the printer is not connected to a PictBridge-enabled camera. For more information, see Printing Photos From a PictBridge-Enabled Camera. General Problems Printing Problems Check the ink levels, and install new ink cartridges if necessary. For more information, see: Dell Ink - Dell P703w All In One Photo Printer | Dell Photo P703w All-In-One Printer User's - Page 44
. Print too dark. NOTE: For best results, use only Dell Ink cartridges and paper for your printer. Try re-taking the picture with the flash on, or move within the flash range of the camera. See your camera user's guide for details. Adjust the exposure compensation on your camera, and try re-taking - Dell P703w All In One Photo Printer | Dell Photo P703w All-In-One Printer User's - Page 45
may blink. NOTE: For best results, use only Dell Ink cartridges and paper for your printer. Check the paper 1. Disengage the photo tray if engaged. 2. Check the paper access on the back of the printer. 3. Remove any loose paper from the printer. 4. Inspect the paper supplies and reload with new - Dell P703w All In One Photo Printer | Dell Photo P703w All-In-One Printer User's - Page 46
computer meets the minimum requirements. NOTE: The printer is compatible with the Dell 8-in-1-card reader (sold separately). Other Dell USB card readers may work with the printer; however, other manufacturers' card readers are not supported. Wireless Network Problem Cannot print using Wi-Fi from my - Dell P703w All In One Photo Printer | Dell Photo P703w All-In-One Printer User's - Page 47
connected with an invalid IP address or not connected, go to Dell Wireless Support Center for assistance or troubleshooting your wireless network. Check that you are connected to correct network. Ensure that the SSID of the printer and the computer are same. To verify, print a Network Configuration - Dell P703w All In One Photo Printer | Dell Photo P703w All-In-One Printer User's - Page 48
WEP key, see the user guide for the wireless router. Wireless adapter in computer is not broadcasting SSID. If the wireless adapter in the computer is not only one memory card at a time. When printing images from a memory card, ensure that the file format of the images is supported by the printer. - Dell P703w All In One Photo Printer | Dell Photo P703w All-In-One Printer User's - Page 49
Ink Cartridge Problems Ensure that you install a genuine Dell ink cartridge. Ensure to replace the expired ink cartridge. Paper Problems Ensure that you loaded the paper correctly. For more information, see Loading Paper. Use Dell recommended paper for your printer. Use a smaller amount of paper - Dell P703w All In One Photo Printer | Dell Photo P703w All-In-One Printer User's - Page 50
improve, try aligning or cleaning the ink cartridges. For more information on aligning the printhead, see Running a Calibration. For more information on cleaning the printhead, see Cleaning the Printhead. For additional solutions, go to support.dell.com. General Guidelines for Selecting or Loading - Dell P703w All In One Photo Printer | Dell Photo P703w All-In-One Printer User's - Page 51
Solution NOTE: For best result, use only Dell ink cartridges & paper for your printer. 1. Disengage the photo paper tray, if engaged. 2. Turn off your printer for 5 seconds, and then turn it back on. 3. Any paper stuck in the printer should automatically eject. 4. If the paper does not automatically - Dell P703w All In One Photo Printer | Dell Photo P703w All-In-One Printer User's - Page 52
number of photos exceeded. A device was attached that contained more than the supported maximum of 1000 images. Memory Card or Digital Camera, USB Thumbdrive. None. Ink overflow container is full. Press the Select button to continue. Printer error. Print job unsuccessful. The printer failed to - Dell P703w All In One Photo Printer | Dell Photo P703w All-In-One Printer User's - Page 53
Dell™ Photo P703w All-In-One Printer User's Guide Printing Photos From the Computer Printing Photos From the Application Using the Print Command Printing Photos From the Operator Panel Menu Printing a Proofsheet Printing a Demo Sheet Printing More Than One Page on a Sheet of Paper - Dell P703w All In One Photo Printer | Dell Photo P703w All-In-One Printer User's - Page 54
customizing your Print settings, click Print. Printing Photos From the Application Using the Print Command 1. Turn on your computer and printer, and ensure that they are connected. 2. Load the paper. For more information, see Loading Paper. 3. With your photo open, click File® Print. The Print - Dell P703w All In One Photo Printer | Dell Photo P703w All-In-One Printer User's - Page 55
Printing a Proofsheet 1. Turn on your printer. 2. Insert a memory card into the appropriate slot, USB Memory key into the PictBridge connector, or connect a digital camera to the PictBridge/USB connector. The last photo is displayed. NOTE: USB HDD is not supported by PictBridge connector. NOTICE: Do - Dell P703w All In One Photo Printer | Dell Photo P703w All-In-One Printer User's - Page 56
to Print Demo Sheet. 5. Press the Start button . Printing More Than One Page on a Sheet of Paper 1. Turn on your computer and printer, and ensure that they are connected. 2. Load the paper. For more information, see Loading Paper. 3. With your document open, click File® Print. The Print dialog box - Dell P703w All In One Photo Printer | Dell Photo P703w All-In-One Printer User's - Page 57
Print. Printing Photos From a PictBridge-Enabled Camera Your printer supports PictBridge-enabled cameras. 1. Insert one end of the USB cable into the camera. 2. Insert the other end of the USB cable into the PictBridge connector on the front of the printer. See the instructions included with your - Dell P703w All In One Photo Printer | Dell Photo P703w All-In-One Printer User's - Page 58
after you disconnect the PictBridge camera from your printer. 3. Turn on your digital camera. The printer automatically enters PictBridge mode. 4. See the instructions included with your camera to begin printing photos. NOTE: For many digital cameras, there are two USB mode selections, computer - Dell P703w All In One Photo Printer | Dell Photo P703w All-In-One Printer User's - Page 59
set print quality for non-photo paper 1. Click Start® Programs or All Programs® Dell Printers® Dell Photo P703w AIO Printer. In Windows Vista®: a. Click ® Programs. b. Click Dell Printers. c. Click Dell Photo P703w AIO Printer. 2. Select Dell Imaging Toolbox. The Dell Imaging Toolbox opens. 3. From - Dell P703w All In One Photo Printer | Dell Photo P703w All-In-One Printer User's - Page 60
Normal, or Best. 7. Click OK or Apply. Print Options 1. Click Start® Programs or All Programs® Dell Printers® Dell Photo P703w AIO Printer. In Windows Vista®: a. Click ® Programs. b. Click Dell Printers. c. Click Dell Photo P703w AIO Printer. 2. Select Dell Imaging Toolbox. The Dell Imaging Toolbox - Dell P703w All In One Photo Printer | Dell Photo P703w All-In-One Printer User's - Page 61
b. Click Dell Printers. c. Click Dell Photo P703w AIO Printer. 2. Select Dell Imaging Toolbox. The Dell Imaging Toolbox opens. 3. From the Dell Imaging Toolbox window, select Settings. 4. Click AIO Printer. 5. Click Print. 6. Select the check box Automatically apply scene balance to digital pictures - Dell P703w All In One Photo Printer | Dell Photo P703w All-In-One Printer User's - Page 62
Back to Contents Page Specifications Dell™ Photo P703w All-In-One Printer User's Guide Overview Environmental Specifications Power Consumption and Requirements Print and Scan Mode Capabilities Operating System Support Memory Specifications and Requirements Media Types and Sizes - Dell P703w All In One Photo Printer | Dell Photo P703w All-In-One Printer User's - Page 63
Print resolution Photo/glossy paper All other media Draft 300 x 300 dpi NA 300 x1200 dpi Normal 300 x 300 dpi NA 600 x 1200 dpi Best 300 x 300 dpi 1200 x 1200 dpi 1200 x 1200 dpi Operating System Support The printer supports: Windows Vista x32 Windows Vista x64 Windows XP Professional x32 - Dell P703w All In One Photo Printer | Dell Photo P703w All-In-One Printer User's - Page 64
10 mm stack Greeting cards, index cards, postcards, or photo cards 3.5x5.25 in. (89x133 mm) 3.5x7.25 in US Letter (8.5x11 in.) (216x280 mm) Photo/glossy or matte paper 3.5x5 in. (89x127 mm) 100x150 mm 5x11 in.) (216x280 mm) Custom size paper The paper must fit the following dimensions: Width: - Dell P703w All In One Photo Printer | Dell Photo P703w All-In-One Printer User's - Page 65
Dell™ Photo P703w All-In-One Printer User's Guide Printing Photos From a Memory Card or USB Key Using the Computer Printing Photos From a Memory Card or USB Key Using the Operator Panel Printing Tagged Photos (DPOF) Most digital cameras use a memory card to store photos. The printer supports - Dell P703w All In One Photo Printer | Dell Photo P703w All-In-One Printer User's - Page 66
Panel 1. Turn on your printer. 2. Insert a memory card into the appropriate slot, USB Memory key into the PictBridge connector, or connect a digital camera to the PictBridge/USB connector. 3. Load the paper. For more information, see Loading Paper. NOTE: To print from the photo tray, ensure that the - Dell P703w All In One Photo Printer | Dell Photo P703w All-In-One Printer User's - Page 67
the Start button . Connecting to the imaging service message box appears. 5. Follow the instructions on how to transfer the photos to your computer. Printing Tagged Photos (DPOF) If your camera supports Digital Print Order Format (DPOF), you can specify which photos to print, and how many of each - Dell P703w All In One Photo Printer | Dell Photo P703w All-In-One Printer User's - Page 68
Page Ordering Printer Supplies Dell™ Photo P703w All-In-One Printer User's Guide Your printer includes software installed to detect the ink levels in the printer. During a print job, a screen appears on your computer to warn you of low ink levels. You can order ink online at www.dell.com/supplies - Dell P703w All In One Photo Printer | Dell Photo P703w All-In-One Printer User's - Page 69
to Contents Page Copying Dell™ Photo P703w All-In-One Printer User's Guide Copying Using the Operator Panel Copying Using the Computer Copying From a Thick Book Changing Copy Settings Copying Using the Operator Panel Same Size 1. Turn on your printer. 2. Load the paper. For more information - Dell P703w All In One Photo Printer | Dell Photo P703w All-In-One Printer User's - Page 70
unless the Preview Mode is turned on. If so, press the Start button to begin making copies. Scale Percent 1. Turn on your printer. 2. Load the paper. For more information, see Loading Paper. 3. Load the original photo. 4. Press the Copy button . 5. Press the down Arrow button to scroll to Output. - Dell P703w All In One Photo Printer | Dell Photo P703w All-In-One Printer User's - Page 71
for making copies of photos on your printer. The following layouts are supported: Borderless (default) Bordered 2 per Page 3 per Page 4 per Page 9 per Page 2x2 Poster 3x3 Poster 4x4 Poster 1. Turn on your printer. 2. Load the paper. For more information, see Loading Paper. 3. Load the original - Dell P703w All In One Photo Printer | Dell Photo P703w All-In-One Printer User's - Page 72
, see Loading Paper. 3. Load the original photo. 4. Click Start® Programs or All Programs® Dell Printers® Dell Photo P703w AIO Printer. In Windows Vista®: a. Click ® Programs. b. Click Dell Printers. c. Click Dell Photo P703w AIO Printer. 5. Select Dell Imaging Toolbox. The Dell Imaging Toolbox - Dell P703w All In One Photo Printer | Dell Photo P703w All-In-One Printer User's - Page 73
6. From Dell Imaging Toolbox, click Copy to open the Copy Pictures window. The Basic Copy window opens. 7. Click Go to Advanced from the Copy Pictures window. The Advanced Copy window opens. - Dell P703w All In One Photo Printer | Dell Photo P703w All-In-One Printer User's - Page 74
checkbox Copy as individual pictures, Color restoration, Borderless, Kodak Perfect Touch technology, and Paper saver, as desired. 12. Select the number of Copies want to copy and click Next>. 16. Click Edit... to enhance the selected photo. NOTE: Click Next > to go directly to the Finish window. 17. - Dell P703w All In One Photo Printer | Dell Photo P703w All-In-One Printer User's - Page 75
information appears that shows the progress of the copy. Copying From a Thick Book 1. Turn on your printer. 2. Load the paper. For more information, see Loading Paper. 3. Load the original thick book. Your printer functions normally even with the top cover open. You can lift the top cover from the - Dell P703w All In One Photo Printer | Dell Photo P703w All-In-One Printer User's - Page 76
set output quality for non-photo paper 1. Click Start® Programs or All Programs® Dell Printers® Dell Photo P703w AIO Printer. In Windows Vista®: a. Click ® Programs. b. Click Dell Printers. c. Click Dell Photo P703w AIO Printer. 2. Select Dell Imaging Toolbox. The Dell Imaging Toolbox opens. 3. From - Dell P703w All In One Photo Printer | Dell Photo P703w All-In-One Printer User's - Page 77
5. Click Copy tab. 6. Select Draft, Normal, or Best. 7. Click OK or Apply. Copy Options - Dell P703w All In One Photo Printer | Dell Photo P703w All-In-One Printer User's - Page 78
® Programs or All Programs® Dell Printers® Dell Photo P703w AIO Printer. In Windows Vista®: a. Click ® Programs. b. Click Dell Printers. c. Click Dell Photo P703w AIO Printer. 2. Select Dell Imaging Toolbox. The Dell Imaging Toolbox opens. 3. From the Dell Imaging Toolbox window, select Settings - Dell P703w All In One Photo Printer | Dell Photo P703w All-In-One Printer User's - Page 79
Back to Contents Page Appendix Dell™ Photo P703w All-In-One Printer User's Guide Dell Technical Support Policy Technical Assistance Obtaining Assistance Product Information Before You Call Contacting Dell Warranty and Return Policy Dell Technical Support Policy Technician-assisted - Dell P703w All In One Photo Printer | Dell Photo P703w All-In-One Printer User's - Page 80
Tag: Express Service Code: Return Material Authorization Number (if provided by Dell support technician): Operating system and version: Is your printer connected to a network? Yes No Network, version, and network adapter: Error message: Description of problem and troubleshooting procedures you - Dell P703w All In One Photo Printer | Dell Photo P703w All-In-One Printer User's - Page 81
your password. Dell Support e-mail addresses [email protected] [email protected] [email protected] (Latin America and Caribbean countries only) [email protected] (Asian/Pacific countries only) Electronic Support Service [email protected] [email protected] la-techsupport - Dell P703w All In One Photo Printer | Dell Photo P703w All-In-One Printer User's - Page 82
reported by the Dell Diagnostics. 4. Include any accessories that belong with the item(s) being returned (power cables, software floppy disks, guides, and so on returned, and you assume the risk of loss during shipment to Dell. Collect On Delivery (C.O.D.) packages are not accepted. Returns that - Dell P703w All In One Photo Printer | Dell Photo P703w All-In-One Printer User's - Page 83
Back to Contents Page Scanning Dell™ Photo P703w All-In-One Printer User's Guide Scanning Using the Operator Panel Scanning Using the Computer Scanning From a Thick Book Editing Scanned Images Editing Scanned Documents Changing Scan Settings Scanning Using the - Dell P703w All In One Photo Printer | Dell Photo P703w All-In-One Printer User's - Page 84
enabled when the wireless connection is established between your printer and the computer. 1. Turn on your printer and the computer. 2. Establish a wireless connection between your printer and the computer. For more information, see Configuring Wireless. 3. Load your original photo or document. - Dell P703w All In One Photo Printer | Dell Photo P703w All-In-One Printer User's - Page 85
scan picture settings. Scanning Using the Computer Scanning Photos 1. Turn on your computer and printer, and ensure that they are connected. 2. Load your original photo. 3. Click Start® Programs or All Programs® Dell Printers® Dell Photo P703w AIO Printer. In Windows Vista®: a. Click ® Programs. - Dell P703w All In One Photo Printer | Dell Photo P703w All-In-One Printer User's - Page 86
b. Click Dell Printers. c. Click Dell Photo P703w AIO Printer. 4. Select Dell Imaging Toolbox. The Dell Imaging Toolbox opens. 5. From the Dell Imaging Toolbox, click Scan to open the Scan Pictures and Document window. The Basic Scan window opens. - Dell P703w All In One Photo Printer | Dell Photo P703w All-In-One Printer User's - Page 87
6. Click Go to Advanced from the Scan Pictures and Document window. The Advanced Scan window opens. 7. Select Picture. 8. Select Color or Black & White. - Dell P703w All In One Photo Printer | Dell Photo P703w All-In-One Printer User's - Page 88
sharpening. 10. Select the Color restoration, Red eye reduction, and Kodak Perfect Touch technology check box, if you want to scan with Edit... to enhance the selected photo (for more information, see Editing Scanned Images) or click Scan More to add more photos to the picture tray. NOTE: - Dell P703w All In One Photo Printer | Dell Photo P703w All-In-One Printer User's - Page 89
, click Save, Send, or Print respectively. Scanning Documents 1. Turn on your computer and printer, and ensure that they are connected. 2. Load your original document. 3. Click Start® Programs or All Programs® Dell Printers® Dell Photo P703w AIO Printer. In Windows Vista®: a. Click Programs. - Dell P703w All In One Photo Printer | Dell Photo P703w All-In-One Printer User's - Page 90
® b. Click Dell Printers. c. Click Dell Photo P703w AIO Printer. 4. Select Dell Imaging Toolbox. The Dell Imaging Toolbox opens. 5. From the Dell Imaging Toolbox, click Scan to open the Scan Pictures and Document window. The Basic Scan window opens. 6. Click Go to Advanced from the Scan Pictures - Dell P703w All In One Photo Printer | Dell Photo P703w All-In-One Printer User's - Page 91
paper, if the size of the book is lesser than the scanner glass. 3. Press the Scan button . 4. Press the left or right Arrow button to scroll to Photo the Dell Imaging Toolbox scan picture settings. Editing Scanned Images Editing Colored Scanned Images 1. Turn on your computer and printer, and - Dell P703w All In One Photo Printer | Dell Photo P703w All-In-One Printer User's - Page 92
Dell Printers® Dell Photo P703w AIO Printer. In Windows Vista®: a. Click ® Programs. b. Click Dell Printers. c. Click Dell Photo P703w AIO Printer. 4. Select Dell Imaging Toolbox. The Dell Imaging Toolbox opens. 5. From the Dell eye reduction, Facial Retouch, Kodak Perfect Touch technology) Adjust - Dell P703w All In One Photo Printer | Dell Photo P703w All-In-One Printer User's - Page 93
Start® Programs or All Programs® Dell Printers® Dell Photo P703w AIO Printer. In Windows Vista®: a. Click ® Programs. b. Click Dell Printers. c. Click Dell Photo P703w AIO Printer. 4. Select Dell Imaging Toolbox. The Dell Imaging Toolbox opens. 5. From the Dell Imaging Toolbox, click Scan to open - Dell P703w All In One Photo Printer | Dell Photo P703w All-In-One Printer User's - Page 94
scanned and scan progress information appears. 9. Click Edit... to edit the selected photo. 10. Edit the image using the tools available in your program. You Crop your image Editing Scanned Documents NOTE: Your printer supports Optical Character Recognition (OCR) capability. Editing Colored Scanned - Dell P703w All In One Photo Printer | Dell Photo P703w All-In-One Printer User's - Page 95
Click Start® Programs or All Programs® Dell Printers® Dell Photo P703w AIO Printer. In Windows Vista®: a. Click ® Programs. b. Click Dell Printers. c. Click Dell Photo P703w AIO Printer. 4. Select Dell Imaging Toolbox. The Dell Imaging Toolbox opens. 5. From Dell Imaging Toolbox, click Scan to open - Dell P703w All In One Photo Printer | Dell Photo P703w All-In-One Printer User's - Page 96
Start® Programs or All Programs® Dell Printers® Dell Photo P703w AIO Printer. InWindows Vista®: a. Click ® Programs. b. Click Dell Printers. c. Click Dell Photo P703w AIO Printer. 4. Select Dell Imaging Toolbox. The Dell Imaging Toolbox opens. 5. From the Dell Imaging Toolbox, click Scan to open - Dell P703w All In One Photo Printer | Dell Photo P703w All-In-One Printer User's - Page 97
black and white, adjust the brightness, contrast, and invert your document Crop your document Editing Black and White Scanned Documents 1. Turn on your computer and printer, and ensure that they are connected. 2. Load your original document. - Dell P703w All In One Photo Printer | Dell Photo P703w All-In-One Printer User's - Page 98
Start® Programs or All Programs® Dell Printers® Dell Photo P703w AIO Printer. In Windows Vista®: a. Click ® Programs. b. Click Dell Printers. c. Click Dell Photo P703w AIO Printer. 4. Select Dell Imaging Toolbox. The Dell Imaging Toolbox opens. 5. From the Dell Imaging Toolbox, click Scan to open - Dell P703w All In One Photo Printer | Dell Photo P703w All-In-One Printer User's - Page 99
® Programs or All Programs® Dell Printers® Dell Photo P703w AIO Printer. In Windows Vista®: a. Click ® Programs. b. Click Dell Printers. c. Click Dell Photo P703w AIO Printer. 2. Select Dell Imaging Toolbox. The Dell Imaging Toolbox opens. 3. From the Dell Imaging Toolbox, select Settings. 4. Click - Dell P703w All In One Photo Printer | Dell Photo P703w All-In-One Printer User's - Page 100
5. Click the General tab. 6. Select the Default item type, Documents or Pictures. 7. From the Default scan drop-down list, select the Default scan destination. 8. Click the Applications list button, if you want to add or delete any application. 9. Click OK or Apply. - Dell P703w All In One Photo Printer | Dell Photo P703w All-In-One Printer User's - Page 101
® Programs or All Programs® Dell Printers® Dell Photo P703w AIO Printer. In Windows Vista®: a. Click ® Programs. b. Click Dell Printers. c. Click Dell Photo P703w AIO Printer. 2. Select Dell Imaging Toolbox. The Dell Imaging Toolbox opens. 3. From the Dell Imaging Toolbox, select Settings. 4. Click - Dell P703w All In One Photo Printer | Dell Photo P703w All-In-One Printer User's - Page 102
® Programs or All Programs® Dell Printers® Dell Photo P703w AIO Printer. In Windows Vista®: a. Click ® Programs. b. Click Dell Printers. c. Click Dell Photo P703w AIO Printer. 2. Select Dell Imaging Toolbox. The Dell Imaging Toolbox opens. 3. From the Dell Imaging, Toolbox select Settings. 4. Click - Dell P703w All In One Photo Printer | Dell Photo P703w All-In-One Printer User's - Page 103
® Programs or All Programs® Dell Printers® Dell Photo P703w AIO Printer. In Windows Vista®: a. Click ® Programs. b. Click Dell Printers. c. Click Dell Photo P703w AIO Printer. 2. Select Dell Imaging Toolbox. The Dell Imaging Toolbox opens. 3. From the Dell Imaging Toolbox, select Settings. 4. Click - Dell P703w All In One Photo Printer | Dell Photo P703w All-In-One Printer User's - Page 104
Back to Contents Page - Dell P703w All In One Photo Printer | Dell Photo P703w All-In-One Printer User's - Page 105
Page Licensing Notice Dell™ Photo P703w All-In-One Printer User's Guide BSD License and Warranty statements The printer resident software contains DAMAGES (INCLUDING, BUT NOT LIMITED TO, PROCUREMENT OF SUBSTITUTE GOODS OR SERVICES; LOSS OF USE, DATA, OR PROFITS; OR BUSINESS INTERRUPTION) HOWEVER
-
 1
1 -
 2
2 -
 3
3 -
 4
4 -
 5
5 -
 6
6 -
 7
7 -
8
-
9
-
10
-
11
-
12
-
13
-
14
-
15
-
16
-
17
-
18
-
19
-
20
-
21
-
22
-
23
-
24
-
25
-
26
-
27
-
28
-
29
-
30
-
31
-
32
-
33
-
34
-
35
-
36
-
37
-
38
-
39
-
40
-
41
-
42
-
43
-
44
-
45
-
46
-
47
-
48
-
49
-
50
-
51
-
52
-
53
-
54
-
55
-
56
-
57
-
58
-
59
-
60
-
61
-
62
-
63
-
64
-
65
-
66
-
67
-
68
-
69
-
70
-
71
-
72
-
73
-
74
-
75
-
76
-
77
-
78
-
79
-
80
-
81
-
82
-
83
-
84
-
85
-
86
-
87
-
88
-
89
-
90
-
91
-
92
-
93
-
94
-
95
-
96
-
97
-
98
-
99
-
100
-
101
-
102
-
103
-
104
-
105
 |
 |

Dell™ Photo P703w All-In-One Printer User's Guide
To order ink or supplies from Dell:
1. Double-click the following icon on your desktop.
2. Visit Dell's website, or order Dell printer supplies by phone.
www.dell.com/supplies
For the best service, ensure you have the Dell printer Service Tag available.
Finding Information
Understanding the Software
About Your Printer
Configuring Wireless
Understanding the Operator Panel Menus
Maintenance
Loading Paper and Originals
Troubleshooting
Printing
Specifications
Printing From a Memory Card or USB Key
Ordering Printer Supplies
Copying
Appendix
Scanning
Licensing Notice
Notes, Notices, and Cautions
NOTE:
A NOTE indicates important information that helps you make better use of your computer.
NOTICE:
A NOTICE indicates either potential damage to hardware or loss of data and tells you how to avoid the
problem.
CAUTION:
A CAUTION indicates a potential for property damage, personal injury, or death.
Information in this document is subject to change without notice.
© 2008 Dell Inc. All rights reserved.
Reproduction of these materials in any manner whatsoever without the written permission of Dell Inc. is strictly forbidden.
Trademarks used in this text:
Dell
, the
DELL, and Dell Ink Management System
are trademarks of Dell Inc.;
Intel
,
Pentium, and Xeon
are
registered trademarks of Intel Corporation in the United States and/or other countries;
Microsoft
,
Windows, and Windows Vista
are either
trademarks or registered trademarks of Microsoft Corporation in the United States and/or other countries;
AMD
,
Athlon
,
and
Opteron
are
trademarks of Advanced Micro Devices, Inc.;
Bonjour, the Bonjour logo, and the Bonjour symbol are trademarks of Apple Computer, Inc.;
Bluetooth
is a registered trademark owned by Bluetooth SIG, Inc. and used by Dell Inc. under license.
Other trademarks and trade names may be used in this document to refer to either the entities claiming the marks and names or their
products. Dell Inc. disclaims any proprietary interest in trademarks and trade names other than its own.
UNITED STATES GOVERNMENT RESTRICTED RIGHT
This software and documentation are provided with RESTRICTED RIGHTS. Use, duplication or disclosure by the Government is subject to
restrictions as set forth in subparagraph (c)(1)(ii) of the Rights in Technical Data and Computer Software clause at DFARS 252.227-7013 and
in applicable FAR provisions: Dell Inc., One Dell Way, Round Rock, Texas, 78682, USA.
August 2008
Rev. A00
Model P703w