Dell PowerConnect J-SRX210 Quick Start Guide
Dell PowerConnect J-SRX210 Manual
 |
View all Dell PowerConnect J-SRX210 manuals
Add to My Manuals
Save this manual to your list of manuals |
Dell PowerConnect J-SRX210 manual content summary:
- Dell PowerConnect J-SRX210 | Quick Start Guide - Page 1
SRX210 Services Gateway Quick Start Use the instructions in this quick start to help you connect the SRX210 Services Gateway to your network. For details, see the SRX210 Services Gateway Hardware Guide at http://www.juniper.net/techpubs/a057.html . SRX210 Services Gateway Front Panel g031132 - Dell PowerConnect J-SRX210 | Quick Start Guide - Page 2
configuration instructions in the Branch SRX Series Services Gateways Golden Configurations at http://www.juniper.net/us SRX210 Services Gateway is powered on for the first time, it boots using the factory default configuration. Task 4: Ensure That an IP Address Is Assigned to the Services Gateway - Dell PowerConnect J-SRX210 | Quick Start Guide - Page 3
address box. The J-Web login page appears. 3. Specify the default username as root. Do not enter any value in the Password field. 4. Click Log In. The first time you log in, the J-Web Initial Setup page appears. 5. To begin configuring your services gateway, click the Start button in the lower right - Dell PowerConnect J-SRX210 | Quick Start Guide - Page 4
SRX Series Services Gateways Golden Configurations at http://www.juniper. Guide. Contacting Juniper Networks For technical support, see http://www.juniper.net/support/requesting-support.html . Using the Reset Config Button If a configuration fails or denies management access to the services gateway
-
 1
1 -
 2
2 -
 3
3 -
 4
4
 |
 |

SRX210 Services Gateway Quick Start
Use the instructions in this quick start to help you connect the SRX210 Services
Gateway to your network. For details, see the
SRX210 Services Gateway Hardware
Guide
.
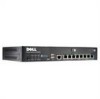
SRX210 Services Gateway Front Panel
SRX210 Services Gateway Back Panel
SRX210 Services Gateway Models
The following models of SRX210 Services Gateways are available:
On the SRX210H-POE, SRX210HE-POE and SRX210HE-POE-TAA models, Power
over Ethernet (PoE) of 50 watts is supported across four ports (
0/0
,
0/1
,
0/2
, and
0/3
).
Note that you must use the following power supply adapters (supplied) for your services
gateway:
±
54V, 150 watts power supply adapters for PoE models
±
12V, 60 watts power supply adapters for non-PoE models
Connecting and Configuring the SRX Series Device
Follow the instructions to connect and set up the SRX210 Services Gateway to protect
your network. Refer to the LEDs on the front of the device to help you determine the
status of the device.
Overview
The SRX210 Services Gateway is a security device that requires the following basic
configuration settings to function:
±
Interfaces must be assigned IP addresses.
±
Interfaces must be bound to zones.
±
Policies must be configured between zones to permit or deny traffic.
±
Source NAT rules must be set.
The device has the following default configuration set when you power it on for the first
time. To use the device, you do not need to perform any initial configuration.
Callout
Description
Callout
Description
1
Mini-PIM slot
5
USB ports
2
Power button
6
Console port
3
LEDs (ALARM, POWER,
STATUS, HA, mPIM, EXPCARD)
7
Gigabit Ethernet (0/0 and 0/1) and Fast
Ethernet (0/2 to 0/7) ports
4
Reset Config button
Callout
Description
Callout
Description
1
Power supply input
4
Lock for security cable
2
Cable tie holder
5
ExpressCard slot
3
Grounding point
g031132
g031113
Device
DDR Memory
Power over
Ethernet
SRX210B
512 MB
No
SRX210H
1 GB
No
SRX210H-POE
1 GB
Yes
SRX210BE
512 MB
No
SRX210HE
1 GB
No
SRX210HE-POE
1 GB
Yes
SRX210HE-TAA
1 GB
No
SRX210HE-POE-TAA
1 GB
Yes