Dell PowerConnect W-AP175 Dell PowerConnect W-AP175P Installation Guide - Page 22
Installing the W-AP175 on a Wall,
 |
View all Dell PowerConnect W-AP175 manuals
Add to My Manuals
Save this manual to your list of manuals |
Page 22 highlights
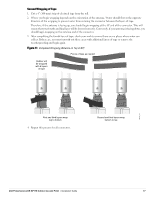
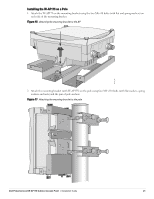
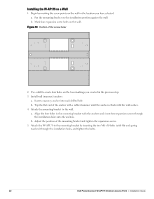
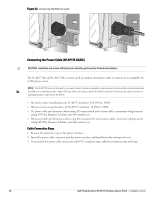
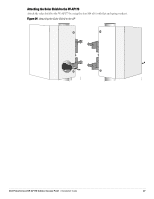
Installing the W-AP175 on a Wall 1. Begin by marking the screw points on the wall in the location you have selected. a. Put the mounting bracket on the installation position against the wall. b. Mark four expansion screw holes on the wall. Figure 18 Position of the screw holes 2. Use a drill to create four holes on the four markings you created in the previous step. 3. Install wall (masonry) anchors. a. Insert a masonry anchor into each drilled hole. b. Tap the flat end of the anchor with a rubber hammer until the anchor is flush with the wall surface. 4. Attach the mounting bracket to the wall. a. Align the four holes in the mounting bracket with the anchors and insert four expansion screws through the installation holes into the anchors. b. Adjust the position of the mounting bracket and tighten the expansion screws. 5. Attach the W-AP175 to the mounting bracket by inserting the two M6 x30 bolts (with flat and spring washers) through the installation holes, and tighten the bolts. 22 Dell PowerConnect W-AP175 Outdoor Access Point | Installation Guide
-
 1
1 -
2
-
3
-
4
-
5
-
6
-
7
-
8
-
9
-
10
-
11
-
12
-
13
-
14
-
15
-
16
-
 17
17 -
 18
18 -
 19
19 -
 20
20 -
 21
21 -
 22
22 -
 23
23 -
 24
24 -
 25
25 -
 26
26 -
 27
27 -
28
-
29
-
30
-
31
-
32
 |
 |