Dell PowerEdge 2400 Installing Redundant Power Supplies
Dell PowerEdge 2400 Manual
 |
View all Dell PowerEdge 2400 manuals
Add to My Manuals
Save this manual to your list of manuals |
Dell PowerEdge 2400 manual content summary:
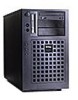
- Dell PowerEdge 2400 | Installing Redundant Power Supplies - Page 1
™ - Dell PowerEdge 2400 | Installing Redundant Power Supplies - Page 2
system. Information in this document is subject to change without notice. © 1999 Dell Computer Corporation. All rights reserved. Reproduction in any manner whatsoever without the written permission of Dell Computer Corporation is strictly forbidden. Trademarks used in this text: Dell, PowerEdge - Dell PowerEdge 2400 | Installing Redundant Power Supplies - Page 3
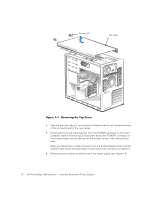
instructions, see Chapter 7, Checking Inside the Computer, in the Installation and Troubleshooting Guide. 2. Disconnect the AC power cable from the AC power receptacle on the back of the power supply. 3. Remove the two screws at the front edge of the top cover (see Figure 1-1). Dell PowerEdge 2400 - Dell PowerEdge 2400 | Installing Redundant Power Supplies - Page 4
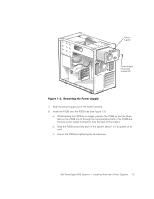
other drives in the external drive bays. When you disconnect a cable connector from the SCSI backplane board and the system board, press the plastic latch on one side of the connector to release it. 6. Remove the two screws on either side of the power supply (see Figure 1-2). 1-2 Dell PowerEdge 2400 - Dell PowerEdge 2400 | Installing Redundant Power Supplies - Page 5
corresponding slots in the PSDB and the two power supply connectors face the back of the chassis. b. Slide the PSDB toward the back of the system about 1 cm (a quarter of an inch). c. Secure the PSDB by tightening the thumbscrew. Dell PowerEdge 2400 Systems - Installing Redundant Power Supplies 1-3 - Dell PowerEdge 2400 | Installing Redundant Power Supplies - Page 6
Power supplies (2) PSDB Catch on power supply handle 9. Attach the 12-conductor cable labeled "PWR3" to connector P3 on the PSDB (see Figure 1-4) and to connector POWER2 on the system board. 1-4 Dell PowerEdge 2400 Systems - Installing Redundant Power Supplies - Dell PowerEdge 2400 | Installing Redundant Power Supplies - Page 7
two computer covers. 1. Using your thumb and index finger, squeeze the catch in the middle of the power supply handle (see Figure 1-3). 2. Rotate the handle downward. 3. Slide the power supply into the chassis (see Figure 1-3). Dell PowerEdge 2400 Systems - Installing Redundant Power Supplies 1-5 - Dell PowerEdge 2400 | Installing Redundant Power Supplies - Page 8
4 to install the second power supply. 6. Connect the AC power cable to the power supplies and to the electrical outlet. 7. Make sure that the AC power cable passes through the plastic strain-relief clip on the system back panel. 1-6 Dell PowerEdge 2400 Systems - Installing Redundant Power Supplies
-
 1
1 -
 2
2 -
 3
3 -
 4
4 -
 5
5 -
 6
6 -
 7
7 -
8
 |
 |
±±±²³´µµ²¶·¸
™
±²³´´µ±¶·¸³¹º»¼³µ±½¾¿¿±ÀÁÂóÄÂ
±²³´µ¶¶±²·¸¹º»¼²»µ²´
½¾¿º¹¸³¼½½¶±º³