Dell PowerEdge 2450 Activating the Dell PERC 3/Si (.pdf)
Dell PowerEdge 2450 Manual
 |
View all Dell PowerEdge 2450 manuals
Add to My Manuals
Save this manual to your list of manuals |
Dell PowerEdge 2450 manual content summary:
- Dell PowerEdge 2450 | Activating the Dell PERC 3/Si (.pdf) - Page 1
- Dell PowerEdge 2450 | Activating the
Dell PERC 3/Si (.pdf) - Page 2
Throughout this guide, blocks of text may be accompanied by an icon and printed in bold type without the written permission of Dell Computer Corporation is strictly forbidden. Trademarks used in this text: Dell, the DELL E COM logo, and PowerEdge are trademarks of Dell Computer Corporation; Intel and - Dell PowerEdge 2450 | Activating the
Dell PERC 3/Si (.pdf) - Page 3
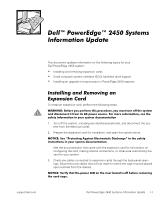
This document updates information on the following topics for your Dell PowerEdge 2450 system: Installing and removing expansion cards Small computer system interface (SCSI) hard-disk drive support Installing an upgrade microprocessor in PowerEdge 2450 systems To install an expansion card, perform - Dell PowerEdge 2450 | Activating the
Dell PERC 3/Si (.pdf) - Page 4
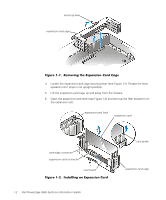
-card latch (see Figure 1-2) and remove the filler bracket from the expansion slot. expansion-card latch expansion card card-edge connector expansion-card connector riser board 1-2 Dell PowerEdge 2450 Systems Information Update card guide expansion-card cage - Dell PowerEdge 2450 | Activating the
Dell PERC 3/Si (.pdf) - Page 5
the latch on the card guide over the top edge of the instructed in steps 10 through 12 of the previous procedure. 6. Close the system doors, and then reconnect the system and peripherals to their AC power sources and turn them on. support.dell.com Dell PowerEdge 2450 Systems Information Update - Dell PowerEdge 2450 | Activating the
Dell PERC 3/Si (.pdf) - Page 6
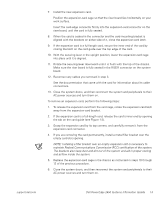
) drives supplied by Dell are identical and are interchangeable. The subsections describing SCSI and redundant array of independent disks (RAID) settings in "Using the System Setup Program," of your Dell PowerEdge 2450 Systems User's Guide have been combined to read as follows: SCSI/RAID Controller - Dell PowerEdge 2450 | Activating the
Dell PERC 3/Si (.pdf) - Page 7
Use the resource configuration utility (RCU) diskette to save the RCU configuration settings (see your User's Guide for complete information). During the upgrade procedure, you must use a wrist-grounding strap for ESD protection. support.dell.com Dell PowerEdge 2450 Systems Information Update 1-5 - Dell PowerEdge 2450 | Activating the
Dell PERC 3/Si (.pdf) - Page 8
the diskette drive and reboot the system. 2. Press when the Welcome screen appears. The Main menu is displayed. 3. Select Step 5: Save and Exit, and then follow the online instructions to save the current system configuration information. 1-6 Dell PowerEdge 2450 Systems Information Update - Dell PowerEdge 2450 | Activating the
Dell PERC 3/Si (.pdf) - Page 9
and Troubleshooting Guide for specific instructions, if needed. 3. Remove the air blower, if present (see Figure 1-3). a. Unplug the Y-shaped air blower power cable from the interposer board. b. Position your right thumb on the outside of the power supply enclosure beside the narrower front part of - Dell PowerEdge 2450 | Activating the
Dell PERC 3/Si (.pdf) - Page 10
the SEC cartridge and heat sink (see Figure 1-4). b. Pull the tab on the other end of the guide-bracket assembly to disengage the tab on the heat sink. Then lift the SEC cartridge and heat sink away from the guide-bracket assembly (see Figure 1-4). 1-8 Dell PowerEdge 2450 Systems Information Update - Dell PowerEdge 2450 | Activating the
Dell PERC 3/Si (.pdf) - Page 11
guide-bracket assembly SEC cartridge tab 1. Slide the SEC cartridge and heat sink into the guide-bracket assembly and firmly seat them in the assembly until the tabs snap into place over the ends of the heat sink (see Figure 1-5). support.dell.com Dell PowerEdge 2450 Systems Information Update - Dell PowerEdge 2450 | Activating the
Dell PERC 3/Si (.pdf) - Page 12
sure the tab goes into the slot at the very top of the back chassis. g. Plug in the Y-shaped blower power cable to the connector on the interposer board. 3. Replace the system cover. 4. Reconnect your system and peripherals to their power sources. 1-10 Dell PowerEdge 2450 Systems Information Update
-
 1
1 -
 2
2 -
 3
3 -
 4
4 -
 5
5 -
 6
6 -
 7
7 -
8
-
9
-
10
-
11
-
12
 |
 |

±²³´µ¶··¸¹¸º»¼ ½¾¿À¶¿ÁÂÃľÁÅÆ
±±²³´²µ²¶·¸²´²¹º»¼½¾¿´¿¾´ÀÁÂÃÄŽ¿´ÆÇÈÉÊËÆÌ´ÆÇÍνÆÌ´ÆÇÈÉÊÏ¿Ì°!»
±±±²³´µµ²¶·¸
¹º»»·¼½²³´µµ²¶·¸
±²³³´µ¶·¸²¹º»¼²´µ½¾¿À
±
ÁÂÃIJÅÃ
±²³´µ¶·¸±´² ¹º»·¸¼