Dell PowerEdge 2500 Rack-to-Tower Conversion Guide (.pdf)
Dell PowerEdge 2500 Manual
 |
View all Dell PowerEdge 2500 manuals
Add to My Manuals
Save this manual to your list of manuals |
Dell PowerEdge 2500 manual content summary:
- Dell PowerEdge 2500 | Rack-to-Tower
Conversion Guide (.pdf) - Page 1
Dell™ Systems 1 x 2 BACKPLANE KIT INSTALLATION GUIDE www.dell.com support.dell.com - Dell PowerEdge 2500 | Rack-to-Tower
Conversion Guide (.pdf) - Page 2
to hardware or loss of data and tells you how to avoid the problem. CAUTION: A CAUTION indicates a potentially hazardous situation which, if not the entities claiming the marks and names or their products. Dell Computer Corporation disclaims any proprietary interest in trademarks and trade names - Dell PowerEdge 2500 | Rack-to-Tower
Conversion Guide (.pdf) - Page 3
Removing the System Cover" in your Installation and Troubleshooting Guide). NOTE: Verify that your system has the latest basic input/output system (BIOS) revision and firmware. Download the latest revision from the Dell support site at http://support.dell.com. 1 x 2 Backplane Kit Installation Guide - Dell PowerEdge 2500 | Rack-to-Tower
Conversion Guide (.pdf) - Page 4
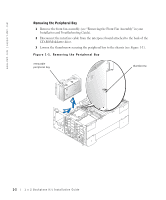
www.dell.com | support.dell.com Removing the Peripheral Bay 1 Remove the front fan assembly (see "Removing the Front Fan Assembly" in your Installation and Troubleshooting Guide). 2 Disconnect the interface cable from the interposer board attached to the back of the CD-ROM/diskette drive. 3 Loosen - Dell PowerEdge 2500 | Rack-to-Tower
Conversion Guide (.pdf) - Page 5
the drive cage into the peripheral bay of a rack system, turn the cage 180° so that the 1 x 2 backplane power connector is near the bottom of the peripheral bay. NOTE: The drive cage can be inserted into the peripheral bay from the front or the back. 1 x 2 Backplane Kit Installation Guide 1-3 - Dell PowerEdge 2500 | Rack-to-Tower
Conversion Guide (.pdf) - Page 6
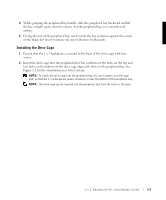
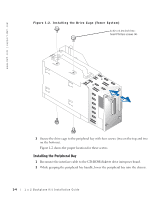
dell.com | support.dell.com Figure 1-2. Installing the Drive Cage (Tower System) 6-32 x 0.25-inch hexhead Phillips screws (4) 3 Secure the drive Installing the Peripheral Bay 1 Reconnect the interface cable to the CD-ROM/diskette drive interposer board. 2 While grasping the peripheral bay handle, - Dell PowerEdge 2500 | Rack-to-Tower
Conversion Guide (.pdf) - Page 7
1 x 2 backplane and its drive cage oriented for a tower system. For rack systems, you must install the x t e n s i o n C a b l e 10-pin I2C connector power connector 20-pin I2C connector on system board nonterminated SCSI cable cooling shroud cable clips 1 x 2 Backplane Kit Installation Guide 1-5 - Dell PowerEdge 2500 | Rack-to-Tower
Conversion Guide (.pdf) - Page 8
array of independent disks (RAID) configurations and the existence of SCSI peripheral cards. Refer to your operating system documentation for information on how to set up your SCSI devices Component Interconnect (PCI) SCSI or PCI RAID controller card. 1-6 1 x 2 Backplane Kit Installation Guide - Dell PowerEdge 2500 | Rack-to-Tower
Conversion Guide (.pdf) - Page 9
the System Cover" in your Installation and Troubleshooting Guide). 3 Replace the front bezel (see "Replacing the Front Bezel" in your Installation and Troubleshooting Guide). 4 Reconnect the system and peripherals to their power sources and turn on power. 1 x 2 Backplane Kit Installation Guide 1-7 - Dell PowerEdge 2500 | Rack-to-Tower
Conversion Guide (.pdf) - Page 10
www.dell.com | support.dell.com 1-8 1 x 2 Backplane Kit Installation Guide
-
 1
1 -
 2
2 -
 3
3 -
 4
4 -
 5
5 -
 6
6 -
 7
7 -
8
-
9
-
10
 |
 |

www.dell.com
support.dell.com
Dell™ Systems
1 x 2 BACKPLANE KIT
INSTALLATION GUIDE