Dell PowerEdge 2550 Activating the Dell PERC 3/Di
Dell PowerEdge 2550 Manual
 |
View all Dell PowerEdge 2550 manuals
Add to My Manuals
Save this manual to your list of manuals |
Dell PowerEdge 2550 manual content summary:
- Dell PowerEdge 2550 | Activating the Dell
PERC 3/Di - Page 1
Dell™ Systems ACTIVATING THE DELL PERC 3/DI www.dell.com support.dell.com - Dell PowerEdge 2550 | Activating the Dell
PERC 3/Di - Page 2
damage to hardware or loss of data and tells you how to avoid the problem. CAUTION: A CAUTION indicates a potentially hazardous situation which, if not avoided Dell Computer Corporation is strictly forbidden. Trademarks used in this text: Dell, PowerEdge, and the DELL logo are trademarks of Dell - Dell PowerEdge 2550 | Activating the Dell
PERC 3/Di - Page 3
and Troubleshooting Guide. NOTICE: To avoid possible data loss, back up all data on the hard-disk drives before changing the mode of operation of the integrated SCSI controller from SCSI to RAID. CAUTION: See "Protecting Against Electrostatic Discharge" in the safety instructions in your - Dell PowerEdge 2550 | Activating the Dell
PERC 3/Di - Page 4
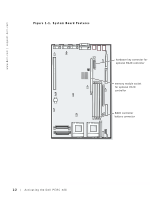
www.dell.com | support.dell.com Figure 1-1. System Board Features hardware key connector for optional RAID controller memory module socket for optional RAID controller RAID controller battery connector 1-2 Activating the Dell PERC 3/Di - Dell PowerEdge 2550 | Activating the Dell
PERC 3/Di - Page 5
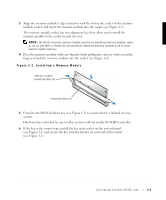
keys intended for use in other systems will not enable the RAID controller. 6 If the key is the correct type, install the key in its socket on the system board (see Figure 1-1) and secure the key with the latches on each end of the socket (see Figure 1-3). Activating the Dell PERC 3/Di 1-3 - Dell PowerEdge 2550 | Activating the Dell
PERC 3/Di - Page 6
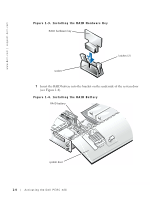
.dell.com | support.dell.com Figure 1-3. Installing the RAID Hardware Key RAID hardware key latches (2) socket 7 Insert the RAID battery into the bracket on the underside of the system door (see Figure 1-4). Figure 1-4. Installing the RAID Battery RAID battery system door 1-4 Activating the Dell - Dell PowerEdge 2550 | Activating the Dell
PERC 3/Di - Page 7
memory module are the correct type and repeat all hardware installation steps found earlier in this document. NOTICE: To avoid possible data loss, back up all data on the hard-disk drives before changing the mode of operation of the integrated SCSI controller from SCSI to RAID. Activating the Dell - Dell PowerEdge 2550 | Activating the Dell
PERC 3/Di - Page 8
set to SCSI, Channel A and Channel B display SCSI.) 5 Press to save settings, and then reboot the system. 6 Configure the RAID subsystem and install the RAID driver and management software. For more information, see the PERC 3/Di controller documentation. 1-6 Activating the Dell PERC 3/Di - Dell PowerEdge 2550 | Activating the Dell
PERC 3/Di - Page 9
Systèmes Dell™ ACTIVATION DE DELL PERC 3/DI www.dell.com support.dell.com - Dell PowerEdge 2550 | Activating the Dell
PERC 3/Di - Page 10
, sous quelque forme que ce soit, sans l'autorisation écrite de Dell Computer Corporation est strictement interdite. Marques utilisées dans ce texte : Dell, PowerEdge, et le logo DELL sont des marques de Dell Computer Corporation. D'autres marques et noms commerciaux peuvent être utilisés dans - Dell PowerEdge 2550 | Activating the Dell
PERC 3/Di - Page 11
é Ce document explique comment activer le contrôleur RAID évolutif PowerEdge™ 3/Di (PERC 3/Di) du système Dell™. Votre kit de mise à niveau comprend un module de mémoire du contrôleur RAID, une clé matérielle RAID, une pile RAID et un logiciel RAID. AVERTISSEMENT : Avant d'effectuer cette procédure - Dell PowerEdge 2550 | Activating the Dell
PERC 3/Di - Page 12
www.dell.com | support.dell.com Figure 2-1. Caractéristiques de la carte système connecteur de la clé matérielle pour le contrôleur RAID optionnel support du module de mémoire pour le contrôleur RAID optionnel connecteur pour pile de contrôleur RAID 2-2 Activation de Dell PERC 3/Di - Dell PowerEdge 2550 | Activating the Dell
PERC 3/Di - Page 13
support du module de mémoire et insérez le module de mémoire dans le support (reportez-vous à la figure 2-2). Le support le support que dans un sens. REMARQUE : Le module de mémoire du contrôleur RAID doit le contrôleur RAID. 6 Si la clé est du type correct, installez la clé dans son support sur la - Dell PowerEdge 2550 | Activating the Dell
PERC 3/Di - Page 14
www.dell.com | support.dell.com Figure 2-3. Installation de la clé matérielle RAID clé matérielle RAID loquets (2) support 7 Insérez la pile RAID dans la languette sur la face inférieure de la porte du système (reportez-vous à la figure 2-4). Figure 2-4. Installation de la pile RAID pile RAID - Dell PowerEdge 2550 | Activating the Dell
PERC 3/Di - Page 15
2 de l'écran de configuration du système. • Si le système détecte le nouveau module de mémoire du contrôleur et la clé matérielle RAID, le système affiche l'option RAID dans la section Integrated Devices (Périphériques intégrés) de l'écran. Activation de - Dell PowerEdge 2550 | Activating the Dell
PERC 3/Di - Page 16
www.dell.com | support.dell.com • Si le système affiche l'option SCSI, cela signifie qu'il n'a pas détecté le contrôleur RAID intégré. Assurez-vous que la clé matérielle RAID et le module de mémoire RAID sont du type correct et répétez toutes les étapes de l'installation du matériel plus haut dans - Dell PowerEdge 2550 | Activating the Dell
PERC 3/Di - Page 17
Dell™ Systeme DELL PERC 3/DI AKTIVIEREN www.dell.com support.dell.com - Dell PowerEdge 2550 | Activating the Dell
PERC 3/Di - Page 18
. Nachdrucke jeglicher Art ohne die vorherige schriftliche Genehmigung der Dell Computer Corporation sind strengstens untersagt. Warenzeichen in diesem Text: Dell, PowerEdge und das DELL Logo sind Warenzeichen der Dell Computer Corporation. Alle anderen in dieser Dokumentation genannten Warenzeichen - Dell PowerEdge 2550 | Activating the Dell
PERC 3/Di - Page 19
Dokument wird erklärt, wie Sie den Dell™ System PowerEdge™-erweiterbaren RAID-Controller 3/Di (PERC 3/Di) aktivieren können. Der Aufrüstbausatz enthält ein RAID-Controller-Speichermodul, ein RAID-Hardwareschloß, eine RAID-Batterie und die RAID-Software. WARNUNG: Bevor dieses Verfahren durchgeführt - Dell PowerEdge 2550 | Activating the Dell
PERC 3/Di - Page 20
www.dell.com | support.dell.com Abbildung 3-1. Komponenten der Systemplatine Anschluß des Hardwareschlosses des optionalen RAID-Controllers Speichermodulsockel für den optionalen RAID-Controller Batterieanschluß des RAID-Controller 3-2 Dell PERC 3/Di aktivieren - Dell PowerEdge 2550 | Activating the Dell
PERC 3/Di - Page 21
Ausrichtungskerben, sodaß das Speichermodul nur in einer Weise in den Sockel eingesetzt werden kann. ANMERKUNG: Das Speichermodul des RAID-Controllers muß ein ungepuffertes Speichermodul mit einer Nenntaktrate von 100 MHz oder schneller sein. Verwenden Sie keine registrierten Speichermodule, wie - Dell PowerEdge 2550 | Activating the Dell
PERC 3/Di - Page 22
.dell.com | support.dell.com Abbildung 3-3. RAID-Hardwareschloß installieren RAID-Hardwareschloß Riegel (2) Sockel 7 Setzen Sie die RAID-Batterie in die Halterung an der Unterseite der Systemtür ein (siehe Abbildung 3-4). Abbildung 3-4. RAID-Batterie installieren RAID-Batterie Systemtür 3-4 Dell - Dell PowerEdge 2550 | Activating the Dell
PERC 3/Di - Page 23
ücken Sie , um zu Seite 2 des System-Setup-Bildschirms zu wechseln. • Wenn Ihr System das neue RAID-Controller-Speichermodul und das RAID-Hardwareschloß erkennt, zeigt es die Option RAID im Abschnitt Integrated Devices (Integrierte Geräte) des Bildschirms an. Dell PERC 3/Di aktivieren 3-5 - Dell PowerEdge 2550 | Activating the Dell
PERC 3/Di - Page 24
www.dell.com | support.dell.com • Wenn das System die Option SCSI anzeigt, hat es den integrierten RAID-Controller nicht erkannt. Stellen Sie sicher, daß das RAID-Hardwareschloß und das RAID-Speichermodul vom korrekten Typ sind und wiederholen Sie alle Hardware-Installationsschritte, die zuvor in - Dell PowerEdge 2550 | Activating the Dell
PERC 3/Di - Page 25
Sistemas Dell™ ACTIVACIÓN DE DELL PERC 3/DI www.dell.com support.dell.com - Dell PowerEdge 2550 | Activating the Dell
PERC 3/Di - Page 26
ón de este documento en cualquier forma sin la autorización por escrito de Dell Computer Corporation. Marcas comerciales utilizadas en este texto: Dell, PowerEdge el logotipo DELL son marcas comerciales de Dell Computer Corporation. Otras marcas y otros nombres comerciales pueden utilizarse en este - Dell PowerEdge 2550 | Activating the Dell
PERC 3/Di - Page 27
documento explica cómo activar el controlador RAID expansible 3/Di (PERC 3/Di) de PowerEdge™ del sistema Dell™. El paquete de actualización incluye un módulo de memoria para el controlador RAID, una llave para hardware de RAID, una batería RAID y software de RAID. ADVERTENCIA: Antes de realizar este - Dell PowerEdge 2550 | Activating the Dell
PERC 3/Di - Page 28
www.dell.com | support.dell.com Figura 4-1. Características de la placa base conector de la llave de hardware para el controlador RAID opcional zócalo de módulo de memoria para controlador RAID opcional conector para la batería del controlador RAID 4-2 Activación de Dell PERC 3/Di - Dell PowerEdge 2550 | Activating the Dell
PERC 3/Di - Page 29
manera. NOTA: El módulo de memoria del controlador RAID debe ser un módulo de memoria sin búfer (2) 5 Examine la llave del hardware de RAID (consulte la Figura 4-3) para asegurarse de que para usar en otros sistemas no habilitarán el controlador RAID. 6 Si la llave es del tipo correcto, inst - Dell PowerEdge 2550 | Activating the Dell
PERC 3/Di - Page 30
www.dell.com | support.dell.com Figura 4-3. Instalación de la llave de hardware RAID llave de hardware RAID pestillos (2) zócalo 7 Inserte la batería RAID en el soporte por debajo de la puerta del sistema (consulte la Figura 4-4). Figura 4-4. Instalación de la batería del RAID batería del RAID - Dell PowerEdge 2550 | Activating the Dell
PERC 3/Di - Page 31
programa Configuración del sistema. • Si el sistema detecta el nuevo módulo de memoria del controlador RAID y la llave de hardware de RAID, el sistema mostrará la opción RAID en la sección Integrated Devices (Dispositivos integrados) de la pantalla. • Si el sistema muestra la opción SCSI, es porque - Dell PowerEdge 2550 | Activating the Dell
PERC 3/Di - Page 32
www.dell.com | support.dell.com 4 Pulse la tecla de flecha izquierda o derecha para cambiar la opción RAID a RAID Enabled (RAID habilitado). El Canal A muestra RAID y el Canal B muestra SCSI. (Cuando la opción RAID está establecida en SCSI, el Canal A y el Canal B muestran SCSI.) 5 Presione
-
 1
1 -
 2
2 -
 3
3 -
 4
4 -
 5
5 -
 6
6 -
 7
7 -
8
-
9
-
10
-
11
-
12
-
13
-
14
-
15
-
16
-
17
-
18
-
19
-
20
-
21
-
22
-
23
-
24
-
25
-
26
-
27
-
28
-
29
-
30
-
31
-
32
 |
 |

www.dell.com
support.dell.com
Dell™ Systems
ACTIVATING THE DELL PERC 3/DI