Dell PowerEdge 2600 Installing or Replacing an ERA/O Card
Dell PowerEdge 2600 Manual
 |
View all Dell PowerEdge 2600 manuals
Add to My Manuals
Save this manual to your list of manuals |
Dell PowerEdge 2600 manual content summary:
- Dell PowerEdge 2600 | Installing or Replacing an ERA/O Card - Page 1
Dell™ Systems Installing or Replacing an ERA/O Card www.dell.com | support.dell.com - Dell PowerEdge 2600 | Installing or Replacing an ERA/O Card - Page 2
to hardware or loss of data and tells you how to avoid the problem. CAUTION: A CAUTION indicates a potential for property damage, personal injury, the entities claiming the marks and names or their products. Dell Computer Corporation disclaims any proprietary interest in trademarks and trade names - Dell PowerEdge 2600 | Installing or Replacing an ERA/O Card - Page 3
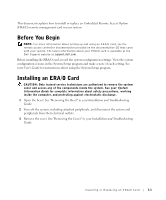
/O card is available at the Dell Support website at support.dell.com. Before installing the ERA/O card, record the system configuration settings. View the system configuration screens in the System Setup program and make a note of each setting. See your User's Guide for instructions about using the - Dell PowerEdge 2600 | Installing or Replacing an ERA/O Card - Page 4
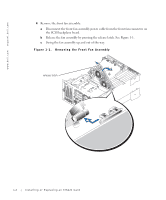
front fan assembly power cable from the front fan connector on the SCSI backplane board. b Release the fan assembly by pressing the release latch. See Figure 1-1. c Swing the fan assembly up and out of the way. Figure 1-1. Removing the Front Fan Assembly release latch 1-2 Installing or Replacing - Dell PowerEdge 2600 | Installing or Replacing an ERA/O Card - Page 5
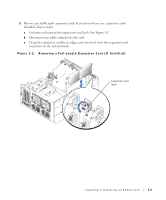
Figure 1-2. b Disconnect any cables attached to the card. c Grasp the expansion card by its edges, and remove it from the expansion-card connector on the system board. Figure 1-2. Removing a Full-Length Expansion Card (If Installed) expansion-card latch Installing or Replacing an ERA/O Card 1-3 - Dell PowerEdge 2600 | Installing or Replacing an ERA/O Card - Page 6
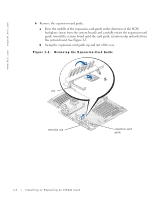
-card guide toward the system board until the card guide retention clip unhooks from the system board. See Figure 1-3. b Swing the expansion-card guide up and out of the way. Figure 1-3. Removing the Expansion-Card Guide slot retention clip expansion-card guide 1-4 Installing or Replacing an - Dell PowerEdge 2600 | Installing or Replacing an ERA/O Card - Page 7
an ERA/O card, see "Removing an ERA/O Card" for removal instructions before continuing with the next step. b Position the ERA/O card so that the card connector is directly over the connector on the system board and the mounting holes in the card line up with the support posts on the system board - Dell PowerEdge 2600 | Installing or Replacing an ERA/O Card - Page 8
www.dell.com | support.dell.com 8 Reinstall the expansion-card guide: a Holding the expansion-card guide at a 45-degree angle, insert the two tabs at the ends of the expansion-card guide base into the slots on the system board. See Figure 1-5. b Rotate the expansion-card guide down until the clip - Dell PowerEdge 2600 | Installing or Replacing an ERA/O Card - Page 9
. 14 Close the bezel. 15 Update the ERA/O card with the latest version of the ERA/O firmware, available at the Dell Support website at support.dell.com. See the RAC documentation provided on the documentation CD for information about updating the firmware. Installing or Replacing an ERA/O Card 1-7 - Dell PowerEdge 2600 | Installing or Replacing an ERA/O Card - Page 10
card to unseat the post. See Figure 1-7. b Repeat step a for each support post. 2 Lift the ERA/O card straight up and out of the chassis. Figure 1-7. Removing an ERA/O Card ERA/O card system board ERA/O card connector mounting holes (4) support posts (4) 1-8 Installing or Replacing an ERA/O Card - Dell PowerEdge 2600 | Installing or Replacing an ERA/O Card - Page 11
Dell™ 系统 ERA/O 卡 www.dell.com | support.dell.com - Dell PowerEdge 2600 | Installing or Replacing an ERA/O Card - Page 12
2002-2003 Dell Computer Corporation Dell Computer Corporation Dell 和 DELL 徽标是 Dell Computer Corporation Dell Computer Corporation 2003 年 4 月 P/N 5U106 Rev. A03 - Dell PowerEdge 2600 | Installing or Replacing an ERA/O Card - Page 13
ERA/O 开始之前 ERA/O CD Dell 支持 Web 站点 support.dell.com ERA/O ERA/O 安装 ERA/O 卡 1 2 3 ERA/O 卡 2-1 - Dell PowerEdge 2600 | Installing or Replacing an ERA/O Card - Page 14
www.dell.com | support.dell.com 4 a 从 SCSI b 2-1 c 图 2-1 释放闩锁 2-2 ERA/O 卡 - Dell PowerEdge 2600 | Installing or Replacing an ERA/O Card - Page 15
5 6 a 2-2 b c 图 2-2 ERA/O 卡 2-3 - Dell PowerEdge 2600 | Installing or Replacing an ERA/O Card - Page 16
www.dell.com | support.dell.com 6 a 向 SCSI 2-3 b 图 2-3 插槽 固定夹 2-4 ERA/O 卡 - Dell PowerEdge 2600 | Installing or Replacing an ERA/O Card - Page 17
7 ERA/O 卡 a 打开 ERA/O ERA/O ERA/O b 确定好 ERA/O 2-4 c ERA/O 图 2-4 安装 ERA/O 卡 ERA/O 卡 固定孔 4 个 主机板 ERA/O 支撑轴 4 个 ERA/O 卡 2-5 - Dell PowerEdge 2600 | Installing or Replacing an ERA/O Card - Page 18
www.dell.com | support.dell.com 8 a 呈 45 2-5 b 图 2-5 卡舌 2 个 插槽 2 个 9 a 2-2 b c SCSI 底板的 SCSI d 2-6 ERA/O 卡 - Dell PowerEdge 2600 | Installing or Replacing an ERA/O Card - Page 19
10 a b SCSI 11 2-6 12 10Mbps 2-6 图 2-6 13 14 15 ERA/O ERA/O 卡 Dell 支持 Web 站点 support.dell.com CD RAC ERA/O 卡 2-7 - Dell PowerEdge 2600 | Installing or Replacing an ERA/O Card - Page 20
www.dell.com | support.dell.com 卸下 ERA/O 卡 ERA/O 1 a 图 2-7 b 2 将 ERA/O 图 2-7 卸下 ERA/O 卡 ERA/O 卡 主机板 ERA/O 固定孔 4 4 个 2-8 ERA/O 卡 - Dell PowerEdge 2600 | Installing or Replacing an ERA/O Card - Page 21
Systèmes Dell™ Installation ou remplacement d'une carte ERA/O www.dell.com | support.dell.com - Dell PowerEdge 2600 | Installing or Replacing an ERA/O Card - Page 22
de marques et marques commerciales utilisés dans ce document se rapportent aux sociétés propriétaires des marques et des noms de ces produits. Dell Computer Corporation décline tout intérêt dans l'utilisation des marques déposées et des noms de marques ne lui appartenant pas. Avril 2003 Réf. 5U106 - Dell PowerEdge 2600 | Installing or Replacing an ERA/O Card - Page 23
CD de documentation fourni avec le système. Les dernières informations concernant la carte ERA/O sont disponibles sur le site Web d'assistance technique de Dell, support.dell.com. Avant d'installer la section « Retrait du cache » dans le Guide d'installation et de dépannage. 2 Mettez le système hors - Dell PowerEdge 2600 | Installing or Replacing an ERA/O Card - Page 24
www.dell.com | support.dell.com 4 Retirez le module du ventilateur avant : a Débranchez le câble d'alimentation du ventilateur du pivoter le ventilateur vers le haut et retirez-le. Figure 3-1. Retrait du ventilateur avant loquet de dégagement 3-2 Installation ou remplacement d'une carte ERA/O - Dell PowerEdge 2600 | Installing or Replacing an ERA/O Card - Page 25
5 Retirez les cartes d'extension de longueur standard. Si aucune carte d'extension n'est installée, passez à l'étape 6. a Débloquez et retirez le loquet de la carte d'extension. Voir la Figure 3-2. b Débranchez les câbles connectés à la carte. c Tenez la carte d'extension par - Dell PowerEdge 2600 | Installing or Replacing an ERA/O Card - Page 26
www.dell.com | support.dell.com 6 Retirez le guide de la carte d'extension : a Appuyez sur le milieu du guide de la carte d'extension dans la direction du fond de panier SCSI (en l'écartant de la carte système) et faites pivoter avec précaution le guide vers la carte système jusqu'à ce que son clip - Dell PowerEdge 2600 | Installing or Replacing an ERA/O Card - Page 27
ERA/O jusqu'à ce qu'il s'enclenche à fond dans le connecteur de la carte système et que les picots de support soient bloqués dans les trous de fixation de la carte. Figure 3-4. Installation de la carte ERA/O carte ERA/O trous de fixation (4) carte système connecteur de la carte ERA/O picots de - Dell PowerEdge 2600 | Installing or Replacing an ERA/O Card - Page 28
dell.com | support.dell.com 8 Réinstallez le guide de la carte d'extension : a En tenant le guide de la carte d'extension à un angle de 45 degrés, insérez les deux languettes des extrémités de la base du guide carte système. Figure 3-5. Réinstallation du guide de la carte d'extension languettes (2) - Dell PowerEdge 2600 | Installing or Replacing an ERA/O Card - Page 29
de fond de panier SCSI. 11 Réinstallez le capot du système. Reportez-vous à la section « Remise en place du capot » dans le Guide d'installation et de dépannage. REMARQUE : Si le connecteur Ethernet de gestion du serveur n'a pas encore été utilisé, retirez le capot qui protège le connecteur avant - Dell PowerEdge 2600 | Installing or Replacing an ERA/O Card - Page 30
com 15 Mettez à jour votre carte ERA/O en installant la dernière version du microcode ERA/O, disponible sur le site Web d'assistance technique de Dell, support.dell.com. Reportez-vous à la documentation RAC sur le CD de documentation pour plus d'informations sur la mise à jour du microcode. Retrait - Dell PowerEdge 2600 | Installing or Replacing an ERA/O Card - Page 31
Figure 3-7. Retrait d'une carte ERA/O carte ERA/O carte système connecteur de la carte ERA/O trous de fixation (4) picots de support (4) Installation ou remplacement d'une carte ERA/O 3-9 - Dell PowerEdge 2600 | Installing or Replacing an ERA/O Card - Page 32
www.dell.com | support.dell.com 3-10 Installation ou remplacement d'une carte ERA/O - Dell PowerEdge 2600 | Installing or Replacing an ERA/O Card - Page 33
Dell™-Systeme Installieren oder Austauschen einer ERA/O-Karte www.dell.com | support.dell.com - Dell PowerEdge 2600 | Installing or Replacing an ERA/O Card - Page 34
Hardware oder den Verlust von Daten hingewiesen und erläutert, wie dieses Problem vermieden werden kann. VORSICHT: VORSICHT weist darauf hin, dass Gefahr eines und Namen der entsprechenden Firmen oder ihrer Produkte. Die Dell Computer Corporation erhebt keinen Anspruch auf Marken und Handelsnamen mit - Dell PowerEdge 2600 | Installing or Replacing an ERA/O Card - Page 35
im Lieferumfang Ihres Systems enthaltenen Dokumentations-CD. Aktuelle Informationen zu Ihrer ERA/O-Karte finden Sie auf der Dell-Support-Webseite unter support.dell.com. Notieren Sie sich die Konfigurationseinstellungen des Systems, bevor Sie mit der Installation der ERA/O-Karte beginnen. Rufen Sie - Dell PowerEdge 2600 | Installing or Replacing an ERA/O Card - Page 36
www.dell.com | support.dell.com 4 Entfernen Sie die vordere Lüfterbaugruppe: a Trennen Sie das Stromkabel der vorderen Lüfterbaugruppe vom vorderen Lüfteranschluss auf der SCSI-Rückwandplatine. b Drücken Sie die Sperrklinke, - Dell PowerEdge 2600 | Installing or Replacing an ERA/O Card - Page 37
5 Entfernen Sie alle Erweiterungskarten mit voller Länge. Wenn keine Erweiterungskarten installiert sind, können Sie bei Schritt 6 weiter machen. a Entsperren und entfernen Sie die Verriegelung für den ErweiterungskartenSteckplatz. Siehe Abbildung 4-2. b Entfernen Sie alle Kabel, die an die Karte - Dell PowerEdge 2600 | Installing or Replacing an ERA/O Card - Page 38
www.dell.com | support.dell.com 6 Entfernen Sie die Führungsschiene der Erweiterungskarte: a Drücken Sie die Mitte der Führungsschiene für die Erweiterungskarte in Richtung der SCSI-Rückwand (weg von der Systemplatine) - Dell PowerEdge 2600 | Installing or Replacing an ERA/O Card - Page 39
7 Installieren Sie die ERA/O-Karte im System: a Nehmen Sie die ERA/O-Karte aus der Verpackung. Tauschen Sie die ERA/O-Karte aus, indem Sie zunächst die Karte entfernen, wie in den Anweisungen unter "Entfernen einer ERA/O-Karte" beschrieben, bevor Sie mit den nächsten Schritten fortfahren. b Setzen - Dell PowerEdge 2600 | Installing or Replacing an ERA/O Card - Page 40
www.dell.com | support.dell.com 8 Bauen Sie die Führungsschiene der Erweiterungskarte wieder ein: a Halten Sie die Führung der Erweiterungskarte in einem Winkel von 45 Grad, und führen Sie die - Dell PowerEdge 2600 | Installing or Replacing an ERA/O Card - Page 41
der SCSI-Rückwandplatine an. 11 Bringen Sie die Systemabdeckung wieder an. Siehe dazu "Anbringen der Systemabdeckung" in der Anleitung zur Installation und Fehlersuche. ANMERKUNG: Wenn der Serverwaltungs-Ethernet-Anschluss noch nicht verwendet worden ist, müssen Sie die Abdeckung über dem Anschluss - Dell PowerEdge 2600 | Installing or Replacing an ERA/O Card - Page 42
mit der neuesten Version der ERA/O-Firmware. Diese finden Sie auf der Dell Support-Website unter support.dell.com. Informationen zur Aktualisierung der Firmware finden Sie in der Dokumentation zum RAC auf der Dokumentations-CD. Entfernen einer ERA/O-Karte HINWEIS: Lösen Sie die ERA/O-Karte erst von - Dell PowerEdge 2600 | Installing or Replacing an ERA/O Card - Page 43
Abbildung 4-7. Entfernen einer ERA/O-Karte ERA/O-Karte Systemplatine ERA/OKartenanschluss Montagelöcher (4) Stützen (4) Installieren oder Austauschen einer ERA/O-Karte 4-9 - Dell PowerEdge 2600 | Installing or Replacing an ERA/O Card - Page 44
www.dell.com | support.dell.com 4-10 Installieren oder Austauschen einer ERA/O-Karte - Dell PowerEdge 2600 | Installing or Replacing an ERA/O Card - Page 45
Dell ERA/O www.dell.com | support.dell.com - Dell PowerEdge 2600 | Installing or Replacing an ERA/O Card - Page 46
2002-2003 Dell Computer Corporation Dell Computer Corporation Dell および DELL Dell Computer Corporation Dell Computer Corporation 2003 年 4 月 P/N 5U106 Rev. A03 - Dell PowerEdge 2600 | Installing or Replacing an ERA/O Card - Page 47
Embedded Remote Access Option(ERA/O はじめに メモ:ERA/O CD ERA/O Web サイト support.jp.dell.com ERA/O ERA/O 1 Installation and Troubleshooting Guide Removing the Bezel 2 3 Installation and Troubleshooting Guide Removing the Cover ERA/O 5-1 - Dell PowerEdge 2600 | Installing or Replacing an ERA/O Card - Page 48
www.dell.com | support.dell.com 4 a SCSI b 5-1 c 図 5-1 5-2 ERA/O - Dell PowerEdge 2600 | Installing or Replacing an ERA/O Card - Page 49
5 6 a 5-2 b c 図 5-2 ERA/O 5-3 - Dell PowerEdge 2600 | Installing or Replacing an ERA/O Card - Page 50
www.dell.com | support.dell.com 6 a SCSI 5-3 b 図 5-3 スロット 5-4 ERA/O - Dell PowerEdge 2600 | Installing or Replacing an ERA/O Card - Page 51
7 ERA/O a ERA/O ERA/O ERA/O b ERA/O 5-4 c ERA/O 図 5-4. ERA/O ERA/O カード 4) ERA/O 支柱(4) ERA/O 5-5 - Dell PowerEdge 2600 | Installing or Replacing an ERA/O Card - Page 52
www.dell.com | support.dell.com 8 a 45 2 5-5 b 図 5-5 タブ(2 2) 9 a 5-2 b c SCSI SCSI d 5-6 ERA/O - Dell PowerEdge 2600 | Installing or Replacing an ERA/O Card - Page 53
10 a b SCSI 11 Installation and Troubleshooting Guide Replacing the Cover Ethernet 5-6 12 10 Mbps Ethernet 5-6 図 5-6 Ethernet Ethernet 13 14 15 Web サイト support.dell.com から ERA/O ERA/O CD RAC ERA/O 5-7 - Dell PowerEdge 2600 | Installing or Replacing an ERA/O Card - Page 54
www.dell.com | support.dell.com ERA/O 4 ERA/O 1 a 5-7 b a 2 ERA/O 図 5-7. ERA/O ERA/O カード ERA/O 4 4) 5-8 ERA/O - Dell PowerEdge 2600 | Installing or Replacing an ERA/O Card - Page 55
Dell ERA/O www.dell.com | support.dell.com - Dell PowerEdge 2600 | Installing or Replacing an ERA/O Card - Page 56
2002-2003 Dell Computer Corporation Dell Computer Corporation Dell 및 DELL 로고는 Dell Computer Corporation Dell Computer Corporation 2003년 4월 P/N 5U106 Rev. A03 - Dell PowerEdge 2600 | Installing or Replacing an ERA/O Card - Page 57
ERA/O(Embedded Remote Access Option 주: ERA/O CD ERA/O Dell support.dell.com ERA/O System Setup System Setup ERA/O 1 2 3 ERA/O 6-1 - Dell PowerEdge 2600 | Installing or Replacing an ERA/O Card - Page 58
www.dell.com | support.dell.com 4 a SCSI b 6-1 c 그림 6-1 6-2 ERA/O - Dell PowerEdge 2600 | Installing or Replacing an ERA/O Card - Page 59
5 6 a 6-2 b c 그림 6-2 ERA/O 6-3 - Dell PowerEdge 2600 | Installing or Replacing an ERA/O Card - Page 60
www.dell.com | support.dell.com 6 a SCSI 6-3 b 그림 6-3 6-4 ERA/O - Dell PowerEdge 2600 | Installing or Replacing an ERA/O Card - Page 61
7 ERA/O a ERA/O ERA/O ERA/O b ERA/O 6-4 c ERA/O 그림 6-4. ERA/O ERA/O 카드 4) ERA/O 고정대(4) ERA/O 6-5 - Dell PowerEdge 2600 | Installing or Replacing an ERA/O Card - Page 62
www.dell.com | support.dell.com 8 a 45 6-5 b 그림 6-5 탭(2) 슬롯(2) 9 a 6-2 b c SCSI SCSI d 6-6 ERA/O - Dell PowerEdge 2600 | Installing or Replacing an ERA/O Card - Page 63
10 a b SCSI 11 6-6 12 10Mbps 6-6 그림 6-6 13 14 15 Dell support.dell.com)에서 ERA/O ERA/O CD RAC ERA/O 6-7 - Dell PowerEdge 2600 | Installing or Replacing an ERA/O Card - Page 64
www.dell.com | support.dell.com ERA/O 4 ERA/O 1 a 6-7 b 2 ERA/O 그림 6-7. ERA/O ERA/O 카드 ERA/O 4) 고정대(4) 6-8 ERA/O - Dell PowerEdge 2600 | Installing or Replacing an ERA/O Card - Page 65
Sistemas Dell™ Instalación o sustitución de una tarjeta ERA/O www.dell.com | support.dell.com - Dell PowerEdge 2600 | Installing or Replacing an ERA/O Card - Page 66
y nombres comerciales que puedan utilizarse en este documento se refieren a las empresas que figuran en las marcas y los nombres de sus productos. Dell Computer Corporation renuncia a cualquier interés de propiedad en las marcas y nombres comerciales que no sean los suyos propios. Abril de 2003 - Dell PowerEdge 2600 | Installing or Replacing an ERA/O Card - Page 67
ón del controlador de acceso remoto que se facilita en el CD de la documentación que se incluye con el sistema. La información más reciente sobre la tarjeta ERA/O está disponible en el sitio Web de Dell Support en la dirección support.dell.com. Antes de instalar la tarjeta ERA/O, grabe los valores - Dell PowerEdge 2600 | Installing or Replacing an ERA/O Card - Page 68
www.dell.com | support.dell.com 4 Retire el conjunto de ventiladores frontales: a Desconecte el cable de alimentación del conjunto de ventiladores frontal del conector del ventilador frontal situado en la - Dell PowerEdge 2600 | Installing or Replacing an ERA/O Card - Page 69
5 Retire las tarjetas de expansión de tamaño normal. Si no tiene ninguna tarjeta de expansión instalada, salte al paso 6. a Suelte y retire el pestillo de la tarjeta de expansión. Consulte la Figura 7-2. b Desconecte todos los cables conectados a la tarjeta. c Sujete la tarjeta de expansión por sus - Dell PowerEdge 2600 | Installing or Replacing an ERA/O Card - Page 70
www.dell.com | support.dell.com 6 Retire la guía de la tarjeta de expansión: a Presione el centro de la guía de la tarjeta de expansión en la dirección de la - Dell PowerEdge 2600 | Installing or Replacing an ERA/O Card - Page 71
7 Instale la tarjeta ERA/O en el sistema: a Desembale la tarjeta ERA/O. Si está sustituyendo una tarjeta ERA/O, consulte "Extracción de una tarjeta ERA/O" para obtener las - Dell PowerEdge 2600 | Installing or Replacing an ERA/O Card - Page 72
www.dell.com | support.dell.com 8 Vuelva a montar la guía de la tarjeta de expansión: a Sujetando la guía de la tarjeta de expansión a un ángulo de 45 grados, inserte las - Dell PowerEdge 2600 | Installing or Replacing an ERA/O Card - Page 73
se ha utilizado anteriormente, extraiga la cubierta que protege dicho conector antes de conectar un cable de red. En la Figura 7-6 puede observar la ubicación del conector. 12 Conecte el cable de red al conector de administración del servidor de 10-Mbps del panel posterior del sistema. Consulte la - Dell PowerEdge 2600 | Installing or Replacing an ERA/O Card - Page 74
el sitio Web de Dell Support en la dirección support.dell.com. Consulte la documentación de RAC incluida en el CD de documentación para obtener los postes de apoyo de la tarjeta: a Comprima las trabas situadas en la parte superior del poste de apoyo al mismo tiempo que levanta con cuidado la esquina - Dell PowerEdge 2600 | Installing or Replacing an ERA/O Card - Page 75
Figura 7-7. Extracción de una tarjeta ERA/O tarjeta ERA/O placa del sistema conector de la tarjeta ERA/O orificios de montaje (4) postes de apoyo (4) Instalación o sustitución de una tarjeta ERA/O 7-9 - Dell PowerEdge 2600 | Installing or Replacing an ERA/O Card - Page 76
www.dell.com | support.dell.com 7-10 Instalación o sustitución de una tarjeta ERA/O - Dell PowerEdge 2600 | Installing or Replacing an ERA/O Card - Page 77
- Dell PowerEdge 2600 | Installing or Replacing an ERA/O Card - Page 78
Printed in the U.S.A Imprimé aux Etats-Unis. Gedruckt in U.S.A Impreso en EE.UU. 05U106A03 www.dell.com | support.dell.com
-
 1
1 -
 2
2 -
 3
3 -
 4
4 -
 5
5 -
 6
6 -
 7
7 -
8
-
9
-
10
-
11
-
12
-
13
-
14
-
15
-
16
-
17
-
18
-
19
-
20
-
21
-
22
-
23
-
24
-
25
-
26
-
27
-
28
-
29
-
30
-
31
-
32
-
33
-
34
-
35
-
36
-
37
-
38
-
39
-
40
-
41
-
42
-
43
-
44
-
45
-
46
-
47
-
48
-
49
-
50
-
51
-
52
-
53
-
54
-
55
-
56
-
57
-
58
-
59
-
60
-
61
-
62
-
63
-
64
-
65
-
66
-
67
-
68
-
69
-
70
-
71
-
72
-
73
-
74
-
75
-
76
-
77
-
78
 |
 |

www.dell.com | support.dell.com
Dell™ Systems
Installing or Replacing an
ERA/O Card