Dell PowerEdge 4600 Rack-to-Tower Conversion Guide
Dell PowerEdge 4600 Manual
 |
View all Dell PowerEdge 4600 manuals
Add to My Manuals
Save this manual to your list of manuals |
Dell PowerEdge 4600 manual content summary:
- Dell PowerEdge 4600 | Rack-to-Tower
Conversion Guide - Page 1
Dell™ Systems Rack-to-Tower Conversion Guide www.dell.com | support.dell.com - Dell PowerEdge 4600 | Rack-to-Tower
Conversion Guide - Page 2
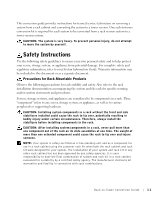
to hardware or loss of data and tells you how to avoid the problem. CAUTION: A CAUTION indicates a potential for property damage, personal injury the entities claiming the marks and names or their products. Dell Computer Corporation disclaims any proprietary interest in trademarks and trade names other - Dell PowerEdge 4600 | Rack-to-Tower
Conversion Guide - Page 3
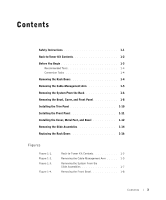
, and Bezel 1-12 Removing the Slide Assemblies 1-14 Replacing the Rack Doors 1-16 Figures Figure 1-1. Figure 1-2. Figure 1-3. Figure 1-4. Rack-to-Tower Kit Contents 1-3 Removing the Cable-Management Arm . . . . . 1-5 Removing the System From the Slide Assemblies 1-7 Removing the Front Bezel - Dell PowerEdge 4600 | Rack-to-Tower
Conversion Guide - Page 4
guide provides instructions for trained service technicians on removing a system from a rack cabinet and converting the system to a tower version. One rack-to-tower conversion kit is required for each system to be converted from a rack version system to a tower version system. CAUTION: The system - Dell PowerEdge 4600 | Rack-to-Tower
Conversion Guide - Page 5
power supply branch circuit that provides power to the rack. The total rack load should not exceed 80 percent of the branch circuit rating. • Ensure that proper airflow is provided to components in the rack. • Do not step on or stand on any system/component when servicing other systems/components - Dell PowerEdge 4600 | Rack-to-Tower
Conversion Guide - Page 6
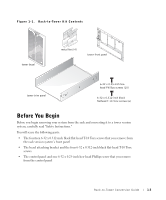
black flathead T-10 Torx screws (6) Before You Begin Before you begin removing your system from the rack and converting it to a tower version system, carefully read "Safety Instructions." You will reuse the following parts: • The fourteen 6-32 x 0.312-inch black flat-head T-10 Torx screws that you - Dell PowerEdge 4600 | Rack-to-Tower
Conversion Guide - Page 7
www.dell.com | support.dell.com Recommended Tools The following tools are required to perform the conversion: • #2 Phillips screwdriver • 1/4-inch nut driver • Flat-tipped screwdriver • Torx T-10 driver (for removing and installing the front panels) Conversion Tasks Removing a system from the rack - Dell PowerEdge 4600 | Rack-to-Tower
Conversion Guide - Page 8
system. 2 At the back of the rack cabinet, disconnect and remove the AC power cable and all other cables connected to the back of the system and back of the system (see Figure 1-2). Figure 1-2. Removing the Cable-Management Arm captive thumbscrew cable-management arm Velcro strap back of system - Dell PowerEdge 4600 | Rack-to-Tower
Conversion Guide - Page 9
and removing the hard drives and power supplies (for instructions, see the Installation and Troubleshooting Guide). 1 Loosen the thumbscrews that secure the system to the front vertical rails (at the front of the rack cabinet). 2 Pull the system out of the rack until the green slide release latches - Dell PowerEdge 4600 | Rack-to-Tower
Conversion Guide - Page 10
Figure 1-3. Removing the System From the Slide Assemblies system release latch (yellow) slide release latch (green) Rack-to-Tower Conversion Guide 1-7 - Dell PowerEdge 4600 | Rack-to-Tower
Conversion Guide - Page 11
www.dell.com | support.dell.com Removing the Bezel, Cover, and Front Panel This procedure is best performed with the system positioned as if it were in the rack (see Figure 1-4). 1 Remove the bezel and set it aside: a Using the system key, unlock the front bezel, if applicable. b Pivot the bezel - Dell PowerEdge 4600 | Rack-to-Tower
Conversion Guide - Page 12
set it aside. Figure 1-5. Removing the System Cover thumbscrews (3) 3 Remove the front panel: a Label and remove all hard drives (see your Installation and Troubleshooting Guide). b Remove all power supplies (see your Installation and Troubleshooting Guide). c Remove the peripheral bay (see your - Dell PowerEdge 4600 | Rack-to-Tower
Conversion Guide - Page 13
dell.com | support.dell.com h Lay the front panel on a smooth work surface with the outside surface facing down. i Remove the two 6-32 x 0.25-inch hex-head Phillips screws that secure the control panel board to the back lift the system into position above system chassis. 3 Lower the system chassis - Dell PowerEdge 4600 | Rack-to-Tower
Conversion Guide - Page 14
the tower front panel (provided with the kit) to the chassis, perform the following steps: 1 Install the peripheral bay by attaching it to the hard-drive bay with the peripheral bay handle pointing away from the front fan assembly. 2 Secure the tower front panel to the chassis and trim panel with - Dell PowerEdge 4600 | Rack-to-Tower
Conversion Guide - Page 15
in step 4. 6 Reconnect the control panel cable. 7 Connect the bezel connector cable to the control panel. Installing the Cover, Metal Feet, and Bezel 1 Position the system as shown in Figure 1-8. 2 Replace the system cover. 1-12 Rack-to-Tower Conversion Guide - Dell PowerEdge 4600 | Rack-to-Tower
Conversion Guide - Page 16
into their mating hinge halves. 7 Reinstall the hard drives in their labeled slots in the drive bay (see your Installation and Troubleshooting Guide for instructions). 8 Reinstall the power supplies (see your Installation and Troubleshooting Guide for instructions). 9 Close the bezel. Rack-to-Tower - Dell PowerEdge 4600 | Rack-to-Tower
Conversion Guide - Page 17
dell.com | support.dell to the front and back vertical rails, go to step 4. 1 At the front of the rack cabinet, locate the blue release push button on one of the on the blue release push button, lift up, and push the slide assembly approximately 2.54 cm (1 inch) back from the front vertical rail - Dell PowerEdge 4600 | Rack-to-Tower
Conversion Guide - Page 18
1-10. Removing the Slide Assemblies (RapidRails and VersaRails Slide Assemblies Shown) mounting screws blue release push button slide-assembly mounting-bracket flange slide-assembly mounting-bracket flange front of rack mounting hooks slide assemblies (2) Rack-to-Tower Conversion Guide 1-15 - Dell PowerEdge 4600 | Rack-to-Tower
Conversion Guide - Page 19
dell.com | support.dell.com 3 Repeat step 2 at the back of the cabinet for this slide assembly. 4 If the slide assemblies are secured with screws, remove the screws that secure the front and back the system you removed from the rack. Replacing the Rack Doors Refer to the procedures for replacing the
-
 1
1 -
 2
2 -
 3
3 -
 4
4 -
 5
5 -
 6
6 -
 7
7 -
8
-
9
-
10
-
11
-
12
-
13
-
14
-
15
-
16
-
17
-
18
-
19
 |
 |

www.dell.com | support.dell.com
Dell™ Systems
Rack-to-Tower
Conversion Guide