Dell PowerEdge R710 Getting Started Guide
Dell PowerEdge R710 Manual
 |
View all Dell PowerEdge R710 manuals
Add to My Manuals
Save this manual to your list of manuals |
Dell PowerEdge R710 manual content summary:
- Dell PowerEdge R710 | Getting Started Guide - Page 1
Dell™ PowerEdge™ R710 Systems Getting Started With Your System Guide de mise en route Primeiros passos com o sistema Procedimientos iniciales con el sistema - Dell PowerEdge R710 | Getting Started Guide - Page 2
- Dell PowerEdge R710 | Getting Started Guide - Page 3
Dell™ PowerEdge™ R710 Systems Getting Started With Your System - Dell PowerEdge R710 | Getting Started Guide - Page 4
document is subject to change without notice. © 2008 Dell Inc. All rights reserved. Reproduction of these materials in any manner whatsoever without the written permission of Dell Inc. is strictly forbidden. Dell, the DELL logo, and PowerEdge are trademarks of Dell -V, Windows, and Windows Server are - Dell PowerEdge R710 | Getting Started Guide - Page 5
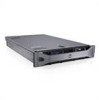
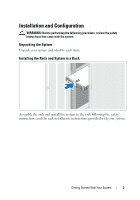
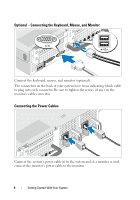
. Unpacking the System Unpack your system and identify each item. Installing the Rails and System in a Rack Assemble the rails and install the system in the rack following the safety instructions and the rack installation instructions provided with your system. Getting Started With Your System 3 - Dell PowerEdge R710 | Getting Started Guide - Page 6
. Connecting the Power Cables Connect the system's power cable(s) to the system and, if a monitor is used, connect the monitor's power cable to the monitor. 4 Getting Started With Your System - Dell PowerEdge R710 | Getting Started Guide - Page 7
end of the power cables into a grounded electrical outlet or a separate power source such as an uninterruptible power supply (UPS) or a power distribution unit (PDU). Turning on the System Press the power button on the system and the monitor. The power indicators should light. Getting Started - Dell PowerEdge R710 | Getting Started Guide - Page 8
and configuration documentation for your operating system. Be sure the operating system is installed before installing hardware or software not purchased with the system. • Citrix® XenServer™ 5.0 with hotfix 1 or later • Microsoft® Windows Server® 2008 Hyper-V™ • Microsoft Windows Server 2008 Web - Dell PowerEdge R710 | Getting Started Guide - Page 9
Owner's Manual provides information about system features and describes how to troubleshoot the system and install or replace system components. This document is available online at support.dell.com. • Any media that ships with your system that provides documentation and tools for configuring and - Dell PowerEdge R710 | Getting Started Guide - Page 10
link (slot 3) NOTE: Support for up to 25W is available only on the first two cards installed in the system; any additional cards installed in the system must be 15W or under. 800, 1066, or 1333 MHz DDR3 registered or unbuffered Error Correcting Code (ECC) DIMMs. Support for Advanced ECC or Memory - Dell PowerEdge R710 | Getting Started Guide - Page 11
SD memory card Four RJ-45 10/100/1000 Mbps Ethernet 9-pin, DTE, 16550-compatible Two 4-pin, USB 2.0-compliant 15-pin VGA One flash memory card slot on the back panel 15-pin VGA Two 4-pin, USB 2.0-compliant One 4-pin, USB 2.0-compliant One internal flash memory card slot Getting Started With - Dell PowerEdge R710 | Getting Started Guide - Page 12
) 1944.9 BTU/hr maximum (Energy Smart) Maximum inrush current Under typical line conditions and over the entire system ambient operating range, the inrush current may reach 55 A per power supply for 10 ms or less. Batteries System battery CR 2032 3.0-V lithium coin cell RAID battery (optional - Dell PowerEdge R710 | Getting Started Guide - Page 13
Environmental NOTE: For additional information about environmental measurements for specific system configurations, see www.dell.com/environmental_datasheets Temperature Operating 10° to 35°C (50° to 95°F) 550 ft. Storage -16 to 10,600 m (-50 to 35,000 ft) Getting Started With Your System 11 - Dell PowerEdge R710 | Getting Started Guide - Page 14
12 Getting Started With Your System - Dell PowerEdge R710 | Getting Started Guide - Page 15
Systèmes Dell™ PowerEdge™ R710 Guide de mise en route - Dell PowerEdge R710 | Getting Started Guide - Page 16
2008 Dell Inc. Tous droits réservés. La reproduction de ces documents de quelque manière que ce soit sans l'autorisation écrite de Dell Inc. est strictement interdite. Dell, le logo DELL et PowerEdge sont des marques de Dell pays ; Microsoft, Hyper-V, Windows et Windows Server sont des marques ou des - Dell PowerEdge R710 | Getting Started Guide - Page 17
système de son emballage et identifiez chaque élément. Installation des rails et du système dans un rack Assemblez les rails et installez le système dans le rack en suivant les consignes de sécurité et les instructions d'installation du rack fournies avec votre système. Guide de mise en route 15 - Dell PowerEdge R710 | Getting Started Guide - Page 18
équipé. Connexion des câbles d'alimentation Connectez le ou les câbles d'alimentation au système et, si vous utilisez un moniteur, connectez son câble d'alimentation. 16 Guide de mise en route - Dell PowerEdge R710 | Getting Started Guide - Page 19
l'alimentation). Mise sous tension du système Appuyez sur le bouton d'alimentation du système et sur celui du moniteur. Les voyants d'alimentation doivent s'allumer. Guide de mise en route 17 - Dell PowerEdge R710 | Getting Started Guide - Page 20
la documentation concernant l'installation et la configuration du système d'exploitation. Veillez à installer le système d'exploitation avant tout élément matériel ou logiciel acheté séparément. • Citrix® XenServer™ 5.0, correctif 1 ou version ultérieure • Microsoft® Windows Server® 2008 Hyper - Dell PowerEdge R710 | Getting Started Guide - Page 21
un rack. • Le document Hardware Owner's Manual (Manuel du propriétaire) présente les caractéristiques du système et contient des informations de dépannage et des instructions d'installation ou de remplacement des composants. Il est disponible en ligne sur le site support.dell.com. Guide de mise en - Dell PowerEdge R710 | Getting Started Guide - Page 22
crite dans ce guide ou si le système ne réagit pas comme prévu, reportez-vous au document Hardware Owner's Manual (Manuel du propriétaire). Dell™ offre une formation exhaustive et une certification sur le matériel. Pour plus d'informations, voir www.dell.com/training. Ce service n'est disponible que - Dell PowerEdge R710 | Getting Started Guide - Page 23
premiers adaptateurs installés. Les autres adaptateurs doivent être de 15 W ou moins. Mémoire Architecture Supports de barrettes de mémoire Capacité des barrettes de mémoire RAM minimale RAM maximale Barrettes de mémoire ECC (code de Go) Guide de mise en route 21 - Dell PowerEdge R710 | Getting Started Guide - Page 24
de bande interne Lecteur Flash Jusqu'à six disques durs DVD-ROM ou DVD+RW SATA slim interne, en option Un lecteur de DVD USB externe, en option REMARQUE : Les périphériques DVD Connecteur DTE à 9 broches, compatible 16550 USB Deux connecteurs à 4 broches, compatibles USB 2.0 Vidéo VGA à 15 - Dell PowerEdge R710 | Getting Started Guide - Page 25
broches, compatibles USB 2.0 Un connecteur à 4 broches, compatible USB 2.0 Un logement interne de carte mémoire Flash Vid thermique Maximum de 2968,6 BTU/h (haute capacité) Maximum de 1944,9 BTU/h (mode Energy Smart) Batterie RAID (en option) Pack 3,7 V au lithium-ion Guide de mise en route 23 - Dell PowerEdge R710 | Getting Started Guide - Page 26
: Pour plus d'informations concernant les mesures d'exploitation liées à différentes configurations spécifiques, voir www.dell.com/environmental_datasheets. Température En fonctionnement De 10 ° à 35 °C (de 1,54 Gms de 10 à 250 Hz pendant 10 mn (toutes positions) 24 Guide de mise en route - Dell PowerEdge R710 | Getting Started Guide - Page 27
température maximale de fonctionnement est réduite de 0,55ºC (1ºF) tous les 168 mètres (550 pieds). Stockage De -16 à 10 600 m (de -50 à 35 000 pieds) Guide de mise en route 25 - Dell PowerEdge R710 | Getting Started Guide - Page 28
26 Guide de mise en route - Dell PowerEdge R710 | Getting Started Guide - Page 29
Sistemas Dell™ PowerEdge™ R710 Primeiros passos com o sistema - Dell PowerEdge R710 | Getting Started Guide - Page 30
2008 Dell Inc. Todos os direitos reservados. É expressamente proibida qualquer forma de reprodução deste material sem a permissão por escrito da Dell Inc. Dell, o logotipo DELL e PowerEdge são marcas comerciais da Dell íses; Microsoft, Hyper-V, Windows e Windows Server são marcas comerciais ou marcas - Dell PowerEdge R710 | Getting Started Guide - Page 31
Remoção do sistema da embalagem Remova o sistema da embalagem e identifique cada item. Instalação dos trilhos e do sistema no rack Monte os trilhos e instale o sistema no rack seguindo as instruções de segurança e as instruções de instalação fornecidas com o sistema. Primeiros passos com o sistema - Dell PowerEdge R710 | Getting Started Guide - Page 32
Opcional - Conexão de teclado, mouse e monitor Conecte o teclado, o mouse e o monitor (opcional). Os conectores na parte de trás do sistema têm ícones que indicam quais cabos devem ser ligados a cada conector. Aperte os parafusos (se houver) do conector do cabo do monitor. - Dell PowerEdge R710 | Getting Started Guide - Page 33
Fixação do cabo de alimentação Dobre o cabo de alimentação do sistema em forma de laço conforme a ilustração e prenda-o com a tira fornecida. Conecte a outra extremidade do cabo de alimentação a uma tomada elétrica aterrada ou a uma fonte de energia separada como, por exemplo, uma UPS ( - Dell PowerEdge R710 | Getting Started Guide - Page 34
Instalação do painel opcional Instale o painel (opcional). Conclua a configuração do sistema operacional Se posterior. • Microsoft® Windows Server® 2008 Hyper-V™ • Microsoft Windows Server 2008, edições Web, Standard, Enterprise (x86 de 32 bits) e Gold • Microsoft Windows Server 2008, edições Web, - Dell PowerEdge R710 | Getting Started Guide - Page 35
Server 10 (SP2) (x86_64) • VMware® ESX Versão 4.0 e 3.5, Atualização 4 (quando disponível) • VMware® ESXi Versão 4.0 e 3.5, Atualização 4 (quando disponível) NOTA: Para obter as informações mais recentes sobre os sistemas operacionais compatíveis, consulte o site www.dell O Manual do support.dell - Dell PowerEdge R710 | Getting Started Guide - Page 36
Manual do proprietário de hardware. A Dell™ oferece treinamento abrangente e certificação de hardware. Consulte o site www.dell. PCI Express, Geração 2 Um slot de altura total, comprimento de 24,13 cm (9,5 pol), conexão x4 (slot 1) NOTA: Esse slot pode ser atualizado para 30,9 cm (12,2 pol). Um slot - Dell PowerEdge R710 | Getting Started Guide - Page 37
RAM 800, 1066 ou 1333 MHz DDR3 com Código de correção de erro (Error Correcting Code, ECC) DIMMs registrado ou sem buffer. Suporte para ECC avançado ou operação unidade fina interna SATA DVD-ROM ou DVD+RW opcional Unidade USB externa de DVD opcional NOTA: Os dispositivos de DVD destinam-se somente a - Dell PowerEdge R710 | Getting Started Guide - Page 38
conectores Ethernet RJ-45 10/100/1000 Mbps Serial DTE de 9 pinos, compatível com 16550 USB Duas unidades de 4 pinos, compatíveis com USB 2.0 Vídeo VGA de 15 pinos Cartão de Um slot de cartão de memória flash no painel traseiro memória VFlash externo opcional Frontais Vídeo VGA de 15 - Dell PowerEdge R710 | Getting Started Guide - Page 39
ção automática, 47-63 Hz Dissipação de calor 2968,6 BTU/hr máximo (alta saída) 1944,9 BTU/hr máximo (Energy Smart) Corrente de entrada máxima Sob condi do tipo moeda, de íon de lítio, CR 2032 de 3,0 V Bateria RAID (opcional) Pacote de bateria de íon de lítio de 3,7-V Características físicas - Dell PowerEdge R710 | Getting Started Guide - Page 40
Ambientais NOTA: Para obter informações adicionais sobre os valores ambientais para configurações de sistema específicas, visite o site www.dell.com/environmental_datasheets (em inglês). Temperatura Operacional 10 °C a 35 °C com variação máxima de 10 °C por hora NOTA: Para altitudes acima de - Dell PowerEdge R710 | Getting Started Guide - Page 41
Sistemas Dell™ PowerEdge™ R710 Procedimientos iniciales con el sistema - Dell PowerEdge R710 | Getting Started Guide - Page 42
2008 Dell Inc. Todos los derechos reservados. Queda estrictamente prohibida la reproducción de este material en cualquier forma sin la autorización por escrito de Dell Inc. Dell, el logotipo de DELL y PowerEdge son marcas comerciales de Dell , HyperV, Windows y Windows Server son marcas comerciales - Dell PowerEdge R710 | Getting Started Guide - Page 43
Desembalaje del sistema Desembale el sistema e identifique cada elemento. Instalación de los rieles y del sistema en un rack Monte los rieles e instale el sistema en el rack siguiendo las instrucciones de seguridad y de instalación del rack incluidas con el sistema. Procedimientos iniciales con el - Dell PowerEdge R710 | Getting Started Guide - Page 44
Conexión del teclado, el ratón y el monitor (opcional) Conecte el teclado, el ratón y el monitor (opcional). Los conectores de la parte posterior del sistema incluyen iconos que indican qué cable debe enchufarse en cada conector. Asegúrese de apretar los tornillos (si los hay) del conector - Dell PowerEdge R710 | Getting Started Guide - Page 45
Fijación del cable de alimentación Doble el cable de alimentación del sistema en forma de bucle, como se muestra en la ilustración, y fíjelo al soporte con la correa proporcionada. Conecte el otro extremo del cable de alimentación a una toma eléctrica con conexión a tierra o a otra fuente de energ - Dell PowerEdge R710 | Getting Started Guide - Page 46
opcional Instale el embellecedor Windows Server® 2008 Hyper-V™ • Microsoft Windows Server 2008 Web, Standard y Enterprise (x86 de 32 bits) Gold Edition • Microsoft Windows Server 2008 Web, Standard, Enterprise y Datacenter (x64) Gold Edition • Microsoft Windows Small Business Server 2008 - Dell PowerEdge R710 | Getting Started Guide - Page 47
Server 10 SP2 (x86_64) • VMware® ESX versión 4.0 y 3.5, actualización 4 (si está disponible) • VMware ESXi versión 4.0 y 3.5, actualización 4 (si está disponible) NOTA: Para obtener la información más reciente sobre los sistemas operativos admitidos, visite www.dell • En el Manual del propietario del - Dell PowerEdge R710 | Getting Started Guide - Page 48
haya adquirido con su sistema. NOTA: Compruebe si hay actualizaciones en support.dell.com y, si las hay, léalas antes de proceder a la si el sistema no funciona del modo esperado, consulte el Manual del propietario del hardware. Dell™ cuenta con una amplia oferta de formación y certificación de - Dell PowerEdge R710 | Getting Started Guide - Page 49
expansión Tipo de bus Ranuras de expansión mediante tarjeta vertical: Tarjeta vertical 1 (tarjeta vertical central) Tarjeta vertical 2 (tarjeta vertical izquierda) PCI Express de segunda generación Una de altura completa de 9,5 pulgadas de longitud, enlace x4 (ranura 1) NOTA: Esta ranura se puede - Dell PowerEdge R710 | Getting Started Guide - Page 50
Unidades de disco duro Unidad de disquete Unidad óptica Unidad de cinta interna Unidad flash 1 GB con un único procesador (1 DIMM por procesador) 96 GB (con Una unidad de DVD-ROM o DVD+RW SATA interna opcional reducida Unidad de DVD USB externa opcional NOTA: Los dispositivos de DVD son sólo de - Dell PowerEdge R710 | Getting Started Guide - Page 51
Parte frontal Vídeo USB Internos USB Módulo SD interno opcional Cuatro RJ-45 Ethernet 10/100/1000 Mbps 9 patas, DTE, compatible con 16550 Dos de 4 patas compatibles con USB 2.0 VGA de 15 patas Una ranura para tarjeta de memoria flash ,6 BTU/h (869,4 W) como máximo (alto rendimiento) 1 944,9 BTU/h - Dell PowerEdge R710 | Getting Started Guide - Page 52
del sistema Batería de tipo botón de litio CR2032 de 3 V Batería RAID (opcional) Batería litio-ion de 3,7 V Características físicas Altura Anchura Profundidad a configuraciones del sistema específicas, vaya a www.dell.com/environmental_datasheets. Temperatura En funcionamiento De 10 °C a - Dell PowerEdge R710 | Getting Started Guide - Page 53
Especificaciones ambientales (continuación) Vibración máxima En funcionamiento 0,26 Grms de 5 a 350 Hz durante 5 minutos en las orientaciones de funcionamiento En almacenamiento 1,54 Grms de 10 a 250 Hz durante 10 minutos en todas las orientaciones Impacto máximo En funcionamiento Impacto en - Dell PowerEdge R710 | Getting Started Guide - Page 54
52 Procedimientos iniciales con el sistema
-
 1
1 -
 2
2 -
 3
3 -
 4
4 -
 5
5 -
 6
6 -
 7
7 -
8
-
9
-
10
-
11
-
12
-
13
-
14
-
15
-
16
-
17
-
18
-
19
-
20
-
21
-
22
-
23
-
24
-
25
-
26
-
27
-
28
-
29
-
30
-
31
-
32
-
33
-
34
-
35
-
36
-
37
-
38
-
39
-
40
-
41
-
42
-
43
-
44
-
45
-
46
-
47
-
48
-
49
-
50
-
51
-
52
-
53
-
54
 |
 |

Dell™ PowerEdge™
R710 Systems
Getting Started
With Your System
Guide de mise en route
Primeiros passos com o sistema
Procedimientos iniciales con el sistema