Dell PowerEdge R910 Getting Started Guide
Dell PowerEdge R910 Manual
 |
View all Dell PowerEdge R910 manuals
Add to My Manuals
Save this manual to your list of manuals |
Dell PowerEdge R910 manual content summary:
- Dell PowerEdge R910 | Getting Started Guide - Page 1
Dell™ PowerEdge™ R910 Systems Getting Started With Your System Guide de mise en route Primeiros passos com o sistema Procedimientos iniciales con el sistema - Dell PowerEdge R910 | Getting Started Guide - Page 2
- Dell PowerEdge R910 | Getting Started Guide - Page 3
Dell™ PowerEdge™ R910 Systems Getting Started With Your System Regulatory Model E06S Series - Dell PowerEdge R910 | Getting Started Guide - Page 4
indicates potential damage to hardware or loss of data if instructions are not followed. WARNING Dell, the DELL logo, and PowerEdge are trademarks of Dell Inc.; Intel and Xeon are registered trademarks of Intel Corporation in the U.S. and other countries; Microsoft, Windows, and Windows Server - Dell PowerEdge R910 | Getting Started Guide - Page 5
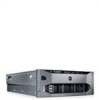
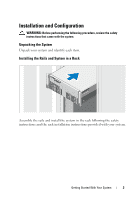
. Unpacking the System Unpack your system and identify each item. Installing the Rails and System in a Rack Assemble the rails and install the system in the rack following the safety instructions and the rack installation instructions provided with your system. Getting Started With Your System 3 - Dell PowerEdge R910 | Getting Started Guide - Page 6
to plug into each connector. Be sure to tighten the screws (if any) on the monitor's cable connector. Connecting the Power Cable(s) Connect the system's power cable(s) to the system and, if a monitor is used, connect the monitor's power cable to the monitor. 4 Getting Started With Your System - Dell PowerEdge R910 | Getting Started Guide - Page 7
other end of the power cable into a grounded electrical outlet or a separate power source such as an uninterrupted power supply (UPS) or a power distribution unit (PDU). Turning On the System Press the power button on the system and the monitor. The power indicators should light. Getting Started - Dell PowerEdge R910 | Getting Started Guide - Page 8
the first time, see the installation and configuration documentation for your operating system. Be sure the operating system is installed before installing hardware or software not purchased with the system. Supported Operating Systems • Microsoft® Windows Server® 2008 (x32) Standard and Enterprise - Dell PowerEdge R910 | Getting Started Guide - Page 9
how to install your system into a rack. • The Hardware Owner's Manual provides information about system features and describes how to troubleshoot the system and install or replace system components. This document is available online at support.dell.com/manuals. • Any media that ships with your - Dell PowerEdge R910 | Getting Started Guide - Page 10
Minimum RAM Maximum RAM 1067 MHz DDR3 registered Error Correcting Code (ECC) DIMMs Sixty four 240-pin DIMM sockets (eight memory risers with eight DIMM sockets per riser) 1 GB, 2 GB, 4 GB, 8 GB, or 16 GB (single, dual, or quad-rank dependent on capacity) 4 GB 1 TB 8 Getting Started With - Dell PowerEdge R910 | Getting Started Guide - Page 11
Drives Hard drives Optical drive Flash drive Connectors Back NIC Serial USB Video Front Video USB Internal USB Video Video type Video memory Up to sixteen 2.5-inch, internal hot-swappable SAS or SSD hard drives NOTE: Only one SATA drive is supported on the x4 backplane. SAS and SATA hard disks on - Dell PowerEdge R910 | Getting Started Guide - Page 12
V 100% load) AC Power Supply (per power supply) Wattage Voltage Maximum inrush current Batteries System battery RAID battery (Optional) Physical Height Width Depth Weight (maximum configuration) Weight (empty) 8407 BTU/hr maximum (with two or four 1100 W PSUs) 5732 BTU/hr maximum (with two or four - Dell PowerEdge R910 | Getting Started Guide - Page 13
specific system configurations, see www.dell.com/environmental_datasheets. Temperature Operating 10° to 35°C (50° to 95°F) with a maximum maximum humidity gradation of 10% per hour Storage 5% to 95% (noncondensing) with a maximum humidity gradation of 10% per hour Maximum the maximum operating - Dell PowerEdge R910 | Getting Started Guide - Page 14
12 Getting Started With Your System - Dell PowerEdge R910 | Getting Started Guide - Page 15
Systèmes Dell™ PowerEdge™ R910 Guide de mise en route Modèle réglementaire série E06S - Dell PowerEdge R910 | Getting Started Guide - Page 16
données en cas de non-respect des instructions données. AVERTISSEMENT : Un AVERTISSEMENT vous Dell, le logo DELL et PowerEdge sont des marques de Dell Inc. ; Intel et Xeon sont des marques déposées d'Intel Corporation aux États-Unis et dans d'autres pays ; Microsoft, Windows, et Windows Server - Dell PowerEdge R910 | Getting Started Guide - Page 17
système de son emballage et identifiez chaque élément. Installation des rails et du système dans un rack Assemblez les rails et installez le système dans le rack en suivant les consignes de sécurité et les instructions d'installation du rack fournies avec votre système. Guide de mise en route 15 - Dell PowerEdge R910 | Getting Started Guide - Page 18
des câbles d'alimentation. Branchez le ou les câbles d'alimentation au système et, si vous utilisez un moniteur, connectez son câble d'alimentation à celui-ci. 16 Guide de mise en route - Dell PowerEdge R910 | Getting Started Guide - Page 19
de l'alimentation). Mise sous tension du système Appuyez sur le bouton d'alimentation du système et sur celui du moniteur. Les voyants d'alimentation s'allument. Guide de mise en route 17 - Dell PowerEdge R910 | Getting Started Guide - Page 20
concernant l'installation et la configuration du système d'exploitation Server 2008 R2 (x64), éditions Standard, Enterprise, Datacenter et Web • Microsoft Windows Server 2003 R2 (x32), éditions Standard et Enterprise • Microsoft Windows Server 2003 R2 (x64), éditions Standard et Enterprise 18 Guide - Dell PowerEdge R910 | Getting Started Guide - Page 21
des informations de dépannage et des instructions d'installation ou de remplacement des composants. Il est disponible en ligne sur le site support.dell.com/manuals. • Tous les supports fournis avec le système contenant de la documentation et des outils permettant de configurer et de gérer le système - Dell PowerEdge R910 | Getting Started Guide - Page 22
une procédure décrite dans ce guide ou si le système ne réagit pas comme prévu, reportez-vous au Manuel du propriétaire. Dell™ offre une formation exhaustive et une certification sur le matériel. Pour plus d'informations, voir www.dell.com/training. Ce service n'est disponible que dans certains pays - Dell PowerEdge R910 | Getting Started Guide - Page 23
Mémoire Architecture Connecteurs de barrette de mémoire Capacité des barrettes de mémoire RAM minimale RAM maximale Lecteurs Disques durs Lecteur optique Lecteur Flash Barrettes de mémoire ECC (code (en option) USB interne (en option) Module SD interne double (en option) Guide de mise en route 21 - Dell PowerEdge R910 | Getting Started Guide - Page 24
carte E/S 1 GbE ou Deux connecteurs RJ-45 et deux ports SPF+ utilisant une carte E/S 10 Gb Un connecteur DTE à 9 broches, compatible 16550 Deux connecteurs à 4 broches, conformes USB 2.0 Un au contrôleur iDRAC 8 Mo REMARQUE : Partagée avec la mémoire d'application iDRAC. 22 Guide de mise en route - Dell PowerEdge R910 | Getting Started Guide - Page 25
Batterie RAID (en option) 8407 BTU/h maximum (avec deux ou quatre unités d'alimentation à 1100 W) 5732 BTU/h maximum 55 A par bloc d'alimentation pendant un maximum de 10 ms. Pile bouton au 99 pouces) avec les loquets du rack 42,20 cm (16,62 pouces) sans les loquets du rack 78,8 cm (31,02 pouces) - Dell PowerEdge R910 | Getting Started Guide - Page 26
: Pour plus d'informations concernant les mesures environnementales liées à différentes configurations spécifiques, voir www.dell.com/environmental_datasheets. Température En fonctionnement De 10 à 35 °C (de l'air Classe G2 ou inférieure selon la norme ISA-S71.04-1985 24 Guide de mise en route - Dell PowerEdge R910 | Getting Started Guide - Page 27
Dell™ PowerEdge™ Sistemas R910 Primeiros passos com o sistema Modelo de regulamentação da série E06S - Dell PowerEdge R910 | Getting Started Guide - Page 28
. AVISO: Um AVISO indica a possibilidade de danos ao hardware ou a perda de dados caso as instruções não Dell, o logotipo da DELL e PowerEdge são marcas comerciais da Dell Inc.; Intel e Xeon são marcas registradas da Intel Corporation nos EUA e em outros países; Microsoft, Windows, e Windows Server - Dell PowerEdge R910 | Getting Started Guide - Page 29
Remoção do sistema da embalagem Remova o sistema da embalagem e identifique cada item. Instalação dos trilhos e do sistema no rack Monte os trilhos e instale o sistema no rack seguindo as instruções de segurança e as instruções de instalação fornecidas com o sistema. Primeiros passos com o sistema - Dell PowerEdge R910 | Getting Started Guide - Page 30
Opcional - Conexão do teclado, mouse e monitor Conecte o teclado, o mouse e o monitor (opcional). Os conectores nas partes dianteira e traseira do sistema possuem ícones que indicam quais cabos devem ser ligados a cada conector. Verifique se apertou os parafusos (caso haja algum) no conector do cabo - Dell PowerEdge R910 | Getting Started Guide - Page 31
Como prender o(s) cabo(s) de alimentação Dobre o cabo de alimentação do sistema em forma de laço conforme mostrado na ilustração e prenda-o com a tira fornecida. Conecte a outra extremidade do cabo de alimentação a uma tomada elétrica aterrada ou a uma fonte de energia separada, como uma fonte de - Dell PowerEdge R910 | Getting Started Guide - Page 32
operacional. Certifique-se de que o sistema operacional esteja instalado antes de instalar qualquer hardware ou software que não tenha sido adquirido com o sistema. Sistemas operacionais compatíveis • Microsoft® Windows Server® 2008 (x32) Standard e Enterprise Editions com SP2 • Microsoft Windows - Dell PowerEdge R910 | Getting Started Guide - Page 33
Server 11 (x86_64) • SUSE Linux Enterprise Server 10 racks. • O Manual do proprietário de hardware fornece informações sobre os recursos do sistema e descreve como solucionar problemas do sistema e instalar ou trocar componentes. Este documento está disponível on-line em support.dell.com/manuals - Dell PowerEdge R910 | Getting Started Guide - Page 34
procedimento descrito neste guia ou se o sistema não apresentar o desempenho esperado, consulte o Manual do proprietário de hardware. A Dell™ oferece treinamento abrangente e certificação de hardware. Consulte o site www.dell.com/training (em Inglês) para obter mais informações. Esse serviço pode - Dell PowerEdge R910 | Getting Started Guide - Page 35
ou quádrupla, dependendo da capacidade) 4 GB 1 TB Até 16 discos rígidos SAS ou SSD internos de 2,5 polegadas que efetuam troca quente NOTA: Apenas uma unidade SATA é compatível com a placa de backplane x4. Os discos rígidos SAS e SATA na mesma placa de backplane não podem ser combinados em um único - Dell PowerEdge R910 | Getting Started Guide - Page 36
Internos USB Vídeo Tipo de vídeo Memória de vídeo Quatro conectores RJ-45 usando uma placa riser E/S de 1 Gb Ou Dois conectores RJ-45 e dois SPF+ usando uma placa riser E/S de 10 Gb DTE de 9 pinos, compatível com 16550 Dois conectores de 4 pinos, compatíveis com USB 2.0 VGA de 15 - Dell PowerEdge R910 | Getting Started Guide - Page 37
máxima Baterias Bateria do sistema Bateria RAID (opcional) Máximo de 8407 BTU/hr (com dois ou quatro PSUs de 1100 W) Máximo de 5732 BTU/hr (com dois ou quatro PSUs de 48,24 cm (18,99 pol) com as travas do rack 42,20 cm (16,62 pol) sem as travas do rack 78,8 cm (31,02 pol) com as fontes de alimenta - Dell PowerEdge R910 | Getting Started Guide - Page 38
NOTA: Para obter informações adicionais sobre as medições ambientais para configurações de sistema específicas, visite o site www.dell.com/environmental_datasheets (em Inglês). Temperatura Operacional 10° a 35° C (50° a 95°F) com variação máxima de 10° C por hora NOTA: Para altitudes acima - Dell PowerEdge R910 | Getting Started Guide - Page 39
Sistemas Dell™ PowerEdge™ R910 Procedimientos iniciales con el sistema Modelo reglamentario serie E06S - Dell PowerEdge R910 | Getting Started Guide - Page 40
os en el hardware o la pé Dell Inc. Marcas comerciales utilizadas en este texto: Dell, el logotipo de DELL y PowerEdge son marcas comerciales de Dell Inc.; Intel y Xeon son marcas comerciales registradas de Intel Corporation en los Estados Unidos y en otros países; Microsoft, Windows y Windows Server - Dell PowerEdge R910 | Getting Started Guide - Page 41
del sistema Desembale el sistema e identifique cada elemento. Instalación de los rieles y del sistema en un rack Monte los rieles e instale el sistema en el rack siguiendo las instrucciones de seguridad y de instalación del rack incluidas con el sistema. Procedimientos iniciales con el sistema 39 - Dell PowerEdge R910 | Getting Started Guide - Page 42
Conexión del teclado, el ratón y el monitor (opcional) Conecte el teclado, el ratón y el monitor (opcional). Los conectores de la parte frontal y posterior del sistema incluyen iconos que indican qué cable debe enchufarse en cada conector. Asegúrese de apretar los tornillos (si los hay) del conector - Dell PowerEdge R910 | Getting Started Guide - Page 43
Fijación de los cables de alimentación Doble el cable de alimentación del sistema en forma de bucle, como se muestra en la ilustración, y fíjelo al soporte con la correa proporcionada. Conecte el otro extremo del cable de alimentación a una toma eléctrica con conexión a tierra o a otra fuente de - Dell PowerEdge R910 | Getting Started Guide - Page 44
el sistema operativo esté instalado antes de instalar hardware o software no adquiridos con el sistema. Sistemas operativos admitidos • Microsoft® Windows Server® 2008 (x32) Standard y Enterprise Edition con SP2 • Microsoft Windows Server 2008 (x64) Standard, Enterprise y Datacenter Edition con SP2 - Dell PowerEdge R910 | Getting Started Guide - Page 45
el sistema en un rack. • En el Manual del propietario del hardware se proporciona información sobre las características del sistema y se describe cómo solucionar problemas del sistema e instalar o sustituir componentes. Este documento está disponible en línea en support.dell.com/manuals. • En los - Dell PowerEdge R910 | Getting Started Guide - Page 46
esta guía o si el sistema no funciona del modo esperado, consulte el Manual del propietario del hardware. Dell™ cuenta con una amplia oferta de formación y certificación de hardware. Para obtener más información, vaya a www.dell.com/training. Es posible que este servicio no se ofrezca en todas las - Dell PowerEdge R910 | Getting Started Guide - Page 47
módulo de memoria Capacidades del módulo de memoria RAM mínima RAM máxima Módulos DIMM DDR3 ECC registrados a 1 067 MHz 64 zócalos DIMM de 240 patas (ocho tarjetas verticales de memoria con ocho zócalos DIMM por tarjeta) 1 GB, 2 GB, 4 GB, 8 GB o 16 GB (no duales, duales o cuádruples en función de - Dell PowerEdge R910 | Getting Started Guide - Page 48
interno opcional Cuatro RJ-45 mediante una tarjeta vertical de E/S de 1 GbE O bien: Dos RJ-45 y dos SPF+ mediante una tarjeta vertical de E/S de 10 Gb 9 patas, DTE, compatible con 16550 Dos de 4 patas compatibles con USB 2.0 VGA de 15 patas VGA de 15 patas Dos de 4 patas compatibles con USB - Dell PowerEdge R910 | Getting Started Guide - Page 49
máxima Baterías Batería del sistema Batería RAID (opcional) 8 407 BTU/h máximo (2 461 W) con dos o cuatro PSU de 1 100 W 5 732 BTU/h máximo (1 678 W) con dos o cuatro 17,26 cm 48,24 cm con los pestillos del rack 42,2 cm sin los pestillos del rack 78,8 cm con las fuentes de alimentación y el - Dell PowerEdge R910 | Getting Started Guide - Page 50
Especificaciones ambientales NOTA: Para obtener información adicional sobre medidas ambientales relativas a configuraciones del sistema específicas, vaya a www.dell.com/environmental_datasheets. Temperatura En funcionamiento De 10 °C a 35 °C con una gradación de temperatura máxima de 10 °C por
-
 1
1 -
 2
2 -
 3
3 -
 4
4 -
 5
5 -
 6
6 -
 7
7 -
8
-
9
-
10
-
11
-
12
-
13
-
14
-
15
-
16
-
17
-
18
-
19
-
20
-
21
-
22
-
23
-
24
-
25
-
26
-
27
-
28
-
29
-
30
-
31
-
32
-
33
-
34
-
35
-
36
-
37
-
38
-
39
-
40
-
41
-
42
-
43
-
44
-
45
-
46
-
47
-
48
-
49
-
50
 |
 |

Dell™ PowerEdge™
R910 Systems
Getting Started
With Your System
Guide de mise en route
Primeiros passos com o sistema
Procedimientos iniciales con el sistema