Dell PowerVault 120T DLT1 Service Tag/Plate Information Update
Dell PowerVault 120T DLT1 Manual
 |
View all Dell PowerVault 120T DLT1 manuals
Add to My Manuals
Save this manual to your list of manuals |
Dell PowerVault 120T DLT1 manual content summary:
- Dell PowerVault 120T DLT1 | Service Tag/Plate Information Update - Page 1
Dell™ PowerVault™ 120T Service Tag/Plate Information Update This document describes the procedure for removing the service tag from a defective system and transferring it to your replacement system. CAUTION: In order to track the future warranty of your Dell purchased system, you must follow the - Dell PowerVault 120T DLT1 | Service Tag/Plate Information Update - Page 2
screws securing the service tag/plate to the back of the defective system. 5. Using the two screws you removed in step 4, secure the service tag/plate Trademarks used in this text: Dell, the DELL E COM logo, and PowerVault are trademarks of Dell Computer Corporation. Other trademarks and trade
-
 1
1 -
 2
2
 |
 |

support.dell.com
www.dell.com
03C141 A00
P/N 3C141 Rev. A00
October 2000
Dell™ PowerVault™ 120T
Service Tag/Plate Information Update
This document describes the procedure for removing the service tag from a defective system and
transferring it to your replacement system.
CAUTION: In order to track the future warranty of your Dell purchased system, you must
follow the instructions outlined below. Failure to perform these steps may result in a delay
in future service for your system.
Service Tag/Plate Transfer Procedure
To transfer the Dell service tag/plate to the replacement system:
1.
Unpack the replacement system.
2.
Shut down the defective system and disconnect the power cable.
3.
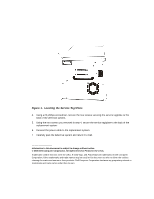
Locate the service tag/plate on the defective system (see Figure 1).