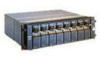
Dell PowerVault 200S Dell PowerVault 2xxS Storage Systems SCSI Backplane Board
Dell PowerVault 200S Manual
 |
View all Dell PowerVault 200S manuals
Add to My Manuals
Save this manual to your list of manuals |
Dell PowerVault 200S manual content summary:
- Dell PowerVault 200S | Dell PowerVault 2xxS Storage Systems SCSI Backplane Board - Page 1
be removed from its enclosure if it is used in a stand-alone configuration. See the Dell PowerVault 200S, 201S, 210S, and 211S Storage Systems Installation and Service Guide for rack and stand-alone information. Dell PowerVault 2xxS Storage Systems SCSI Backplane Board Replacement Instructions 1 - Dell PowerVault 200S | Dell PowerVault 2xxS Storage Systems SCSI Backplane Board - Page 2
Use the following procedures, in the order listed, to replace the SCSI backplane board. 1. Remove the hard-disk drives. 2. Remove the power supplies. 3. Remove the cooling fans. 4. Remove the enclosure services modules or enclosure services expander modules. 5. Remove the component mounting bracket - Dell PowerVault 200S | Dell PowerVault 2xxS Storage Systems SCSI Backplane Board - Page 3
them on a padded surface. Never drop the hard-disk drives. Release the hard-disk drive carrier by pressing down on the hard-disk drive carrier lock (see Figure 3) and swing the carrier handle down (see Figure 4). Dell PowerVault 2xxS Storage Systems SCSI Backplane Board Replacement Instructions 3 - Dell PowerVault 200S | Dell PowerVault 2xxS Storage Systems SCSI Backplane Board - Page 4
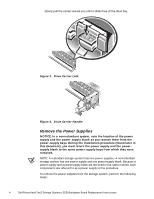
and a power-supply blank are removed in the same manner, both components are referred to as a power supply in this procedure. To remove the power supplies from the storage system, perform the following steps: 4 Dell PowerVault 2xxS Storage Systems SCSI Backplane Board Replacement Instructions - Dell PowerVault 200S | Dell PowerVault 2xxS Storage Systems SCSI Backplane Board - Page 5
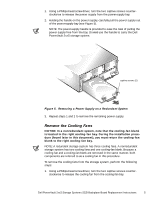
remove the cooling fans from the storage system, perform the following steps: 1. Using a Phillips-head screwdriver, turn the two captive screws counterclockwise to release the cooling fan from the cooling-fan bay. Dell PowerVault 2xxS Storage Systems SCSI Backplane Board Replacement Instructions 5 - Dell PowerVault 200S | Dell PowerVault 2xxS Storage Systems SCSI Backplane Board - Page 6
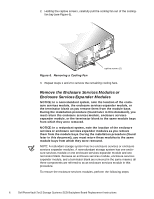
and a terminator blank are removed in the same manner, all three components are referred to as an enclosure services module in this procedure. To remove the enclosure services modules, perform the following steps: 6 Dell PowerVault 2xxS Storage Systems SCSI Backplane Board Replacement Instructions - Dell PowerVault 200S | Dell PowerVault 2xxS Storage Systems SCSI Backplane Board - Page 7
Enclosure Services Module Removal 3. Repeat steps 1 and 2 to remove the remaining enclosure services module. Remove the Component Mounting Bracket To remove the component mounting bracket, perform of the chassis. Dell PowerVault 2xxS Storage Systems SCSI Backplane Board Replacement Instructions 7 - Dell PowerVault 200S | Dell PowerVault 2xxS Storage Systems SCSI Backplane Board - Page 8
Looking in the rear of the storage system, locate the fifteen screws that secure the two halves of the chassis together. There are nine across the top and six across bottom of the backplane board (see Figure 10). 8 Dell PowerVault 2xxS Storage Systems SCSI Backplane Board Replacement Instructions - Dell PowerVault 200S | Dell PowerVault 2xxS Storage Systems SCSI Backplane Board - Page 9
services module is shown Figure 11. Screw Location in the Left Enclosure Services Module Bay 3. Separate the two chassis halves to remove the backplane board (see Figure 12). Figure 12. Chassis Separation Dell PowerVault 2xxS Storage Systems SCSI Backplane Board Replacement Instructions - Dell PowerVault 200S | Dell PowerVault 2xxS Storage Systems SCSI Backplane Board - Page 10
area to secure the chassis front, backplane board, and chassis back together. 8. Using a Phillips-head screwdriver, loosen the captive screws at the top of the enclosure services modules. 10 Dell PowerVault 2xxS Storage Systems SCSI Backplane Board Replacement Instructions - Dell PowerVault 200S | Dell PowerVault 2xxS Storage Systems SCSI Backplane Board - Page 11
, and a terminator blank install in the same manner, all these components are referred to as an enclosure services module in this procedure. To install the enclosure services modules, perform the following steps: Dell PowerVault 2xxS Storage Systems SCSI Backplane Board Replacement Instructions 11 - Dell PowerVault 200S | Dell PowerVault 2xxS Storage Systems SCSI Backplane Board - Page 12
connector. 2. Using a Phillips-head screwdriver, turn the two captive screws clockwise until the new power supply is secured to the power-supply bay. 3. Repeat steps 1 and 2 to install the remaining power supply. 12 Dell PowerVault 2xxS Storage Systems SCSI Backplane Board Replacement Instructions - Dell PowerVault 200S | Dell PowerVault 2xxS Storage Systems SCSI Backplane Board - Page 13
hard-disk drives, use gentle pressure to slide them in the drive bays. Insert them slowly; never use force. To install the hard-disk drives, perform the following steps: 1. Carefully slide the hard-disk drive 14). Dell PowerVault 2xxS Storage Systems SCSI Backplane Board Replacement Instructions 13 - Dell PowerVault 200S | Dell PowerVault 2xxS Storage Systems SCSI Backplane Board - Page 14
installation, cabling, and powering on the storage system, see the Dell PowerVault 200S, 201S, 210S, and 211S Storage Systems Installation and Service Guide. After replacing the SCSI backplane board, complete the procedure by performing the following steps: 1. Install the storage system in the rack
-
 1
1 -
 2
2 -
 3
3 -
 4
4 -
 5
5 -
 6
6 -
 7
7 -
8
-
9
-
10
-
11
-
12
-
13
-
14
 |
 |

Dell PowerVault 2xxS Storage Systems SCSI Backplane Board Replacement Instructions
1
Dell™ PowerVault™ 2xxS
Storage Systems SCSI Backplane
Board Replacement Instructions
This document describes how to replace the small computer system interface
(SCSI) backplane board in the Dell PowerVault 2
xx
S storage system. To access
the SCSI backplane board, all of the components in the storage system must
be removed.
Before you perform any of the procedures in this section, read the following
warning for your personal safety and to prevent damage to the storage system
from electrostatic discharge (ESD).
WARNING: The power supplies in this system produce energy haz-
ards, which can cause bodily harm. Only trained service technicians
are authorized to perform the procedures in this document.
WARNING: FOR YOUR PERSONAL SAFETY AND PROTECTION OF THE
EQUIPMENT WHEN WORKING INSIDE THE STORAGE SYSTEM:
Before you start to work on the storage system, perform the following
steps in the sequence listed:
1.
Turn off the storage system.
2.
Disconnect the storage system from its power source(s).
3.
Disconnect any communications cables.
4.
Wear a wrist grounding strap, and clip it to an unpainted metal sur-
face, such as a part of the chassis.
If a wrist grounding strap is not available, touch the fan guard or some
other unpainted metal surface on the back of the chassis to discharge
any static charge from your body.
See the
Dell PowerVault 200S, 201S, 210S, and 211S Storage Systems Installa-
tion and Service Guide
for cabling and power information.
System Preparation
If the storage system is installed in a rack, it must be removed from the rack
before the SCSI backplane board can be replaced. Likewise, the storage sys-
tem must be removed from its enclosure if it is used in a stand-alone
configuration. See the
Dell PowerVault 200S, 201S, 210S, and 211S Storage
Systems Installation and Service Guide
for rack and stand-alone information.