Dell PowerVault MD3200 CLI Guide - Page 79
Enabling the Virtual Disk Copy Feature, Determining Virtual Disk Copy Candidates
 |
View all Dell PowerVault MD3200 manuals
Add to My Manuals
Save this manual to your list of manuals |
Page 79 highlights
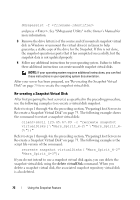
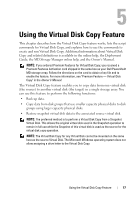
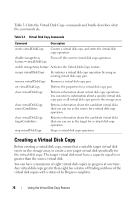
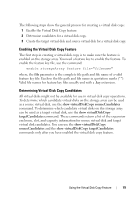
The following steps show the general process for creating a virtual disk copy: 1 Enable the Virtual Disk Copy feature. 2 Determine candidates for a virtual disk copy. 3 Create the target virtual disk and source virtual disk for a virtual disk copy. Enabling the Virtual Disk Copy Feature The first step in creating a virtual disk copy is to make sure the feature is enabled on the storage array. You need a feature key to enable the feature. To enable the feature key file, use the command: enable storageArray feature file="filename" where, the file parameter is the complete file path and file name of a valid feature key file. Enclose the file path and file name in quotation marks (" "). Valid file names for feature key files usually end with a .key extension. Determining Virtual Disk Copy Candidates All virtual disks might not be available for use in virtual disk copy operations. To determine which candidate virtual disks on the storage array can be used as a source virtual disk, use the show virtualDiskCopy sourceCandidates command. To determine which candidate virtual disks on the storage array can be used as a target virtual disk, use the show virtualDiskCopy targetCandidates command. These commands return a list of the expansion enclosure, slot, and capacity information for source virtual disk and target virtual disk candidates. You can use the show virtualDiskCopy sourceCandidates and the show virtualDiskCopy targetCandidates commands only after you have enabled the virtual disk copy feature. Using the Virtual Disk Copy Feature 79
-
 1
1 -
2
-
3
-
4
-
5
-
6
-
7
-
8
-
9
-
10
-
11
-
12
-
13
-
14
-
15
-
16
-
17
-
18
-
19
-
20
-
21
-
22
-
23
-
24
-
25
-
26
-
27
-
28
-
29
-
30
-
31
-
32
-
33
-
34
-
35
-
36
-
37
-
38
-
39
-
40
-
41
-
42
-
43
-
44
-
45
-
46
-
47
-
48
-
49
-
50
-
51
-
52
-
53
-
54
-
55
-
56
-
57
-
58
-
59
-
60
-
61
-
62
-
63
-
64
-
65
-
66
-
67
-
68
-
69
-
70
-
71
-
72
-
73
-
 74
74 -
 75
75 -
 76
76 -
 77
77 -
 78
78 -
 79
79 -
 80
80 -
 81
81 -
 82
82 -
 83
83 -
 84
84 -
85
-
86
-
87
-
88
-
89
-
90
-
91
-
92
-
93
-
94
-
95
-
96
-
97
-
98
-
99
-
100
-
101
-
102
-
103
-
104
-
105
-
106
-
107
-
108
-
109
-
110
-
111
-
112
-
113
-
114
-
115
-
116
-
117
-
118
-
119
-
120
-
121
-
122
-
123
-
124
-
125
-
126
-
127
-
128
-
129
-
130
-
131
-
132
-
133
-
134
-
135
-
136
-
137
-
138
-
139
-
140
-
141
-
142
-
143
-
144
-
145
-
146
-
147
-
148
-
149
-
150
-
151
-
152
-
153
-
154
-
155
-
156
-
157
-
158
-
159
-
160
-
161
-
162
-
163
-
164
-
165
-
166
-
167
-
168
-
169
-
170
-
171
-
172
-
173
-
174
-
175
-
176
-
177
-
178
-
179
-
180
-
181
-
182
-
183
-
184
-
185
-
186
-
187
-
188
-
189
-
190
-
191
-
192
-
193
-
194
-
195
-
196
-
197
-
198
-
199
-
200
-
201
-
202
-
203
-
204
-
205
-
206
-
207
-
208
-
209
-
210
-
211
-
212
-
213
-
214
-
215
-
216
-
217
-
218
-
219
-
220
-
221
-
222
-
223
-
224
-
225
-
226
-
227
-
228
-
229
-
230
-
231
-
232
-
233
-
234
-
235
-
236
-
237
-
238
-
239
-
240
-
241
-
242
-
243
-
244
-
245
-
246
-
247
-
248
-
249
-
250
-
251
-
252
-
253
-
254
-
255
-
256
-
257
-
258
-
259
-
260
-
261
-
262
-
263
-
264
-
265
-
266
-
267
-
268
-
269
-
270
-
271
-
272
-
273
-
274
-
275
-
276
-
277
-
278
-
279
 |
 |