Dell PowerVault NX3500 Administrator's Guide - Page 42
Creating Host-to-Virtual Disk Mappings, Topology, Default Group, Mappings, Define, Additional Mapping
 |
View all Dell PowerVault NX3500 manuals
Add to My Manuals
Save this manual to your list of manuals |
Page 42 highlights
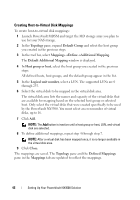
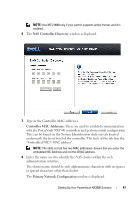
Creating Host-to-Virtual Disk Mappings To create host-to-virtual disk mappings: 1 Launch PowerVault MDSM and target the MD storage array you plan to use for your NAS storage. 2 In the Topology pane, expand Default Group and select the host group you created in the previous steps. 3 In the tool bar, select MappingsDefineAdditional Mapping. The Default Additional Mapping window is displayed. 4 In Host group or host, select the host group you created in the previous steps. All defined hosts, host groups, and the default group appear in the list. 5 In the Logical unit number, select a LUN. The supported LUNs are 0 through 255. 6 Select the virtual disk to be mapped in the virtual disk area. The virtual disk area lists the names and capacity of the virtual disks that are available for mapping based on the selected host group or selected host. Only select the virtual disks that were created specifically to be used by the PowerVault NX3500. You must select an even number of virtual disks, up to 16. 7 Click Add. NOTE: The Add button is inactive until a host group or host, LUN, and virtual disk are selected. 8 To define additional mappings, repeat step 4 through step 7. NOTE: After a virtual disk has been mapped once, it is no longer available in the virtual disk area. 9 Click Close. The mappings are saved. The Topology pane and the Defined Mappings pane in the Mappings tab are updated to reflect the mappings. 42 Setting Up Your PowerVault NX3500 Solution
-
 1
1 -
2
-
3
-
4
-
5
-
6
-
7
-
8
-
9
-
10
-
11
-
12
-
13
-
14
-
15
-
16
-
17
-
18
-
19
-
20
-
21
-
22
-
23
-
24
-
25
-
26
-
27
-
28
-
29
-
30
-
31
-
32
-
33
-
34
-
35
-
36
-
 37
37 -
 38
38 -
 39
39 -
 40
40 -
 41
41 -
 42
42 -
 43
43 -
 44
44 -
 45
45 -
 46
46 -
 47
47 -
48
-
49
-
50
-
51
-
52
-
53
-
54
-
55
-
56
-
57
-
58
-
59
-
60
-
61
-
62
-
63
-
64
-
65
-
66
-
67
-
68
-
69
-
70
-
71
-
72
-
73
-
74
-
75
-
76
-
77
-
78
-
79
-
80
-
81
-
82
-
83
-
84
-
85
-
86
-
87
-
88
-
89
-
90
-
91
-
92
-
93
-
94
-
95
-
96
-
97
-
98
-
99
-
100
-
101
-
102
-
103
-
104
-
105
-
106
-
107
-
108
-
109
-
110
-
111
-
112
-
113
-
114
-
115
-
116
-
117
-
118
-
119
-
120
-
121
-
122
-
123
-
124
-
125
-
126
-
127
-
128
-
129
-
130
-
131
-
132
-
133
-
134
-
135
-
136
-
137
-
138
-
139
-
140
-
141
-
142
-
143
-
144
-
145
-
146
-
147
-
148
-
149
-
150
-
151
-
152
-
153
-
154
-
155
-
156
-
157
-
158
-
159
-
160
-
161
-
162
-
163
-
164
-
165
-
166
-
167
-
168
-
169
-
170
-
171
-
172
-
173
-
174
-
175
-
176
-
177
-
178
-
179
-
180
-
181
-
182
-
183
-
184
-
185
-
186
-
187
-
188
-
189
-
190
-
191
-
192
-
193
-
194
-
195
-
196
-
197
-
198
 |
 |