Dell PowerVault NX3500 Administrator's Guide - Page 44
Graphical Installation, Command-Line Installation
 |
View all Dell PowerVault NX3500 manuals
Add to My Manuals
Save this manual to your list of manuals |
Page 44 highlights
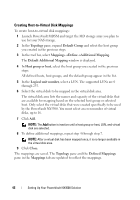
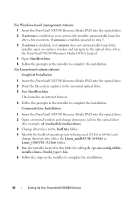
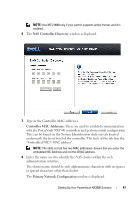
For Windows-based management stations: 1 Insert the PowerVault NX3500 Resource Media DVD into the optical drive. 2 If autorun is enabled on your system, the installer automatically launches after a few moments. If autorun is enabled, proceed to step 5. 3 If autorun is disabled, or if autorun does not automatically launch the installer, open an explorer window and navigate to the optical drive where the PowerVault NX3500 Resource Media DVD is located. 4 Open StartHere.htm. 5 Follow the prompts in the installer to complete the installation. For Linux-based admin stations: Graphical Installation 1 Insert the PowerVault NX3500 Resource Media DVD into the optical drive. 2 Point the file-system explorer to the mounted optical drive. 3 Run StartHere.htm. This launches an internet browser. 4 Follow the prompts in the installer to complete the installation. Command-Line Installation 1 Insert the PowerVault NX3500 Resource Media DVD into the optical drive. 2 Open a terminal window and change directories (cd) to the optical drive (For example, cd /media/disk/media/cdrom). 3 Change directories to the InstData folder. 4 Identify the build of operating system being used (32-bit or 64-bit) and change directory into either the Linux_amd64/VM/ (64-bit) or Linux_i386/VM/ (32-bit) folder. 5 Run the installer located in this folder by calling sh ./pv-nas-config-utilityinstaller-linux-.bin. 6 Follow the steps in the installer to complete the installation. 44 Setting Up Your PowerVault NX3500 Solution
-
 1
1 -
2
-
3
-
4
-
5
-
6
-
7
-
8
-
9
-
10
-
11
-
12
-
13
-
14
-
15
-
16
-
17
-
18
-
19
-
20
-
21
-
22
-
23
-
24
-
25
-
26
-
27
-
28
-
29
-
30
-
31
-
32
-
33
-
34
-
35
-
36
-
37
-
38
-
 39
39 -
 40
40 -
 41
41 -
 42
42 -
 43
43 -
 44
44 -
 45
45 -
 46
46 -
 47
47 -
 48
48 -
 49
49 -
50
-
51
-
52
-
53
-
54
-
55
-
56
-
57
-
58
-
59
-
60
-
61
-
62
-
63
-
64
-
65
-
66
-
67
-
68
-
69
-
70
-
71
-
72
-
73
-
74
-
75
-
76
-
77
-
78
-
79
-
80
-
81
-
82
-
83
-
84
-
85
-
86
-
87
-
88
-
89
-
90
-
91
-
92
-
93
-
94
-
95
-
96
-
97
-
98
-
99
-
100
-
101
-
102
-
103
-
104
-
105
-
106
-
107
-
108
-
109
-
110
-
111
-
112
-
113
-
114
-
115
-
116
-
117
-
118
-
119
-
120
-
121
-
122
-
123
-
124
-
125
-
126
-
127
-
128
-
129
-
130
-
131
-
132
-
133
-
134
-
135
-
136
-
137
-
138
-
139
-
140
-
141
-
142
-
143
-
144
-
145
-
146
-
147
-
148
-
149
-
150
-
151
-
152
-
153
-
154
-
155
-
156
-
157
-
158
-
159
-
160
-
161
-
162
-
163
-
164
-
165
-
166
-
167
-
168
-
169
-
170
-
171
-
172
-
173
-
174
-
175
-
176
-
177
-
178
-
179
-
180
-
181
-
182
-
183
-
184
-
185
-
186
-
187
-
188
-
189
-
190
-
191
-
192
-
193
-
194
-
195
-
196
-
197
-
198
 |
 |