Dell PowerVault NX3610 User Manual - Page 48
Phase 3—Restore Cluster A Fail Back From Cluster B To Cluster A, Join AD server or LDAP/NIS.
 |
View all Dell PowerVault NX3610 manuals
Add to My Manuals
Save this manual to your list of manuals |
Page 48 highlights
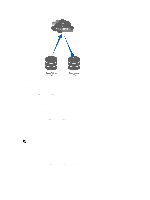
Ensure that the DNS server on cluster B is the same as the DNS server or in the same DNS farm as the DNS server of cluster A. Existing client connections may break and may need to be re-established. You must unmount and remount the NFS Exports on the client. b) Join AD server or LDAP/NIS. Ensure that the AD and LDAP are in the same AD/LDAP farm or same server. Phase 3-Restore Cluster A Fail Back From Cluster B To Cluster A 1. Fix the reason that caused cluster A to fail (replace hardware, replace disk, and so on), and if required reinstall FluidFS. 2. Rebuild the cluster (use the settings for cluster A that you saved earlier), format the NAS reserve, and set up the network (client, SAN, and IC) as before. 3. Log on to cluster B and set up the replication partnership between cluster B and cluster A. For more information on setting up replication partners, see Setting Up A Replication Partner. 4. Create replication policy for all the source volumes in cluster B to target volumes in cluster A. For more information on creating replication policies, see Adding A Replication Policy. NOTE: Replication policy is a one to one match on volume base, for example: Source volume B1 (cluster B) to target volume A1 (cluster A) Source volume B2 (cluster B) to target volume A2 (cluster A Source volume Bn (cluster B) to target volume An (cluster A) NOTE: FluidFS 1.1 supports auto generate target volume during addition of the replication policy. For FluidFS 1.0, you must create the target volumes in cluster B and make sure that the volume size is big enough to accommodate the corresponding source volume data in cluster A. 5. In the NAS Manager web interface, select Data Protection → Replication → NAS Replication and click Replicate Now for all the volumes in cluster B (B1, B2, .., Bn). If the replication fails, fix the problems encountered and restart the replication process. Ensure that all the volumes are successfully replicated to cluster A. 6. Delete the replication policy for all the volumes (B1, B2, .. Bn) and apply source volume configuration from cluster B to cluster A. Repeat this procedure to delete all the replication policies and bring all target volumes in cluster A to standalone volumes. 7. Log on to cluster A. 8. From the NAS Manager web interface, restore the NAS system configuration from cluster B. For more information on restoring the NAS system configuration, see Restoring Cluster Configuration. This changes cluster A global configuration settings, like, protocol setting, time setting, authentication parameters, and so on to cluster B settings. NOTE: If system configuration restore fails, manually set them back to the original settings (use the settings for cluster A that you saved earlier). Cluster A is restored to its original settings. 9. Start using cluster A to serve client requests. Administrators must perform the following steps to set up DNS and authentication: a) Point the DNS names from customer DNS server to cluster A instead of cluster B. Ensure that the DNS server on cluster A is the same as the DNS server or in the same DNS farm as the DNS server of cluster B. Existing client connections may break and need to re-establish during this process. 48
-
 1
1 -
2
-
3
-
4
-
5
-
6
-
7
-
8
-
9
-
10
-
11
-
12
-
13
-
14
-
15
-
16
-
17
-
18
-
19
-
20
-
21
-
22
-
23
-
24
-
25
-
26
-
27
-
28
-
29
-
30
-
31
-
32
-
33
-
34
-
35
-
36
-
37
-
38
-
39
-
40
-
41
-
42
-
 43
43 -
 44
44 -
 45
45 -
 46
46 -
 47
47 -
 48
48 -
 49
49 -
 50
50 -
 51
51 -
 52
52 -
 53
53 -
54
-
55
-
56
-
57
-
58
-
59
-
60
-
61
-
62
-
63
-
64
-
65
-
66
-
67
-
68
-
69
-
70
-
71
-
72
-
73
-
74
-
75
-
76
-
77
-
78
-
79
-
80
-
81
-
82
-
83
-
84
-
85
-
86
-
87
-
88
-
89
-
90
-
91
-
92
-
93
-
94
-
95
-
96
-
97
-
98
-
99
-
100
-
101
-
102
-
103
-
104
-
105
-
106
-
107
-
108
-
109
-
110
-
111
-
112
-
113
-
114
-
115
-
116
-
117
 |
 |