Dell Studio One 19 1909 Studio One 19 Setup Guide
Dell Studio One 19 1909 Manual
 |
View all Dell Studio One 19 1909 manuals
Add to My Manuals
Save this manual to your list of manuals |
Dell Studio One 19 1909 manual content summary:
- Dell Studio One 19 1909 | Studio One 19 Setup Guide - Page 1
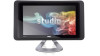
SETUP GUIDE - Dell Studio One 19 1909 | Studio One 19 Setup Guide - Page 2
- Dell Studio One 19 1909 | Studio One 19 Setup Guide - Page 3
Model MTF SETUP GUIDE - Dell Studio One 19 1909 | Studio One 19 Setup Guide - Page 4
hardware or loss of data and tells you how to avoid the problem. WARNING: A WARNING indicates a potential for property damage, personal injury is a registered trademark owned by Bluetooth SIG, Inc. and is used by Dell under license. Other trademarks and trade names may be used in this document to - Dell Studio One 19 1909 | Studio One 19 Setup Guide - Page 5
Your Studio One 12 Front View Features 12 Left Side Features 14 Back Panel Features 16 Locating the Service Tag 17 Using the Optical Disc Drive 17 Using the Touch Screen (Optional 18 Software Features 21 Solving Problems 23 Touch Screen Problems 23 Wireless Keyboard or Mouse Problems 24 - Dell Studio One 19 1909 | Studio One 19 Setup Guide - Page 6
Hardware Troubleshooter 32 Dell Diagnostics 33 System Recovery Options 35 System Restore 35 Dell Factory Image Restore 36 Operating System Reinstallation 38 Getting Help 40 Technical Support and Customer Service 41 DellConnect 41 Online Services 41 Automated Order-Status Service 42 - Dell Studio One 19 1909 | Studio One 19 Setup Guide - Page 7
up your Studio One and connecting peripherals. WARNING: Before you begin any of the procedures in this section, read the safety information that shipped with your computer. For additional safety best practices information, see the Regulatory Compliance Homepage at www.dell.com/ regulatory_compliance - Dell Studio One 19 1909 | Studio One 19 Setup Guide - Page 8
Setting Up Your Studio One Connect the Network Cable (Optional) A network connection is not (RJ11 connector) into the network connector. To attach your computer to a network or broadband device, connect one end of a network cable to either a network port or a broadband device. Connect the other end - Dell Studio One 19 1909 | Studio One 19 Setup Guide - Page 9
and Mouse (Optional) Your Studio One supports a special wireless (non-Bluetooth) keyboard and mouse which are optimized for use with your computer. After installing the batteries the wireless keyboard and mouse are synced and ready to use. If you have a problem setting up your wireless keyboard - Dell Studio One 19 1909 | Studio One 19 Setup Guide - Page 10
Setting Up Your Studio One Press the Power Button 8 - Dell Studio One 19 1909 | Studio One 19 Setup Guide - Page 11
Studio One Windows Vista® Setup Your Dell computer is pre configured with Windows Vista. To set up Windows Vista for the first time, follow the instructions modem or network connection and an Internet service provider (ISP). Your ISP will offer one or more of the following Internet connection - Dell Studio One 19 1909 | Studio One 19 Setup Guide - Page 12
Your Studio One • Dial-up connections that provide Internet access through a telephone line. Dialup connections are considerably slower than DSL and cable (or satellite) modem connections. Your computer does not have an integrated modem. An optional USB modem must be used for dial-up service with - Dell Studio One 19 1909 | Studio One 19 Setup Guide - Page 13
Your Studio One 1. Save and close any open files, and exit any open programs. 2. Click Start → Connect To. 3. Follow the instructions on successfully connected in the past, the ISP might have a service outage. Contact your ISP to check the service status, or try connecting again later. NOTE: Have - Dell Studio One 19 1909 | Studio One 19 Setup Guide - Page 14
Using Your Studio One Front View Features 1 23 4 1 Air vents - Internal fans create airflow through the vents to prevent the computer from overheating. The fans are turned on automatically when the computer gets hot. Fan noise is normal and does not indicate a problem with the fan or the computer. - Dell Studio One 19 1909 | Studio One 19 Setup Guide - Page 15
eject a disc gently touch the control. Using Your Studio One 7 Computer stand - Use the stand to tilt Service Tag/ Express Service Code is located on a label under the display glass. To view the Service Tag/Express Service Code tilt the display by 40°. Use this code when you access the Dell Support - Dell Studio One 19 1909 | Studio One 19 Setup Guide - Page 16
Using Your Studio One Left Side Features 1 2 3 4 5 6 14 1 Media Card Reader - Provides a fast and convenient way to view and share digital photos, music, videos, and documents stored on the - Dell Studio One 19 1909 | Studio One 19 Setup Guide - Page 17
Using Your Studio One 3 Headphone or line-out connector - Connects to headphones. NOTE: To connect to a powered speaker or sound supply. • Solid white - the computer is in power-on state. • Blinking amber - there is a power problem, a device may be malfunctioning or incorrectly installed. 15 - Dell Studio One 19 1909 | Studio One 19 Setup Guide - Page 18
Using Your Studio One Back Panel Features 1 2 34 1 USB 2.0 connectors (4) - Connects to USB devices, such as a mouse, keyboard, printer, external drive, or MP3 player. 16 2 Wireless sync button - Reestablishes - Dell Studio One 19 1909 | Studio One 19 Setup Guide - Page 19
Locating the Service Tag Using Your Studio One Using the Optical Disc Drive 1 1 Service Tag Gently tilt the display upwards to reveal the Service Tag. Insert the disc, with the label facing outwards and gently push the disc into the slot. The drive will automatically pull the disc in - Dell Studio One 19 1909 | Studio One 19 Setup Guide - Page 20
on your Studio One converts your computer into an interactive display. Dell Touch Zone To launch the Dell Touch Zone software click Start →Dell Touch Zone. You can access the following features in the Dell Touch Zone To view the video at a later time, access it via Help or at support.dell.com. 18 - Dell Studio One 19 1909 | Studio One 19 Setup Guide - Page 21
of these gestures may not work outside the Dell Touch Zone software. Zoom Allows you to increase two fingers close together to reduce the view of the active window. Using Your Studio One Dwell Allows you to access additional information by simulating a right-click. Press and songs in a playlist. 19 - Dell Studio One 19 1909 | Studio One 19 Setup Guide - Page 22
Using Your Studio One Scroll Allows you to scroll through content. The scroll features include: Pan - Allows you to move the focus on the selected object when the entire - Dell Studio One 19 1909 | Studio One 19 Setup Guide - Page 23
Using Your Studio One Software Features NOTE: For more information about the features described in this section, see the Dell Technology Guide available on your computer or on the Dell Support website at support.dell.com. Facial Recognition (Optional) Your computer may have the FastAccess facial - Dell Studio One 19 1909 | Studio One 19 Setup Guide - Page 24
Using Your Studio One Customizing the Desktop You can customize your desktop to change the appearance, resolution, wallpaper, screensaver, and so Click Back up files or Back up computer 3. Click Continue on the User Account Control window and follow the instructions in the Back up Files wizard. 22 - Dell Studio One 19 1909 | Studio One 19 Setup Guide - Page 25
This section provides troubleshooting information for your computer. If you cannot solve your problem using the following guidelines, see "Using Support Tools" on page 30 or "Contacting Dell" on page 44. Touch Screen Problems Some or all multi-touch features are not working - • Certain multi - Dell Studio One 19 1909 | Studio One 19 Setup Guide - Page 26
Wireless Keyboard or Mouse Problems If the mouse and keyboard stop communicating with the computer - The batteries may not be working or the keyboard and mouse have lost their connection - Dell Studio One 19 1909 | Studio One 19 Setup Guide - Page 27
Solving Problems Network Problems Wireless Connections The network activity light on the integrated open files, and exit any open programs. 2. Click Start → Connect To. 3. Follow the instructions on the screen to complete the setup. Wired Connections The link integrity light on the integrated - Dell Studio One 19 1909 | Studio One 19 Setup Guide - Page 28
page 44). If the power light is blinking amber - There is a power problem, a device may be malfunctioning or incorrectly installed. For assistance, contact Dell (see "Contacting Dell" on page 44). If you encounter interference that hinders reception on your computer - An unwanted signal is creating - Dell Studio One 19 1909 | Studio One 19 Setup Guide - Page 29
for minimum memory requirements. For assistance, contact Dell (see "Contacting Dell" on page 44). • Run Dell Diagnostics (see "Dell Diagnostics" on page 33). If you experience other memory problems - • Ensure that the memory you are using is supported by your computer. For more information about - Dell Studio One 19 1909 | Studio One 19 Setup Guide - Page 30
Panel→ Programs→ Use an older program with this version of Windows. 2. In the welcome screen, click Next. 3. Follow the instructions on the screen. If you have other software problems - • Back up your files immediately. • Use a virus-scanning program to check the hard drive or CDs. • Save and close - Dell Studio One 19 1909 | Studio One 19 Setup Guide - Page 31
• Check the software documentation or contact the software manufacturer for troubleshooting information: --Ensure that the program is compatible with the operating system installed on your not conflict with the program. --If necessary, uninstall and then reinstall the program. Solving Problems 29 - Dell Studio One 19 1909 | Studio One 19 Setup Guide - Page 32
see the Dell Technology Guide available on your computer or on the Dell Support website at support.dell.com. Beep Codes Your computer might emit a series of beeps during start-up if the monitor cannot display errors or problems. The following repetitive beep codes help you troubleshoot problems with - Dell Studio One 19 1909 | Studio One 19 Setup Guide - Page 33
: To replace parts see the Service Manual on the Dell Support website at support.dell.com. One beep - BIOS ROM checksum failure. Possible motherboard failure Contact Dell (see "Contacting Dell" on page 44). Two beeps - No RAM Detected • Remove the memory modules, reinstall one module and restart the - Dell Studio One 19 1909 | Studio One 19 Setup Guide - Page 34
Service Manual on the Dell Support website at support.dell.com or see "Contacting Dell" on page 44 for assistance. Alert! Previous attempts at booting this system have failed at checkpoint [nnnn]. For help in resolving this problem both of them. Hardware Troubleshooter If a device is either not - Dell Studio One 19 1909 | Studio One 19 Setup Guide - Page 35
Diagnostics before you contact Dell for technical assistance. NOTE: Dell Diagnostics works only on Dell computers. NOTE: The Drivers and Utilities media is optional and may not ship with your computer. Using Support Tools See the System Setup section in the Service Manual to review your computer - Dell Studio One 19 1909 | Studio One 19 Setup Guide - Page 36
Using Support Tools 3. When the DELL™ logo appears, press immediately. Select Diagnostics from then, shut down your computer and try again. NOTE: The next steps change the boot sequence for one time only. On the next start-up, the computer boots according to the devices specified in the - Dell Studio One 19 1909 | Studio One 19 Setup Guide - Page 37
System media also deletes all data on the hard drive. Use the disc only if neither System Restore nor Dell Factory Image Restore did not resolve your operating system problem. System Restore The Windows operating systems provide a System Restore option which allows you to return your computer to an - Dell Studio One 19 1909 | Studio One 19 Setup Guide - Page 38
for the Windows default view, so they may not apply if you set your Dell™ computer to the Windows Classic view. Starting System Restore 1. Click Start . options. Use Dell Factory Image Restore only if System Restore did not resolve your operating system problem. NOTE: Dell Factory Image Restore - Dell Studio One 19 1909 | Studio One 19 Setup Guide - Page 39
messages, digital photos, music files, and so on. If possible, back up all data before using Factory Image Restore. Dell Factory Image Restore 1. Turn on the computer. When the Dell logo appears, press several times to access the Vista Advanced Boot Options Window. NOTE: If the operating system - Dell Studio One 19 1909 | Studio One 19 Setup Guide - Page 40
you are considering reinstalling the Windows operating system to correct a problem with a newly installed driver, first try using Windows Device the following items: • Operating System media • Dell Drivers and Utilities media NOTE: The Dell Drivers and Utilities media contains drivers that were - Dell Studio One 19 1909 | Studio One 19 Setup Guide - Page 41
Windows message appears. 4. Restart the computer. 5. When the DELL logo appears, press immediately. NOTE: If the Recovery Options NOTE: The next steps change the boot sequence for one time only. On the next start-up, the computer boots instructions on the screen to complete the installation. 39 - Dell Studio One 19 1909 | Studio One 19 Setup Guide - Page 42
at Dell Support (support.dell.com) for help with installation and troubleshooting procedures. See "Online Services" on page 41 for a more extensive list of Dell Support online. 5. If the preceding steps have not resolved the problem, see "Contacting Dell" on page 44. NOTE: Call Dell Support from - Dell Studio One 19 1909 | Studio One 19 Setup Guide - Page 43
the contact information for your region or go to support.dell.com. DellConnect DellConnect is a simple online access tool that allows a Dell service and support associate to access your computer through a broadband connection, diagnose your problem and repair it all under your supervision. For more - Dell Studio One 19 1909 | Studio One 19 Setup Guide - Page 44
mail address as your password. Automated Order-Status Service To check on the status of an order or if you have a problem with your order, such as missing part, wrong parts, or incorrect billing , contact Dell (see "Contacting Dell" on page 44 or go to support.dell.com). NOTE: Have your invoice or - Dell Studio One 19 1909 | Studio One 19 Setup Guide - Page 45
that are missing any of the preceding requirements will be refused at Dell's receiving dock and returned to you. Before You Call NOTE: Have your Express Service Code ready when you call. The code helps Dell's automated-support telephone system direct your call more efficiently. You may also be asked - Dell Studio One 19 1909 | Studio One 19 Setup Guide - Page 46
file. Otherwise, record the contents of each file before calling Dell. • Error message, beep code, or diagnostic code: • Description of problem and troubleshooting procedures you performed: Contacting Dell For customers in the United States, call 800-WWW-DELL (800-999-3355). NOTE: If you do not have - Dell Studio One 19 1909 | Studio One 19 Setup Guide - Page 47
3. Click Contact Us on the left side of the page. 4. Select the appropriate service or support link based on your need. 5. Choose the method of contacting Dell that is convenient for you. NOTE: For technical support fill out the Diagnostic Checklist (see "Diagnostic Checklist" on page 44) before you - Dell Studio One 19 1909 | Studio One 19 Setup Guide - Page 48
and documentation updates can be found on the Dell™ Support website at support.dell.com. the Dell Technology Guide available on your computer or on the Dell Support website at support.dell.com. the Service Manual on the Dell Support website at support.dell.com. NOTE: In some countries, opening and - Dell Studio One 19 1909 | Studio One 19 Setup Guide - Page 49
and Conditions (U.S. only), Safety instructions, Regulatory information, Ergonomics information, and End User License Agreement. find your Service Tag/Express Service Code- You must use the Service Tag to identify your computer on support.dell.com or to contact technical support. find drivers and - Dell Studio One 19 1909 | Studio One 19 Setup Guide - Page 50
System model Studio One 1909 This section provides information that you may need when setting up, updating drivers for, and upgrading your computer. NOTE: Offerings may vary by region. For more information regarding the configuration of your computer, click Start → Help and Support and select - Dell Studio One 19 1909 | Studio One 19 Setup Guide - Page 51
Specifications Drives and devices Available devices Memory Type Connectors Capacities Minimum Maximum Serial ATA hard drive, DVD and CD-RW combo drive (optional), DVD+/- RW (optional), Blu-ray Disc™ (optional), microphone array, and 7-in-1 Media Card Reader. Dual channel 800 MHz DDR2 Two 512 MB, 1 - Dell Studio One 19 1909 | Studio One 19 Setup Guide - Page 52
Specifications External connectors Audio Two side-panel connectors for microphone/line-in and headphone/ line-out; one back-panel connector for line-out Audio Type Power Frequency response Integrated speakers 4W x 2 150 Hz to 15 kHz Video Type LCD interface nVIDIA MCP7A - Dell Studio One 19 1909 | Studio One 19 Setup Guide - Page 53
depth (with stand installed) Approximate weight (with stand) Approximate weight with touch screen (with stand) 8.21 cm (3.23 inches) 8.85 cm (3.48 inches) 19.25 cm (7.57 inches) 10.4 kg (22.92 lb) 10.3 kg (22.70 lb) Specifications Power Wattage Voltage Backup battery 190 W 100-240 VAC - Dell Studio One 19 1909 | Studio One 19 Setup Guide - Page 54
Specifications Computer environment Maximum Vibration: Operating 0.26 Grms random for 2 min in all operational orientations Storage 2.2 Grms random for 15 mins Maximum Shock: Operating Storage Half-Sine Pulse: 40G for 2ms with a change in velocity of 20 in/s (51 cm/s) Half-Sine Pulse: 40G - Dell Studio One 19 1909 | Studio One 19 Setup Guide - Page 55
Appendix The information in this document also applies to the products listed below: • Dell™ Studio One 1909 • Dell™ Studio One 19 Macrovision Product Notice This product incorporates copyright protection technology that is protected by method claims of certain U.S. patents and other intellectual - Dell Studio One 19 1909 | Studio One 19 Setup Guide - Page 56
Index A airflow, allowing 5 audio 50 B backups creating 22 C calling Dell 43 CDs, playing and creating 21 chipset 49 computer weights and dimensions 50 -up 10 via DSL 10 via WLAN 10 wireless keyboard 7 connectors back view 14 contacting Dell online 44 customer service 41 customizing your desktop 21 - Dell Studio One 19 1909 | Studio One 19 Setup Guide - Page 57
E email addresses for technical support 42 energy conserving 22 expansion bus 50 F finding more information 46 flick 19 front-side connectors 12 FTP login, anonymous 42 G gestures 19 H hard drive activity light 15 hardware problems diagnosing 33 Hardware Troubleshooter 32 headphone front connector - Dell Studio One 19 1909 | Studio One 19 Setup Guide - Page 58
Index help getting assistance and support 40 I Internet connection 9 ISP Internet Service Provider 9 L line-in connector 15 M media card reader 14 memory minimum and maximum 49 memory problems solving 27 Memory Stick reader 14 memory support 49 56 microphone connector 15 MMC 14 Multi Media Card - Dell Studio One 19 1909 | Studio One 19 Setup Guide - Page 59
solving problems 23 specifications 48 support email addresses 42 support sites worldwide 41 system messages 31 system reinstall options 35 System Restore 35 T technical support 41 touch screen 18 touch screen gestures gestures multi-touch gestures 19 U USB 2.0 back connectors 14, 16 V ventilation - Dell Studio One 19 1909 | Studio One 19 Setup Guide - Page 60
Index W warranty returns 42 Windows, reinstalling 35 Windows Vista® Program Compatibility Wizard 28 reinstalling 39 wireless mouse and keyboard reconnecting 24 wireless network connection 25 wireless sync button 16 X xD-Picture Card reader 14 58 - Dell Studio One 19 1909 | Studio One 19 Setup Guide - Page 61
- Dell Studio One 19 1909 | Studio One 19 Setup Guide - Page 62
Printed in the U.S.A. www.dell.com | support.dell.com 0P687XA01
-
 1
1 -
 2
2 -
 3
3 -
 4
4 -
 5
5 -
 6
6 -
 7
7 -
8
-
9
-
10
-
11
-
12
-
13
-
14
-
15
-
16
-
17
-
18
-
19
-
20
-
21
-
22
-
23
-
24
-
25
-
26
-
27
-
28
-
29
-
30
-
31
-
32
-
33
-
34
-
35
-
36
-
37
-
38
-
39
-
40
-
41
-
42
-
43
-
44
-
45
-
46
-
47
-
48
-
49
-
50
-
51
-
52
-
53
-
54
-
55
-
56
-
57
-
58
-
59
-
60
-
61
-
62
 |
 |

SETUP GUIDE