Dell V525W User Manual - Page 123
Select your printer from the Print dialog before sending the print job - printer problems
 |
View all Dell V525W manuals
Add to My Manuals
Save this manual to your list of manuals |
Page 123 highlights
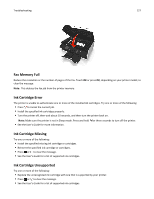
Troubleshooting 123 SELECT YOUR PRINTER FROM THE PRINT DIALOG BEFORE SENDING THE PRINT JOB Note: This solution applies to Macintosh users only. 1 With a document open, choose File > Print. 2 From the printer pop-up menu, choose your printer, and then click Print. If your printer does not appear in the Printer list, then choose Add Printer. From the list of printers in the Default tab, select your printer, and then click Add. If your printer does not appear in the list, then try either of the following: • For a USB-connected printer, remove and then reconnect the USB cable. • For a printer that is wirelessly connected, see the Wireless troubleshooting section. MAKE SURE THE PRINT JOB IS NOT PAUSED MAKE SURE YOUR PRINTER IS SET AS THE DEFAULT PRINTER RECONNECT THE PRINTER POWER SUPPLY 1 Turn off the printer. Note: Make sure the printer is not in Sleep mode. Press and hold for three seconds to turn off the printer. 2 Unplug the power cord from the wall outlet, and then pull out the power cord from the power supply. 3 After one minute, reconnect the power cord into the power supply, and then plug the power cord into the wall outlet. 4 Turn on the printer. REMOVE AND RECONNECT THE USB CABLE CONNECTED TO YOUR PRINTER CHECK THE USB CONNECTION 1 Check the USB cable for any obvious damage. If the cable is damaged, then use a new one. 2 Firmly plug the square end of the USB cable into the back of the printer. 3 Firmly plug the rectangular end of the USB cable into the USB port of the computer. The USB port is marked with . Note: If you continue to have problems, then try another USB port on the computer. You may have connected to a defective port. REMOVE AND REINSTALL THE PRINTER SOFTWARE
-
 1
1 -
2
-
3
-
4
-
5
-
6
-
7
-
8
-
9
-
10
-
11
-
12
-
13
-
14
-
15
-
16
-
17
-
18
-
19
-
20
-
21
-
22
-
23
-
24
-
25
-
26
-
27
-
28
-
29
-
30
-
31
-
32
-
33
-
34
-
35
-
36
-
37
-
38
-
39
-
40
-
41
-
42
-
43
-
44
-
45
-
46
-
47
-
48
-
49
-
50
-
51
-
52
-
53
-
54
-
55
-
56
-
57
-
58
-
59
-
60
-
61
-
62
-
63
-
64
-
65
-
66
-
67
-
68
-
69
-
70
-
71
-
72
-
73
-
74
-
75
-
76
-
77
-
78
-
79
-
80
-
81
-
82
-
83
-
84
-
85
-
86
-
87
-
88
-
89
-
90
-
91
-
92
-
93
-
94
-
95
-
96
-
97
-
98
-
99
-
100
-
101
-
102
-
103
-
104
-
105
-
106
-
107
-
108
-
109
-
110
-
111
-
112
-
113
-
114
-
115
-
116
-
117
-
 118
118 -
 119
119 -
 120
120 -
 121
121 -
 122
122 -
 123
123 -
 124
124 -
 125
125 -
 126
126 -
 127
127 -
 128
128 -
129
-
130
-
131
-
132
-
133
-
134
-
135
-
136
-
137
-
138
-
139
-
140
-
141
-
142
-
143
-
144
-
145
-
146
-
147
-
148
-
149
-
150
-
151
-
152
-
153
-
154
-
155
-
156
-
157
-
158
-
159
-
160
-
161
-
162
-
163
-
164
-
165
-
166
-
167
-
168
-
169
-
170
-
171
-
172
-
173
-
174
-
175
-
176
-
177
 |
 |