Dell V525W User Manual - Page 124
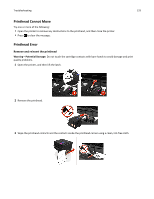
Printer is printing blank s, Reinstall the ink cartridges and deep clean and align the printhead - printhead cannot move
 |
View all Dell V525W manuals
Add to My Manuals
Save this manual to your list of manuals |
Page 124 highlights
Troubleshooting 124 Printer is printing blank pages Blank pages may be caused by improperly installed ink cartridges. REINSTALL THE INK CARTRIDGES AND DEEP CLEAN AND ALIGN THE PRINTHEAD 1 Reinstall the ink cartridges, see "Replacing ink cartridges" on page 15 for more information. If the cartridges do not seem to fit, then make sure the printhead is properly seated, and then try installing the cartridges again. 2 Load plain, unmarked paper. 3 From the printer control panel, navigate to: > Setup > > Maintenance > 4 Press the up or down arrow button to scroll to Deep Clean Printhead, and then press . A cleaning page prints. 5 Load plain, unmarked paper. 6 From the Maintenance menu screen, press the up or down arrow button to scroll to Align Printer, and then press . An alignment page prints. Note: Do not remove the alignment page until printing is finished. Printer is busy or does not respond If the "Before you troubleshoot" checklist does not solve the problem, then try one or more of the following: MAKE SURE THE PRINTER IS NOT IN SLEEP MODE If the power light is blinking on and off slowly, then the printer is in Sleep mode. Press to wake up the printer. If the printer will not come out of Sleep mode, then reset the power: 1 Unplug the power cord from the wall outlet, and then wait 10 seconds. 2 Insert the power cord into the wall outlet, and then turn on the printer. If this problem persists, then check our Web site for updates for your printer software or firmware. RECONNECT THE PRINTER POWER SUPPLY 1 Turn off the printer. Note: Make sure the printer is not in Sleep mode. Press and hold for three seconds to turn off the printer. 2 Unplug the power cord from the wall outlet, and then pull out the power cord from the power supply. 3 After one minute, reconnect the power cord into the power supply, and then plug the power cord into the wall outlet. 4 Turn on the printer.
-
 1
1 -
2
-
3
-
4
-
5
-
6
-
7
-
8
-
9
-
10
-
11
-
12
-
13
-
14
-
15
-
16
-
17
-
18
-
19
-
20
-
21
-
22
-
23
-
24
-
25
-
26
-
27
-
28
-
29
-
30
-
31
-
32
-
33
-
34
-
35
-
36
-
37
-
38
-
39
-
40
-
41
-
42
-
43
-
44
-
45
-
46
-
47
-
48
-
49
-
50
-
51
-
52
-
53
-
54
-
55
-
56
-
57
-
58
-
59
-
60
-
61
-
62
-
63
-
64
-
65
-
66
-
67
-
68
-
69
-
70
-
71
-
72
-
73
-
74
-
75
-
76
-
77
-
78
-
79
-
80
-
81
-
82
-
83
-
84
-
85
-
86
-
87
-
88
-
89
-
90
-
91
-
92
-
93
-
94
-
95
-
96
-
97
-
98
-
99
-
100
-
101
-
102
-
103
-
104
-
105
-
106
-
107
-
108
-
109
-
110
-
111
-
112
-
113
-
114
-
115
-
116
-
117
-
118
-
 119
119 -
 120
120 -
 121
121 -
 122
122 -
 123
123 -
 124
124 -
 125
125 -
 126
126 -
 127
127 -
 128
128 -
 129
129 -
130
-
131
-
132
-
133
-
134
-
135
-
136
-
137
-
138
-
139
-
140
-
141
-
142
-
143
-
144
-
145
-
146
-
147
-
148
-
149
-
150
-
151
-
152
-
153
-
154
-
155
-
156
-
157
-
158
-
159
-
160
-
161
-
162
-
163
-
164
-
165
-
166
-
167
-
168
-
169
-
170
-
171
-
172
-
173
-
174
-
175
-
176
-
177
 |
 |