Dell V525W User Manual - Page 148
Make sure that you have the correct manual answer code, Cannot run the fax software
 |
View all Dell V525W manuals
Add to My Manuals
Save this manual to your list of manuals |
Page 148 highlights
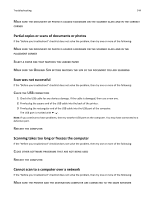
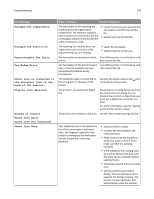
Troubleshooting 148 MAKE SURE THAT YOU HAVE THE CORRECT MANUAL ANSWER CODE If you set the printer to receive faxes manually (Auto Answer Off), then you need to press the correct code when a fax comes in so that the printer can receive it. 1 From the printer control panel, navigate to: > Setup > > Fax Setup > > Ringing and Answering > > Manual Pickup Code > 2 Copy the manual answer code that appears on the display. Note: To increase the security, you can change your manual pickup code to a number that only you know. You can enter up to 7 characters for your code. The valid characters are the digits 0-9 and the characters # and *. Cannot run the fax software The printer must be connected to a telephone, DSL, VoIP, or cable service before you can configure the fax settings in the fax software. MAKE SURE THE PRINTER IS CONNECTED TO A TELEPHONE LINE You need to connect the printer to your telephone line (through a standard wall jack, a DSL filter, a VoIP adapter, or a cable modem) before you can open the fax software and configure the fax settings. Fax error messages on the printer control panel Error Message: Remote Fax Error Fax Mode Unsupported What it indicates: Possible solutions: The receiving fax machine cannot receive the fax. The error on the receiving end could be due to several factors. • Resend the fax. There may have been a problem with the quality of the connection. • Decrease the transmission speed of your fax modem. • Register your user information. In some countries, you cannot send a fax without registering your fax name and fax number. Some fax machines also block faxes without sender information. The receiving fax machine does not support color fax or the scan resolution of the document that you are sending. • Enable Auto Fax Conversion. The printer automatically converts color faxes to black and lowers the scan resolution of the document. • Lower the fax quality. • Reformat the document on Letter‑size paper.
-
 1
1 -
2
-
3
-
4
-
5
-
6
-
7
-
8
-
9
-
10
-
11
-
12
-
13
-
14
-
15
-
16
-
17
-
18
-
19
-
20
-
21
-
22
-
23
-
24
-
25
-
26
-
27
-
28
-
29
-
30
-
31
-
32
-
33
-
34
-
35
-
36
-
37
-
38
-
39
-
40
-
41
-
42
-
43
-
44
-
45
-
46
-
47
-
48
-
49
-
50
-
51
-
52
-
53
-
54
-
55
-
56
-
57
-
58
-
59
-
60
-
61
-
62
-
63
-
64
-
65
-
66
-
67
-
68
-
69
-
70
-
71
-
72
-
73
-
74
-
75
-
76
-
77
-
78
-
79
-
80
-
81
-
82
-
83
-
84
-
85
-
86
-
87
-
88
-
89
-
90
-
91
-
92
-
93
-
94
-
95
-
96
-
97
-
98
-
99
-
100
-
101
-
102
-
103
-
104
-
105
-
106
-
107
-
108
-
109
-
110
-
111
-
112
-
113
-
114
-
115
-
116
-
117
-
118
-
119
-
120
-
121
-
122
-
123
-
124
-
125
-
126
-
127
-
128
-
129
-
130
-
131
-
132
-
133
-
134
-
135
-
136
-
137
-
138
-
139
-
140
-
141
-
142
-
 143
143 -
 144
144 -
 145
145 -
 146
146 -
 147
147 -
 148
148 -
 149
149 -
 150
150 -
 151
151 -
 152
152 -
 153
153 -
154
-
155
-
156
-
157
-
158
-
159
-
160
-
161
-
162
-
163
-
164
-
165
-
166
-
167
-
168
-
169
-
170
-
171
-
172
-
173
-
174
-
175
-
176
-
177
 |
 |