Dell V525W User Manual - Page 98
Configuring 802.1X Authentication, Switching between USB, Ethernet - driver windows 7
 |
View all Dell V525W manuals
Add to My Manuals
Save this manual to your list of manuals |
Page 98 highlights
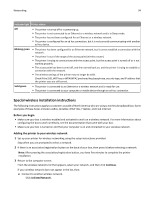
Networking 98 • CA certificate EAP‑TLS • RADIUS user name • CA certificate • Signed certificate EAP‑TTLS • Appropriate inner authentication • RADIUS user name • RADIUS password • CA certificate Configuring 802.1X Authentication The information to complete is dependent on the 802.1X security mechanism you select. Some require user names, passwords, and/or certificates. If your network contains multiple access points with different modes of authentication, then you can select and configure more than one authentication mechanism. 1 From the Configure 802.1X Authentication dialog, select an authentication mechanism. If you have selected Do this EAP‑MD5, LEAP, or MSCHAPv2 Proceed to the next step. PEAP or EAP‑TTLS Click Install CA Certificate, and then type the path to the CA certificate, or click Browse to locate the certificate file. EAP‑TLS a Click Install Signed Certificate, and then type the path to the signed certificate, or click Browse to locate the certificate file. b Click Install CA Certificate, and then type the path to the CA certificate, or click Browse to locate the certificate file. 2 Type the necessary information that the authentication server requires. 3 Click OK, and then follow the instructions on the computer screen. Switching between USB, Ethernet, and wireless connections (Windows only) You can change the way you access your printer, depending on your needs. The following procedures assume that you have configured your printer for one type of connection and that the printer drivers are installed on the computer. See related topics on troubleshooting specific connection types if you encounter difficulties during configuration. Note: The printer supports one active local (USB) connection and one active network connection (Ethernet or wireless) at a time. It is not possible to connect the printer to both Ethernet and wireless networks at the same time. Using the printer wirelessly Select the connection type that describes how you currently access your printer:
-
 1
1 -
2
-
3
-
4
-
5
-
6
-
7
-
8
-
9
-
10
-
11
-
12
-
13
-
14
-
15
-
16
-
17
-
18
-
19
-
20
-
21
-
22
-
23
-
24
-
25
-
26
-
27
-
28
-
29
-
30
-
31
-
32
-
33
-
34
-
35
-
36
-
37
-
38
-
39
-
40
-
41
-
42
-
43
-
44
-
45
-
46
-
47
-
48
-
49
-
50
-
51
-
52
-
53
-
54
-
55
-
56
-
57
-
58
-
59
-
60
-
61
-
62
-
63
-
64
-
65
-
66
-
67
-
68
-
69
-
70
-
71
-
72
-
73
-
74
-
75
-
76
-
77
-
78
-
79
-
80
-
81
-
82
-
83
-
84
-
85
-
86
-
87
-
88
-
89
-
90
-
91
-
92
-
 93
93 -
 94
94 -
 95
95 -
 96
96 -
 97
97 -
 98
98 -
 99
99 -
 100
100 -
 101
101 -
 102
102 -
 103
103 -
104
-
105
-
106
-
107
-
108
-
109
-
110
-
111
-
112
-
113
-
114
-
115
-
116
-
117
-
118
-
119
-
120
-
121
-
122
-
123
-
124
-
125
-
126
-
127
-
128
-
129
-
130
-
131
-
132
-
133
-
134
-
135
-
136
-
137
-
138
-
139
-
140
-
141
-
142
-
143
-
144
-
145
-
146
-
147
-
148
-
149
-
150
-
151
-
152
-
153
-
154
-
155
-
156
-
157
-
158
-
159
-
160
-
161
-
162
-
163
-
164
-
165
-
166
-
167
-
168
-
169
-
170
-
171
-
172
-
173
-
174
-
175
-
176
-
177
 |
 |