Dell V715W User's Guide - Page 105
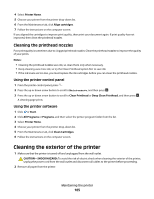
Cleaning the printhead nozzles, Cleaning the exterior of the printer
 |
UPC - 884116016564
View all Dell V715W manuals
Add to My Manuals
Save this manual to your list of manuals |
Page 105 highlights
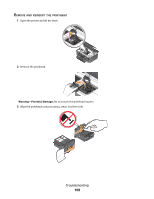
4 Select Printer Home. 5 Choose your printer from the printer drop-down list. 6 From the Maintenance tab, click Align cartridges. 7 Follow the instructions on the computer screen. If you aligned the cartridges to improve print quality, then print your document again. If print quality has not improved, then clean the printhead nozzles. Cleaning the printhead nozzles Poor print quality is sometimes due to clogged printhead nozzles. Clean the printhead nozzles to improve the quality of your prints. Notes: • Cleaning the printhead nozzles uses ink, so clean them only when necessary. • Deep cleaning uses more ink, so try the Clean Printhead option first to save ink. • If the ink levels are too low, you must replace the ink cartridges before you can clean the printhead nozzles. Using the printer control panel 1 From the printer control panel, press . 2 Press the up or down arrow button to scroll to Maintenance, and then press . 3 Press the up or down arrow button to scroll to Clean Printhead or Deep Clean Printhead, and then press . A cleaning page prints. Using the printer software 1 Click or Start. 2 Click All Programs or Programs, and then select the printer program folder from the list. 3 Select Printer Home. 4 Choose your printer from the printer drop-down list. 5 From the Maintenance tab, click Clean Cartridges. 6 Follow the instructions on the computer screen. Cleaning the exterior of the printer 1 Make sure that the printer is turned off and unplugged from the wall outlet. CAUTION-SHOCK HAZARD: To avoid the risk of electric shock when cleaning the exterior of the printer, unplug the power cord from the wall outlet and disconnect all cables to the printer before proceeding. 2 Remove all paper from the printer. Maintaining the printer 105
-
 1
1 -
2
-
3
-
4
-
5
-
6
-
7
-
8
-
9
-
10
-
11
-
12
-
13
-
14
-
15
-
16
-
17
-
18
-
19
-
20
-
21
-
22
-
23
-
24
-
25
-
26
-
27
-
28
-
29
-
30
-
31
-
32
-
33
-
34
-
35
-
36
-
37
-
38
-
39
-
40
-
41
-
42
-
43
-
44
-
45
-
46
-
47
-
48
-
49
-
50
-
51
-
52
-
53
-
54
-
55
-
56
-
57
-
58
-
59
-
60
-
61
-
62
-
63
-
64
-
65
-
66
-
67
-
68
-
69
-
70
-
71
-
72
-
73
-
74
-
75
-
76
-
77
-
78
-
79
-
80
-
81
-
82
-
83
-
84
-
85
-
86
-
87
-
88
-
89
-
90
-
91
-
92
-
93
-
94
-
95
-
96
-
97
-
98
-
99
-
 100
100 -
 101
101 -
 102
102 -
 103
103 -
 104
104 -
 105
105 -
 106
106 -
 107
107 -
 108
108 -
 109
109 -
 110
110 -
111
-
112
-
113
-
114
-
115
-
116
-
117
-
118
-
119
-
120
-
121
-
122
-
123
-
124
-
125
-
126
-
127
-
128
-
129
-
130
-
131
-
132
-
133
-
134
-
135
-
136
-
137
-
138
-
139
-
140
-
141
-
142
-
143
-
144
-
145
-
146
-
147
-
148
-
149
-
150
 |
 |