Dell Venue 8 User Manual
Dell Venue 8 Manual
 |
View all Dell Venue 8 manuals
Add to My Manuals
Save this manual to your list of manuals |
Dell Venue 8 manual content summary:
- Dell Venue 8 | User Manual - Page 1
Venue 7/8 User's Manual Tablet model: Venue 7, Venue 8, Venue 7 3730, Venue 7 HSPA+, Venue 8 3830, Venue 8 HSPA+ Regulatory model: T01C/T02D Regulatory type: T01C001, T02C002/T02D001, T02D002 - Dell Venue 8 | User Manual - Page 2
helps you make better use of your tablet. CAUTION: A CAUTION indicates potential damage to hardware or loss of data if instructions are not followed. WARNING: A WARNING indicates a potential for property damage, personal injury, or death. © 2013 Dell Inc. All rights reserved. Information in this - Dell Venue 8 | User Manual - Page 3
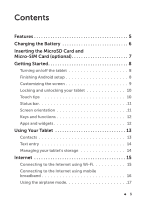
Contents Features 5 Charging the Battery 6 Inserting the MicroSD Card and Micro-SIM Card (optional 7 Getting Started 8 Turning on/off the tablet 8 Finishing Android setup 8 Customizing the screen 9 Locking and unlocking your tablet 10 Touch tips 10 Status bar 11 Screen orientation 11 Keys - Dell Venue 8 | User Manual - Page 4
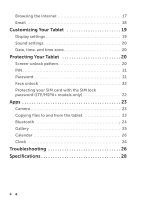
Protecting Your Tablet 20 Screen-unlock pattern 20 PIN 21 Password 21 Face unlock 22 Protecting your SIM card with the SIM lock password (LTE/HSPA+ models only 22 Apps 23 Camera 23 Copying files to and from the tablet 23 Bluetooth 24 Gallery 25 Calendar 26 Clock 26 Troubleshooting 26 - Dell Venue 8 | User Manual - Page 5
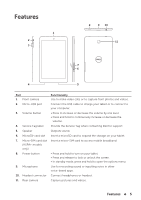
and videos. Connect the USB cable to charge your tablet or to connect to your computer. • Press to increase or decrease the volume by one level. • Press and hold to continuously increase or decrease the volume. Provide the Service Tag when contacting Dell for support. Outputs sound. Insert a microSD - Dell Venue 8 | User Manual - Page 6
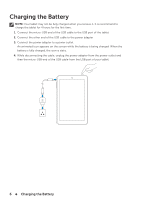
the Battery NOTE: Your tablet may not be fully charged when you receive it. It is recommend to charge the tablet for 4 hours for the first time. 1. Connect the micro-USB end of the USB cable to the USB port of the tablet. 2. Connect the other end of the USB cable to the power adapter. 3. Connect - Dell Venue 8 | User Manual - Page 7
Inserting the MicroSD Card and Micro-SIM Card (optional) Open the card-slot door, insert the cards into their respective slots, and close the card-slot door. NOTE: Make sure the cards are correctly aligned and are inserted all the way. SIM SIM Inserting the MicroSD Card and Micro-SIM Card (optional) - Dell Venue 8 | User Manual - Page 8
After you turn on your tablet for the first time, follow the prompts on the screen to finish Android setup. You can configure settings such as language, date and time, connect to your Wi-Fi network, sign-in to your Google account, enable Google location services, and so on. → 8 Getting Started - Dell Venue 8 | User Manual - Page 9
Customizing the screen After finishing several Android setup optionally, you can customize your tablet's screen as prompted. → Getting Started 9 - Dell Venue 8 | User Manual - Page 10
the power button to wake up the screen and then slide the lock icon in any direction. Touch tips Your tablet has a multi-touch sensitive screen. You can use the touch screen as follows: Tap Tap and hold Slide Drag zoom-in and zoom-out in maps, photos, web pages, and so on. 10 Getting Started - Dell Venue 8 | User Manual - Page 11
all the notifications from the notifications panel. 2. Status panel displays status icons to show the current state of your tablet, such as battery charge and charging progress, alarms, Bluetooth, and so on. Slide the panel down to access more settings and configuration options. Screen orientation - Dell Venue 8 | User Manual - Page 12
to the previous screen and exit the running application. • Tap to close the on-screen keyboard in text input mode. • Tap to return to the main screen. • Tap and task. Your tablet is preloaded with a variety of applications, and additional applications can be downloaded from the Play Store. • Widgets - Dell Venue 8 | User Manual - Page 13
Using Your Tablet Contacts To view and manage your contacts, tap → People. Sign in to an existing Google account or create a new Google account to back up your contacts online. Creating a contact 1. Tap → People→ Create a new contact. 2. Enter the contact information using the on-screen keyboard and - Dell Venue 8 | User Manual - Page 14
text to the left of the cursor. 3. Tap once to show the uppercase keyboard for typing a capital letter. Tap twice to enable the Caps Lock mode. Tap . The used, unused, and total space on the tablet's internal storage and microSD card is displayed. Erasing app data and cache 1. Tap → Settings→ Apps→ - Dell Venue 8 | User Manual - Page 15
that you back up all the required data before you proceed. 1. Tap → Settings→ Backup & reset→ Factory data reset. 2. Tap Reset tablet. 3. Read the warning and tap Erase everything. Internet You can connect your tablet to Wi-Fi networks to access the Internet. If you purchase a LTE/HSPA+ model, you - Dell Venue 8 | User Manual - Page 16
bar. NOTE: On the LTE/HSPA+ models, if both Wi-Fi and mobile broadband networks are available, the tablet gives priority to Wi-Fi connection. NOTE: If the tablet cannot automatically searches for the carrier signal, tap → Settings→ Wireless & networks→ More→ Mobile networks→ Data enabled to enable - Dell Venue 8 | User Manual - Page 17
Using the airplane mode Putting the tablet in Airplane mode disables all mobile and Wi-Fi connections. This feature is useful when wireless connectivity is strictly prohibited, such as on an airplane. - Dell Venue 8 | User Manual - Page 18
IMAP, and exchange email accounts from web-based email services on your tablet. Opening the email app Tap → Email . Setting up Settings→ ADD ACCOUNT to set up another email account. Deleting an email account on your tablet 1. In an email account screen, tap → Settings and then select one account. 2. - Dell Venue 8 | User Manual - Page 19
the picture, and then tap OK to set it as the wallpaper. Select the time after which the tablet goes into sleep mode automatically. Select the pictures or animation to show while the tablet is docked or being charged. Set your tablet's font size from Small, Normal, Large, and Huge. Customizing Your - Dell Venue 8 | User Manual - Page 20
Screen lock sound Adjust the volume for music, videos, games, notification, and alarms. Select a default ringtone for notifications . Date, time, and time zone Your tablet automatically uses the network-provided date, time, and time zone by default. To manually set the date, time, and time zone - Dell Venue 8 | User Manual - Page 21
This security method requires you to enter a PIN that you need to enter every time to unlock the tablet. If incorrect unlock PINs are entered for five consecutive times, the tablet forces a 30-second delay before you can try again. Creating a PIN 1. Tap → Settings→ Security→ Screen lock→ PIN. 2. On - Dell Venue 8 | User Manual - Page 22
tap Set it up. 3. Find an indoor spot that is not too bright or too dim. Hold the tablet at eye level and then tap Continue. 4. Show your face in the face-capturing area. After your face Key (PUK) to unlock the SIM card. Contact your service provider to obtain the PUK. 22 Protecting Your Tablet - Dell Venue 8 | User Manual - Page 23
optional microSD card. To transfer files, connect the tablet to your computer using the micro-USB cable. Setting the SD card or the internal device storage as a USB drive 1. Connect the tablet to the computer by connecting the micro-USB end to the tablet and the bigger end to your computer. 2. The - Dell Venue 8 | User Manual - Page 24
, or vice versa. NOTE: The steps above are applicable to Microsoft Windows. Turning off media storage mode The tablet does not recognize the SD card and the internal device storage when they are being used as USB drives. While the tablet is in media storage mode, you cannot use applications that - Dell Venue 8 | User Manual - Page 25
connection page, tap device. Gallery → Disconnect to end the Bluetooth connection. → Unpair to erase all pairing information with that To view and manage the pictures and videos stored on your tablet, tap → Gallery . Sharing or deleting albums All pictures and videos are grouped in separate - Dell Venue 8 | User Manual - Page 26
the alarm. Troubleshooting Security problems The SIM card's PIN code is blocked. System problems Battery does not charge. Unable to turn the tablet on. Possible battery and charger. The battery has no charge. Possible solutions Contact your service provider to get the PUK code. Possible - Dell Venue 8 | User Manual - Page 27
. Check the service area with your service provider. Poor signal. Your tablet is in airplane mode with no wireless connectivity. Move to an open space or if you are inside a building, move closer to a window. Slide the status panel down and then disable Airplane mode. Troubleshooting 27 - Dell Venue 8 | User Manual - Page 28
Regulatory model Regulatory type Temprature range Battery Dimensions: Height Width Depth • Venue 7 3730, Venue 7 HSPA+. • Venue 8 3830, Venue 8 HSPA+ T01C/T02D T01C001, T02C002/T02D001, T02D002 0 °C - 35 °C (30 °F -95 °F) 4100 mAh Venue 7 Venue 8 193 mm 212 mm 118.20 mm 130 mm 9.5 mm
-
 1
1 -
 2
2 -
 3
3 -
 4
4 -
 5
5 -
 6
6 -
 7
7 -
8
-
9
-
10
-
11
-
12
-
13
-
14
-
15
-
16
-
17
-
18
-
19
-
20
-
21
-
22
-
23
-
24
-
25
-
26
-
27
-
28
 |
 |

Tablet model: Venue 7, Venue 8, Venue 7 3730, Venue 7 HSPA+,
Venue 8 3830, Venue 8 HSPA+
Regulatory model: T01C/T02D
Regulatory type: T01C001, T02C002/T02D001, T02D002
Venue 7/8
User's Manual