Dell Vostro V13 Service Manual
Dell Vostro V13 Manual
 |
View all Dell Vostro V13 manuals
Add to My Manuals
Save this manual to your list of manuals |
Dell Vostro V13 manual content summary:
- Dell Vostro V13 | Service Manual - Page 1
Dell™ Vostro™ V13 Service Manual Working on Your Computer Removing and Replacing Parts Specifications System Setup Diagnostics Notes, Cautions, and Warnings NOTE: A NOTE indicates important information that helps you make better use of your computer. CAUTION: A CAUTION - Dell Vostro V13 | Service Manual - Page 2
Dell™ Vostro™ V13 Service Manual current amount of memory or set the type of hard drive installed Before you immediately. NOTE: The F2 prompt indicates that the keyboard has initialized. This prompt can appear very quickly right side of the System Setup window and contains help information about the - Dell Vostro V13 | Service Manual - Page 3
No-Execute Mode Memory Protection Intel® Virtualization Technology Integrated NIC WLAN Control WWAN Control Bluetooth USB Outside Ports USB BIOS Legacy Support USB Wake Support ExpressCard Card Reader Wake On LAN SATA Mode Selection Camera Control Microphone Control Keyboard Click Advanced Enable - Dell Vostro V13 | Service Manual - Page 4
computer's internal hard drive (HDD). The hard drive password is enabled even when the hard drive is installed on another computer. Enable or disable authentication every time your computer boots. Allows you to set a service tag when the system board is replaced. Displays the current service tag of - Dell Vostro V13 | Service Manual - Page 5
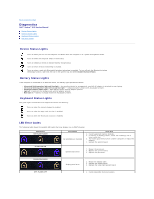
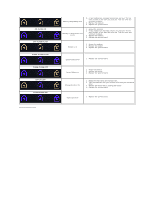
Back to Contents Page Diagnostics Dell™ Vostro™ V13 Service Manual Device Status Lights Battery Status Lights Keyboard Status Lights LED Error Codes Device Status Lights Turns on when you turn on the computer and blinks when the computer is in a power management mode. Turns on when the computer - Dell Vostro V13 | Service Manual - Page 6
error 1. Reseat the device. 2. Replace the device. 3. Replace the system board. Storage device error 1. Reseat the hard drive and optical drive. 2. Test the computer with just the hard drive and just the optical drive. 3. Replace the device that is causing the failure. 4. Replace the system board - Dell Vostro V13 | Service Manual - Page 7
Replacing Parts Dell™ Vostro™ V13 Service Manual ExpressCard Subscriber Identity Module (SIM) Card Base Cover Wireless Local Area Network (WLAN) Card Hard Drive and Audio Board Speaker Memory Coin-Cell Battery Heat Sink and Fan Assembly Display Panel Palm Rest and Display Assembly Hard Drive Cable - Dell Vostro V13 | Service Manual - Page 8
Contents Page Specifications Dell™ Vostro™ Service Manual NOTE: Offerings may vary by region. For more information regarding the configuration of your computer, click Start® Help and Support and select the option to view information about your computer. System Information Memory Audio ExpressCard - Dell Vostro V13 | Service Manual - Page 9
WLAN, WWAN, and Bluetooth® wireless support if optional cards are purchased. ExpressCard NOTE: The ExpressCard slot does NOT support PC Cards. ExpressCard connector ExpressCard slot Cards supported 34-mm ExpressCards Ports and Connectors Audio Video Network adapter USB Memory card reader Mini - Dell Vostro V13 | Service Manual - Page 10
VDC 16 mm (0.63 inch) 66 mm (2.60 inch) 127 mm (5.00 inch) 0° C to 35° C (32° F to 95° F) -40 °C to 65 °C (-40 °F to 149 °F) Physical Height (front to back) Width Depth Weight (with 6-cell battery) 16.5 mm to 19.7 mm (0.65 inch to 0.78 inch) 330 mm (12.99 inch) 230 mm (9.05 inch) - Dell Vostro V13 | Service Manual - Page 11
NOTE: Shock is measured with hard drive in head-parked position and a 2-ms half-sine pulse. Altitude: Operating Storage -15.2 m to 3048 m (-50 ft to 10,000 ft) -15.2 m to 10,668 m (- - Dell Vostro V13 | Service Manual - Page 12
Board Dell Vostro™ V13 Service Manual WARNING: Before working inside your computer, read the safety information that shipped with your computer. For additional safety best practices information, see the Regulatory Compliance Homepage at www.dell.com/regulatory_compliance. Removing the Hard Drive and - Dell Vostro V13 | Service Manual - Page 13
Battery Dell™ Vostro™ V13 Service Manual WARNING: Before working inside your computer, read the safety information that shipped with your computer. For additional safety best practices information, see the Regulatory Compliance Homepage at www.dell.com/regulatory_compliance. Removing the Battery - Dell Vostro V13 | Service Manual - Page 14
the battery. 6. Remove the hard drive and audio board. 7. Remove the WLAN card. 8. Remove the LCD cover. 9. Remove the memory. 10. Remove the keyboard. 11. Remove the card reader. 12. Remove the coin-cell battery. 13. Remove the system board. 14. Remove the screw that secures the Bluetooth card - Dell Vostro V13 | Service Manual - Page 15
Page Base Cover Dell™ Vostro™ V13 Service Manual WARNING: Before working inside your computer, read the safety information that shipped with your computer. For additional safety best practices information, see the Regulatory Compliance Homepage at www.dell.com/regulatory_compliance. Removing - Dell Vostro V13 | Service Manual - Page 16
to Contents Page Camera Dell™ Vostro™ V13 Service Manual WARNING: Before working inside your computer, read the safety information that shipped with your computer. For additional safety best practices information, see the Regulatory Compliance Homepage at www.dell.com/regulatory_compliance. Removing - Dell Vostro V13 | Service Manual - Page 17
the WLAN card. 8. Remove the LCD cover. 9. Remove the memory. 10. Remove the keyboard. 11. Remove the screws that secure the card reader to the computer. 12. Carefully turn over the computer. 13. Lift the clip that secures the hard-drive data cable to the system board and disconnect it from its - Dell Vostro V13 | Service Manual - Page 18
Page Coin-Cell Battery Dell™ Vostro™ V13 Service Manual WARNING: Before working inside your computer, read the safety information that shipped with your computer. For additional safety best practices information, see the Regulatory Compliance Homepage at www.dell.com/regulatory_compliance. Removing - Dell Vostro V13 | Service Manual - Page 19
Page ExpressCard Dell™ Vostro™ V13 Service Manual WARNING: Before working inside your computer, read the safety information that shipped with your computer. For additional safety best practices information, see the Regulatory Compliance Homepage at www.dell.com/regulatory_compliance. Removing - Dell Vostro V13 | Service Manual - Page 20
Display Closure Sensor Dell™ Vostro™ V13 Service Manual WARNING: Before working inside your computer, read the safety information that shipped with your computer. For additional safety best practices information, see the Regulatory Compliance Homepage at www.dell.com/regulatory_compliance. Removing - Dell Vostro V13 | Service Manual - Page 21
Hard Drive Cable Kit Dell™ Vostro™ 13 Service Manual WARNING: Before working inside your computer, read the safety information that shipped with your computer. For additional safety best practices information, see the Regulatory Compliance Homepage at www.dell.com/regulatory_compliance. Installing - Dell Vostro V13 | Service Manual - Page 22
7. The hard drive flex cable is attached with a double sided tape. Peel off the cable from the system. 8. Remove the cloth tape from the card reader board edge. NOTE: Skip this step if the cloth tape is not present. - Dell Vostro V13 | Service Manual - Page 23
9. Peel off the double sided tape and attach the rubber bumper to the system. 10. Peel off the double sided tape from the hard drive flex cable. Connect the cable end labeled 'HDD' to the hard drive connector first, follow by connecting the other end to the system board connector. - Dell Vostro V13 | Service Manual - Page 24
edge of the card reader to prevent unnecessary bent to the flex cable. 11. Re-install back the pre-removal part in reverse order. NOTE: When replacing the bottom base cover, do not add unnecessary pressure at the hard drive and card reader location. This is to avoid unnecessary contact between the - Dell Vostro V13 | Service Manual - Page 25
. 5. Remove the battery. 6. Remove the hard drive and audio board. 7. Remove the WLAN card. 8. Remove the LCD cover. 9. Remove the memory. 10. Remove the keyboard. 11. Remove the card reader. 12. Remove the coin-cell battery. 13. Remove the system board. 14. Disconnect the fan cable from the system - Dell Vostro V13 | Service Manual - Page 26
Keyboard Dell™ Vostro™ V13 Service Manual WARNING: Before working inside your computer, read the safety information that shipped with your computer. For additional safety best practices information, see the Regulatory Compliance Homepage at www.dell.com/regulatory_compliance. Removing the Keyboard - Dell Vostro V13 | Service Manual - Page 27
Page Display Panel Dell™ Vostro™ V13 Service Manual WARNING: Before working inside your computer, read the safety information that shipped with your computer. For additional safety best practices information, see the Regulatory Compliance Homepage at www.dell.com/regulatory_compliance. Removing - Dell Vostro V13 | Service Manual - Page 28
Page Display Bezel Dell™ Vostro™ V13 Service Manual WARNING: Before working inside your computer, read the safety information that shipped with your computer. For additional safety best practices information, see the Regulatory Compliance Homepage at www.dell.com/regulatory_compliance. Removing - Dell Vostro V13 | Service Manual - Page 29
to Contents Page Memory Dell™ Vostro™ V13 Service Manual WARNING: Before working inside your computer, read the safety information that shipped with your computer. For additional safety best practices information, see the Regulatory Compliance Homepage at www.dell.com/regulatory_compliance. Removing - Dell Vostro V13 | Service Manual - Page 30
. 4. Remove the base cover. 5. Remove the battery. 6. Remove the hard drive and audio board. 7. Remove the WLAN card. 8. Remove the LCD cover. 9. Remove the memory. 10. Remove the keyboard. 11. Remove the card reader. 12. Remove the coin-cell battery. 13. Remove the system board. 14. Remove the - Dell Vostro V13 | Service Manual - Page 31
Contents Page LED Cover Dell™ Vostro™ V13 Service Manual WARNING: Before working inside your computer, read the safety information that shipped with your computer. For additional safety best practices information, see the Regulatory Compliance Homepage at www.dell.com/regulatory_compliance. Removing - Dell Vostro V13 | Service Manual - Page 32
Back to Contents Page - Dell Vostro V13 | Service Manual - Page 33
Digital (SD) Card Dell™ Vostro™ V13 Service Manual WARNING: Before working inside your computer, read the safety information that shipped with your computer. For additional safety best practices information, see the Regulatory Compliance Homepage at www.dell.com/regulatory_compliance. Removing the - Dell Vostro V13 | Service Manual - Page 34
Page SIM Card Reader Dell™ Vostro™ V13 Service Manual WARNING: Before working inside your computer, read the safety information that shipped with your computer. For additional safety best practices information, see the Regulatory Compliance Homepage at www.dell.com/regulatory_compliance. Removing - Dell Vostro V13 | Service Manual - Page 35
Module (SIM) Card Dell™ Vostro™ V13 Service Manual WARNING: Before working inside your computer, read the safety information that shipped with your computer. For additional safety best practices information, see the Regulatory Compliance Homepage at www.dell.com/regulatory_compliance. Removing the - Dell Vostro V13 | Service Manual - Page 36
Speaker Dell™ Vostro™ V13 Service Manual WARNING: Before working inside your computer, read the safety information that shipped with your computer. For additional safety best practices information, see the Regulatory Compliance Homepage at www.dell.com/regulatory_compliance. Removing the Speaker - Dell Vostro V13 | Service Manual - Page 37
. 5. Remove the battery. 6. Remove the hard drive and audio board. 7. Remove the WLAN card. 8. Remove the LCD cover. 9. Remove the memory. 10. Remove the keyboard. 11. Remove the card reader. 12. Remove the coin-cell battery. 13. Pull up the blue tab to disconnect the display cable from the system - Dell Vostro V13 | Service Manual - Page 38
(WLAN) Card Dell™ Vostro™ V13 Service Manual WARNING: Before working applicable. 4. Remove the base cover. 5. Remove the battery. 6. Remove the antenna cables from the WLAN card. 7. Remove the screw that secures . Replacing the WLAN Card To replace the WLAN Card, perform the above steps in reverse - Dell Vostro V13 | Service Manual - Page 39
Working on Your Computer Dell™ Vostro™ V13 Service Manual Before Working Inside Your Computer Recommended Tools internal components. 11. Remove any installed ExpressCards or Smart Cards from the appropriate slots. 12. Remove the hard drive (see Hard Drive). Recommended Tools The procedures in this - Dell Vostro V13 | Service Manual - Page 40
below, and then click Shut Down. l In Windows® XP: Click Start® Turn Off Computer® Turn battery designed for this particular Dell computer. Do not use batteries designed for other Dell computers. 1. Connect any external devices, such as a port replicator, battery slice, or media base, and replace
-
 1
1 -
 2
2 -
 3
3 -
 4
4 -
 5
5 -
 6
6 -
 7
7 -
8
-
9
-
10
-
11
-
12
-
13
-
14
-
15
-
16
-
17
-
18
-
19
-
20
-
21
-
22
-
23
-
24
-
25
-
26
-
27
-
28
-
29
-
30
-
31
-
32
-
33
-
34
-
35
-
36
-
37
-
38
-
39
-
40
 |
 |
Dell™ Vostro™ V13 Service Manual
Notes, Cautions, and Warnings
If you purchased a Dell™ n Series computer, any references in this document to Microsoft®
Windows
®
operating systems are not applicable.
Information in this document is subject to change without notice.
© 2010 Dell Inc. All rights reserved.
Reproduction of this material in any manner whatsoever without the written permission of Dell Inc. is strictly forbidden.
Other trademarks and trade names may be used in this document to refer to either the entities claiming the marks and names or their products. Dell Inc. disclaims any
proprietary interest in trademarks and trade names other than its own.
February 2010
Rev. A00
Working on Your Computer
Removing and Replacing Parts
Specifications
System Setup
Diagnostics
NOTE:
A NOTE indicates important information that helps you make better use of your computer.
CAUTION:
A CAUTION indicates potential damage to hardware or loss of data if instructions are not followed.
WARNING:
A WARNING indicates a potential for property damage, personal injury, or death.
Trademarks used in this text:
Dell
, the
DELL
logo,
and Vostro
are trademarks of Dell Inc.;
Intel
,
Core
, and
Celeron
are either trademarks or
registered trademarks of Intel Corporation;
Microsoft
,
Windows,
Windows Vista
,
and the
Windows Vista
start button
are either trademarks or
registered trademarks of Microsoft Corporation in the United States and/or other countries;
Bluetooth
is a registered trademark of Bluetooth SIG,
Inc.